How To Wire Your Gas Furnace To A Generator

Contributed by Guest Blogger: Rick Brodersen
of Rick’s DIY (HVAC & Electrical DIY)

Wiring your gas furnace to a generator is a project that’s frequently either over-thought or not thought of at all. Some people think you need a high dollar transfer switch wired to your breaker panel, requiring an electrician, or you have to temporarily rewire the breaker to the generator and then rewire everything again once the power comes back on.

But this isn’t the case, NEC (National Electric Code) only requires that appliances be on their own dedicated circuit. So, by simply rewiring your furnace you have the ability to use your furnace with a portable generator (or other auxiliary power). Then when the power goes out, just disconnect the furnace from the outlet and connect it to your generator, and use it like you normally would.

video: How To Wire Your Gas Furnace To A Generator

Materials:
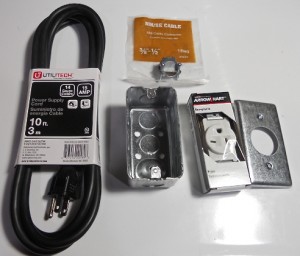
The cost of the materials was less than $20, and all of the items can be found at most hardware stores.

  • Outlet Box
  • Single Outlet Receptacle
  • Outlet Cover Plate
  • Power Supply Cord
  • Cable Connector
  • Misc Wire Nuts, Electrical Tape & Mounting Screws

Tools:
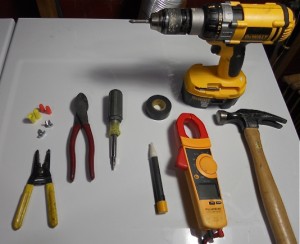
  • Hammer
  • Screwdriver (multi-tip)
  • Side Cutters
  • Wire Strippers
  • Multi-Meter
  • Voltage Stick (optional)
  • Drill (probably a little overkill but if you’re installing the outlet box onto your furnace with sheet metal screws it will be needed)

How To Do It:
Everytime you’re working around electricity you MUST check that the power is OFF and then CHECK AGAIN. You can never be too careful when it comes to this point. (Even after all these years I occasionally still get shocked.)

Turn Off the breaker that controls your furnace. (Keep in mind that a many breaker panels are mislabeled.) Open your furnace and find where your power is coming in from and follow it to the junction box (or in my case, the circuit board.)

Pull off any covers and then test for voltage. I like to use the Fluke Voltage Stick first (ensure it works on a live circuit and then you can test it). After you have verified the power is off, carefully remove the wire nuts and test with a voltmeter. Once you are darn sure there is no power then you are safe to work on it.

Write down, or label your wires, the BLACK (hot), WHITE (neutral) & GREEN (ground). (Some might be red, orange, brown, etc.) You must rewire it exactly as it was: Black to Black, White to White, and Green to Green/Ground. Pull the wires out to the outside of the furnace.

First, install the OUTLET BOX. I put the conduit with the wires coming from the breaker into the outlet box and then level it where I would like to mount it. Screw it to the wall or furnace with the appropriate screws.

Next, you need to wire in your Single Receptacle Outlet. You may need to cut back your wires and strip them. (This is hard to explain in text and is better understood in the video.) Wire your Black (or hot) to the smaller bladed side of the outlet (if you’re facing the outlet this will be the right side) this screw is normally brass/gold in color. The White (or neutral) wires up to the larger bladed side, this screw is usually silver in color. Then the Green (or ground) goes to the last terminal that is bonded with the metal framework of the receptacle, sometimes this screw will be green colored (but every manufacturer is different).

Once wired, carefully push the receptacle back into the outlet box and screw it in, put on the COVER PLATE and we’re ready to move onto the final part.

To install the POWER CORD we have to add in the CABLE CONNECTOR to where the old power cable came into the furnace. Once you have the cable connector in, you can pull the power cord through and secure it.

Next, rewire the power cord to the connections on the furnace. If you’re using wire nuts be sure to Double Check that the wires are secured by tugging on each individually and then taping the connection with electrical tape (you can further secure with tie straps if needed).

Make sure to replace any cover plates, double-check that everything is wired properly and secured. Turn the power back on and check the outlet with your meter (this is not shown in the video) to make sure everything is wired properly. Finally, plug in your furnace and check operations.

video: An Overview: How To Wire Your Gas Furnace To A Generator

ALL DONE
Now that you’re done, test it out with or without your generator. I recommend a test run on a dark, rainy night so you know what it’s going to be like when you’re actually going to have to use it.

Bio
Rick Brodersen is an HVAC/R Mechanic and has worked in the Seattle area for over 15 years, specializing in the commercial service industry. He has instructed at local trade schools and now continues teaching at RicksDIY.com. He is also an avid prepper, hiker, and fisherman who, along with his family, enjoys taking in all the Pacific Northwest has to offer.

Read Rick’s Disclaimer

NOTE: Comments have been closed for this post. Please feel free to read the many, many replies Rick has given, if you still need his help he has asked you contact him directly through his site at RicksDIY.com

(Wednesday: Book Review: The Doom and Bloom Survival Medicine Handbook)

What I Did This Week To Prep 1/27/12

and Storm After Action Review

Anytime you use your preps–after you neatly put them away for the next time–it’s important to review how things went. What went well? What needs to be changed or improved? And what did you learn? We were pleased with how our preps worked during the storm, and because of them the power outage was only a minor inconvenience.

However, there were a couple of things I needed to follow-up on. I checked the generator to see why it had stopped running. As stated, I assumed it had stopped because it ran out of gasoline. I looked in the tank, it still had plenty of fuel left, and it started just fine. I let it run for about 20 minutes and there were no issues. I don’t know why it had stopped. My only concern was the age of the gasoline in it. When we bought it a year ago the tank was full and we still had that same fuel. The previous owner had added Sta-Bil, but I don’t know when. I decided to drain the tank and fill it with fresh gasoline. I siphoned as much as I could into the Jeep, then let the generator run until it was empty (it ran for over an hour before it stopped – an inadvertent but useful test). Then I added new gasoline and Sta-Bil, started it up to double-check, and put it away.

While working with the generator, Sarah, Ryan and I all practiced starting it.  It’s important that all adults (and as many of the kids as possible) in the home know how to run the critical prepper equipment. We had been concerned that Sarah wouldn’t have the ‘bulk’ to pull-start the generator, but she was able to do it without much trouble.

Next, when the battery bank was in use it had shut off earlier than I expected; I thought it was because of some kind of a surge. But my understanding may have been flawed. Fellow prepping blogger Homestead Fritz send me a link to The 12volt Side of Life; a 12-volt battery information site. I’m going to do some additional research on that topic. I’ve said before, I have a decent amount of knowledge about a variety of topics – but electricity is not one of them (though I’m learning).

Finally, I went by the hardware store and bought an 8-foot, 14-gauge extension cord that will be dedicated to use with the furnace. During the power outage I realized I was one cord short, so we had to shuffle cords around. The battery bank and the furnace are only about six feet apart so it seemed like a waste to use a 25-foot cord, but the smaller ones I own were only 2-prong household types and I needed a heavier duty 3-prong one.

Also this week, I found out my favorite collapse medicine experts, Doctor Bones and Nurse Amy of the Doom & Bloom Hour, had written a book. The Doom and Bloom Survival Medicine Handbook was published last week. I immediately ordered one and just received it in the mail. I’m very excited to have what I believe will be a fantastic medical reference. I’ll post a review on it soon.

I’ve started posting more to the TraceMyPreps Facebook page. I’d encourage you to “like” it and join our budding community; use that forum to comment, ask questions, and give advice. To make it easier I’ve added a ‘TraceMyPreps on Facebook’ like button on the top of the right side of my blog page. Also, right below that is a ‘Follow Blog Via Email’ box, if you sign up there each post I write will be automatically sent to you as soon as I publish it – this is an easy way to keep up on the posts as they come out.

What did you do?

Winter Power Outage = Good Chance To Test Preps

Weathering The Storm 

Western Washington had a pretty good storm last week. I realize, in the larger category of “winter storms”, this wasn’t anywhere among the worst. That being said, it was a big deal around here – we don’t have storms like that very often. What started off as a good amount of snow coming down, transitioned into an ice storm. The tree branches were weighed down and many broke, taking down power lines and causing a power outage that affected close to 300,000 homes.

We were one of those homes, our power was out for about 36 hours. So when life gives you lemons… I figured this was the perfect opportunity to test our preps! At 7:30 am, as Sarah and I were in the Jeep driving back from the train station (the trains were cancelled because of frozen switches), I got the call the power was out. As I drove up to the house, even though I knew the power was off, I still tried to use the garage door opener (habits). First lesson of the power outage: make sure everyone knows how to manually open the garage door.

Since we have had a couple of “lights-out” drills we knew where to start. We:

  1. ‘Fired-up’ the battery bank and, using a volt meter, checked and recorded the starting voltage (12.6 volts).
  2. Ran a 50 foot, 14-gauge extension cord into the house and plugged it into a surge protector for inside use.
  3. Connected another extension cord to the natural gas furnace to run the blower*.
  4. Put a temperature probe inside the deep freezer (in the garage), with one end out so that it could be easily read, and recorded the starting temperature (10 degrees).
  5. Brought lamps, with low energy bulbs, into the main room and plugged them into the surge protector.

The battery bank operated well that day. My parents, visiting from Colorado, were able to appreciated all our preps. My mom was especially grateful to be able to blow dry and curl her hair (before leaving to see more family) – she felt this alone justified all our preparations. We had heat (though we kept it lower than normal, 62 degrees), light, Ryan was able to play Xbox, and we watched a movie after dinner. Every couple of hours we’d check and record the battery voltage and the deep freezer temperature.

However, when we woke up the next morning I realized the heat wasn’t on. I checked the battery bank and it had powered off. Even though it registered plenty of voltage (11.3 volts) the indicator light showed the batteries had gotten too low – this shouldn’t have happened until it reached 10.0 volts. It’s possible this occurred because I had left the inverter plugged into the wall and the line may have surged, but I don’t know for sure. We got out the generator, fired it up, and connected it to the:

  • inverter, to recharge the battery bank. As soon as it was plugged in the inverter began to charge and work again.
  • freezer, even though the temperature was still below 20 degrees.
  • furnace blower, and turned the heat up to 70 degrees.
  • laptop computer and all other rechargeable devices.

Once the generator was running we used our Volcano Grill and percolator to make coffee, then boiled water for oatmeal.

Sarah and I then left for work. The generator ran for about three hours, then Ryan called and told me it had stopped. I assumed it had run out of gas. I had him plug things back into the inverter and continue to power the house from the battery bank (Repetitive & Redundant). That evening the power came back on. We put everything neatly away, ready for the next time.

(Friday: What I Did This Week To Prep including Storm After Action Review)

*Last summer my good friend, fellow prepper, and HVAC/R technician, Rick helped me rewire the line that powers the blower on my natural gas furnace. This allows me to plug the blower into an alternate power supply if needed. Rick has agreed to guest blog for me next Monday (1/30/12), when he’ll write about how you can do this same project yourself, complete with a detailed how-to video.

As The Water Slosheth

We Prepare For The Aftermath

The other day there was a casserole dish, full of water, soaking in the kitchen sink. I was ready to wash it, so I lifted it and began to pour the water out. Immediately I realized I had misjudged and the majority of the water would miss the sink and land on the adjacent counter. I tried to jerk the dish back, but the water was already in motion and flooded over the counter causing a wet mess.

As I was cleaning up the spilled dishwater, I reflected on what had happened. I hadn’t meant to spill the water. The moment it started moving the wrong way I realized it and tried to correct it, but it was too late. The water was in motion and the consequences were unstoppable. There was going to be dirty dishwater all over the counter – all I could do is clean it up.

Though the spilled water, once in motion, was unavoidable, the consequences were mitigated by established habit and routine. There weren’t any dishes drying in the rack next to the sink, so nothing had to be re-washed. We don’t prepare food in that area, so no food was ruined. A towel is kept under the sink, so clean up was started immediately. Because of our kitchen ‘preparedness’ a potential disaster became just a minor inconvenience.

This happened in less time than it takes to tell about it. That is frequently how life’s disasters–big or small–occur. It could be a tornado, a fall, a car crash, a fire, an earthquake, a bicycle accident, or an explosion. Even if there are indicators (seen or unseen) the actual incident typically happens incredibly quickly.

As a prepper you’re not preparing to stop, or even survive, the disaster; you’re preparing to survive the aftermath. The disaster itself–once in motion–is unstoppable; you either die in the immediate “burst” (or very soon after), or live to face the aftermath.

In that aftermath, while those around us are panicking and searching for direction; we know what we need: food, water, shelter, security, and energy. Our goal is to have preparations in place with a plan to use them, and the knowledge that we many have to improvise that plan as needed.

We have very little control over most things in our life, but we will still be forced to deal with the consequences. Once things are set into motion all we can do is respond. Plan and prepare to survive the aftermath.

(Wednesday: Weathering The Storm)

Adding A New Page: My Reading List

At the top of my site, under the TraceMyPreps banner, it reads ‘Home’ (which is the page you are currently on), ‘About Trace’, and ‘Check Here…”. Hopefully you’ve looked at those pages. Today I’m adding a new page: ‘My Reading List’.

While I know there are many, many good books out there, including many more we need to get; my list is the books we currently have in our library. Feel free to suggest additional books in either the comments section or on the TraceMyPreps FB Page.

So, without further ado:

What I’m Reading Now
The Eagle Has Crashed by Ted Lacksonen

What I Read Last
Alas, Babylon by Pat Frank

Prepper / Survivalist Novels

  • Lights Out by David Crawford
  • The Eagle Has Crashed by Ted Lacksonen
  • One Second After by William R. Forstchen
  • Alas, Babylon by Pat Frank (my review)
  • Patriots by James Wesley Rawles
  • The Road by Cormac McCarthy
  • The Change series by S.M. Stirling

Medical References

  • Special Operations Forces Medical Handbook
  • Delmar Nurse’s Drug Handbook
  • Herbal Medicine-Maker’s Handbook by James Green
  • Culpeper’s Complete Herbal, natural remedies for ancient ills

Gardening References

  • Gardening For Dummies
  • Practical Herb Garden by Jessica Houdret
  • Square Foot Gardening by Mel Bartholomew

Cookbooks

  • Joy of Cooking Erma Rombaur and Marion Rombaur Becker
  • The Woman’s Day Cookbook by Kathy Farrell-Kingsley
  • Fix-It and Forget It Cookbook Feasting with your Slow Cooker by Dawn J. Ranck
  • Dutch It! by Archie and Linda Dixon

Home Repair

  • Straight Poop, A Plumber’s Tattler by Peter Hemp
  • Home Improvement For Dummies
  • Photovoltaic Systems published by American Technical
  • Solar Water Heating by Bob Ramlow
  • Basic Electricity by Milton Gussow

General Prepper Resource Books

  • Hoyle’s Rules of Games
  • Encyclopedia of Country Living by Carla Emery
  • Ultimate Suburban Survivalist Guide by Sean Brodrick
  • Tom Brown’s Field Guide to City and Suburban Survival by Tom Brown, Jr.
  • Complete Joy of Home Brewing by Charlie Papazian

(Wednesday 1/17/12: no post, site blacked-out in support of the SOPA protest)

What I Did This Week To Prep 1/13/12

Taking my own advice, I bought some new heavy hiking boots. I needed to replace my old Danner boots that I have owned for over 14 years – since I was in the military. I knew they had finally given up the ghost when the Danner Refurbishing Department said they couldn’t rebuild my boots again (they had been rebuilt once and resoled three times – I loved those boots). So I went to a local shop and got them repaired and resoled as best as they could, and passed them down to Ryan. When Danner said they couldn’t rebuild my boots, they did send me a 25% off coupon for a new pair. For a late Christmas gift we ordered me a new pair of Danner Rain Forest Plain Toe Work Boots. They arrived in the mail this week. I was thrilled to have them, but not thrilled to have to break in a new pair of boots. It’s much easier to talk (or blog) the talk, then walk the walk (pun intended). Fortunately today’s genre of hiking boots is far better and easier to break in then they were a generation ago. But they sure felt stiff when Kate (our Border Collie) and I went out for the first three-mile walk. Now, I no longer have an excuse when it’s time to take her for a walk.

We visited Costco this week. (For the record, this month’s coupons sucked; nothing in the way of good prepper stuff.) We purchased a cross-cut paper shredder to be able to ‘create’ more browns for our compost pile (reference last week’s What I Did This Week To Prep). We also got a three-pack set of basic utilities knives for $10 to put in our BOBs*, they’re not as cool as the Gerber EAB, but at 1/3 of the cost they’ll work just fine and they–the utility knifes and the Gerber EAB–all use the same blades so we’ll only have to stock one type. Also, interesting to note, peanut butter (that went up in price in November, see What I Did This Week To Prep 10/21/11) is still $2 higher than it’s price last fall. We’re glad we had our SWYE all stocked up with plenty of PB and don’t need to buy it now at the higher price.

I also ordered the book, The Eagle Has Crashed by Ted Lacksonen. A novel about an economic meltdown and how society collapses in the aftermath. I heard him interviewed on The Survival Podcast (Episode 814) and was impressed with his insights and attitudes. I look forward to reading his book and plan to write a review of it.

What did you do?

(Monday: Adding New Page: My Reading List)

*For my list of abbreviations and other information, open the above ‘Check Here…’ page tab.

Sarah’s View: “What Do You Think Of All This?”

A Prepper’s Wife’s Point of View

I’m Sarah, Trace’s wife. We have been together almost three years and married for a year and a half. The year I met and moved in with Trace life completely changed. However, it wasn’t until shortly after we got married (a year after we started dating) that Trace discovered The Survival Podcast and our prepping life began.

Prepping, in our house, began in the “normal” way – with 72-hour kits. Since we live in Western Washington – prime earthquake territory – I’d always thought an emergency kit was a good idea. Although I would never have actually created one, I was quietly supportive when Trace started putting them together. Slowly, however, the “kits” began taking on a life of their own. They went from manageable backpacks to a backpack plus extra bags, totaling close to 60 pounds. At some point the bags went from being called 72-hour kits to Bug Out Bags, and the rest is history…

I didn’t totally “get” it, but I went along with his prepping. I love my husband and it seemed very important to him that we do this. It wasn’t until several friends – and then my mom – asked me, “What do you think of all this?” that I was forced to actually articulate my thinking. Trace does this, all of this, because he loves us and wants to protect us. If he were single he would not be prepping this way. He does this to give us the best chance in a worst case scenario.

There are parts of prepping I enjoy more than others. I like contemplating “what if?” scenarios. “What if” Mount Rainier (which is within 20 miles of our backyard) erupts and we’re trapped because of landslides? How would I get home from work? “What if” a pandemic breaks out? How do we help the kids when they’ve been at their mom’s for over a week and possibly exposed? “What if” the kids are with us when disaster strikes? They want their mom, Trace wants the kids with him…so we plan for me and Trace, the kids, and Trace’s ex-wife.

The  more tedious logistical aspects, i.e. calculating how much of each item we need, rotating food, etc. are less interesting to me. I help out as needed and appreciate our preps and all their redundancies, but – if it were just me – I wouldn’t be doing all this.

Being the wife of a prepper has had its eyebrow-raising moments, but when I remember that Trace does this because he wants us to be safe and happy no matter what life brings, I can’t help but smile. What girl doesn’t want to help her man be her knight in shining armor?

(Friday (back to Trace with): What I Did This Week To Prep)

Product Review: Gerber EAB Lite Utility Knife

When I was 8 years old, and became a Cub Scout, my grandfather gave me my first pocket knife. Since then I’ve carried a knife almost every day of my life (when I was a kid we could have a knife at school). For the last few years I’ve carried a  Benchmade 930 Kulgera. I love my knife and I don’t like to use it to cut cardboard (which quickly dulls it), sticky stuff, in the dirt, etc. – I will if I have to, but I’m not happy about it.

I first heard about the Gerber EAB Lite on The Survival Podcast (Episode 611). EAB stands for Exchange A Blade. The Gerber EAB is a folding, lightweight, utility knife that uses a standard size utility blade. It was described as a knife that was so compact and convenient that you could easily carry it–in addition to your normal every day carry knife–and have it available to use for those dirty jobs. Once the blade is dull, change it by either flipping it around or exchange the blade for a new one (like a traditional utility knife).

I decided to go ahead and buy one – it only cost $12. When I got it home I was very pleased. It’s a nice looking tool, very compact, with a good pocket clip. The blade is kept in place with a set screw so it won’t come loose; to change it you will need to remove the screw (but it can even be done with a dime). It clips and fits nicely in the right side watch pocket of my Carhartt jeans. The folded knife could also double as a money clip; when folded it looks very innocuous – most people would never notice that your money clip is actually a knife.

I was so impressed with this knife that I bought three more, one for: Sarah, Ryan, and Chanse. I stocked up on extra blades, 100 utility knife blades costs less than $15; with that you could change the blade of your knife each week for almost two years. Because of the durability of the handle and the razor sharpness of the utility blade, you could easily use it for anything from cutting carpet to skinning small game to minor surgery (it’s sharp enough, but not clean enough). All you do to keep sharp it is change the blade.

I still carry my Benchmade everyday, but now I also carry a second knife: a Gerber EAB Lite. (Repetitive and Redundant)

Stats for the Gerber EAB Lite

  • Open Length: 5.1”
  • Closed Length: 2.85”
  • Weight: 2.5 oz
  • Handle Material: Stainless Steel

UPDATE 2/3/12: There has been discussion on TSP Forum where several people complained about the clip easily breaking off the knife. I’ve carried mine, clipped to my pocket everyday, for a couple of months now without any issues. But just to do some follow-up, I contacted Gerber’s Warranty Department (by email). I told them we have several EABs and expressed my concern about the clip weakness, and asked them for a couple extra clips to keep on hand. They, no questions or hassles, sent me three replacement clips – no charge for shipping or anything. In summary, it’s a good little knife, good customer service experience, and I haven’t had any issues with the clip.

UPDATE 3/16/12: Finally, as everyone told me it would, the clip broke off. I had only carried it clipped to my pocket, every day, for about three months when it did. Fortunately, you say, I had extras on hand right? Sort of, they don’t go on well and two broke trying to get them on – before I gave up. Ironically, as I keep mine in the watch/change pocket of my jeans, it works just fine and actually now has a slimmer profile. If I ever buy a replacement one, I’ll just remove the clip. Final clip recommendation: Don’t plan on keeping it clipped to a pocket – the clip will break. The clip would work fine as a money clip (maybe that’s all the designers had in mind). But clip or not, it’s a handy, small, folding EDC utility knife that still has all of the benefits previously discussed. I love mine, carry it everyday, and would encourage anyone else to do the same.

(Disclaimer: I have no association with this product or any dealer or manufacturer. I researched and bought the product to add to my preps and I wanted to pass along the experience I have had with it.)

(Wednesday: My wife, Sarah, guest posts and answers the question she frequently hears, What Do You Think About All This?)

What I Did This Week To Prep 1/6/12

We’re expanding our garden this week, not a whole bunch–our yard isn’t that big here in suburbia–but some. We’re making more room for the strawberries and to maximize the areas that get good sunlight. The cool thing about it is that this time we’re using compost that we made.

We’ve been composting for about a year now with very slow, unpredictable results – learning as we go. Our compost pile has had lots of ‘greens’ (high in nitrogen) coming from kitchen vegetable and fruit peelings, coffee grounds, and plant cuttings. It hasn’t had enough ‘browns’ (high in carbon) that can come from fallen leaves, hay and straw, or paper and cardboard. You need significantly more browns than greens to achieve the right ratio in your compost pile, and we’ve been short on browns. You wouldn’t think that here in Washington we’d have a shortage of fallen leaves, but the problem is (here in suburbia) all the trees were cleared when they developed our subdivision. We also can’t just pick up someone else’s bagged leaves because they’re all put in large yard waste bins for collection. So I sent Ryan out to an area with lots of leaves on the ground and he collected three big bags. We added one bag of leaves (unfortunately I didn’t shred them first – next time) to some coffee grounds from Starbucks and continued adding our normal kitchen wastes. A a week later our pile was actually ‘hot’, it had never been hot before! There are still good leaves to be had so we’re going to collect some more to have on hand (“One man’s trash…”). We’re also going to buy a cross cut paper shredder to produce more usable browns. (I found good composting tips at compost-info-guide.com)

We also took advantage of Sarah having a few extra days off over the holidays to make a day trip over to the Sequim area and look at potential homestead properties. We had plenty of time so we ambitiously visited all eleven listings we have been loosely following online. It was a long, but fun day. We brought Kate, our four month old Border Collie, and she had the time of her life tramping through the wooded areas as we walked around the different properties. We found one we liked, sure it has it’s issues – there’s a reason why it’s listed so cheap and is still on the market. But it was kind of cool. It feels remote, on a hill in a very forested area, while still being close to services in the nearby small town. When we got home Sarah looked up the plat information and found everything she could about it online, including that it is adjacent to state forest land. We asked our realtor to follow up on it for us and tentatively scheduled a date with him to go back and look at it closer. Is it “The One”? Probably not, but it has potential. We figure the more we look at, and the more we understand the process, the better prepared we’ll be to make that final decision.

As I mentioned in my What I Did This YEAR To Prep post, my wife Sarah is my “biggest prepper asset”. You’ve seen her hand in every post I write because she sits down with me, after I’ve finished writing, and helps me edit it before it’s published. She’s a good writer with very strong technical skills (she gets it from her dad, CJ Booth, he recently published his first book, Olive Park). She and I talked, on our Sequim property search road trip, about the blog and we discussed her writing a post as sort of “guest blogger” (possibly even on a monthly basis). The more we discussed it, the more we liked the idea. Next Wednesday, the 50th TraceMyPreps post, Sarah will answer the question every prepper’s wife gets, “So what do you think about all this?”

What did you do?

(Monday: Product Review: Gerber EAB Lite Utility Knife)

Walk A Mile In Your Shoes, Part 2*

Boot Selection and Common Hiking Injuries

Boot Selection

Before you walk too far–either by choice or circumstance–I’d strongly encourage you to get a good pair of hiking boots. What I believe you need (as an individual striving to be prepared) is a heavy boot made of leather, at least six inches tall, with a quality sole, and preferably with a water-proof lining. These boots will be a relatively expensive initial investment, ranging from $200 – $300. But, if well cared for, they will last for years and you (and your feet) will never regret that purchase.

A trail shoe, or light weight boot may feel very comfortable, but it won’t hold up to serious walking; especially off-trail and/or for multiple days. A heavy boot will be rigid enough to support your feet (arch and toes), will provide shock absorption for your joints (all the way up to your lower back), will provide good ankle support, and it will last.

If your feet get wet and/or cold you will be miserable. To keep your feet dry, I recommend you buy a boot with a waterproof (such as Gore-Tex) lining. To keep your feet warm, insulated boots are available. Boots insulated with 200 grams of Thinsulate will keep them warm in temperate climates, 400 – 600 grams will work well in cold climates, 1000 grams will ensure warm feet in extreme conditions.

The biggest disadvantage of a heavy boot, other than the initial cost (and the weight), is that they are stiff and require a break-in period. We’ve discussed before that you can’t  buy stuff to have ‘just in case’; this is especially true with a heavy hiking boot. You need to walk in them, start with shorter walks and build up. Figure out how to adjust and lace them up comfortably, and what kind of sock(s) to wear. As endurance improves, start going on longer walks, on dirt trails, carrying a pack.

Common Hiking Injuries

Blisters are formed when skin is damaged by friction (this is accelerated by wetness). Fluid collects between the upper layers of skin, attempting to cushion the tissue underneath and protecting it from further damage. Wet feet, poorly fitted boots, boots not properly broken in, and unconditioned feet all can result in blisters.

Shin splints–pain when you lift your toes to take a step–are frequently caused by a muscle imbalance, specifically tightness of the calf muscles and weak shin (tibialis anterior) muscles. Too quickly increasing intensity and duration of walking causes these lower leg muscles to become fatigued and makes it difficult for them to absorb the shock of the impact from each step. This impact is worse when walking uphill, downhill or on hard surfaces; wearing poor or worn-our shoes also contributes.

In addition to muscle soreness in your feet and legs, your lower back muscles can become fatigued and sore as they are forced to stabilize, along with the abdominal muscles, the upper body each step you take.

Once you throw on a pack your shoulders and neck may become sore from the additional weight. Loading a pack efficiently, with proper weight distribution, takes practice and experience. Remember to use the waist strap, and consider using the chest strap, to redistribute the weight.

We take our ability to walk for granted. We assume that if we need to we can walk as far as is required. But–in the modern, inactive, motorized world we live in–distance walking is becoming a lost skill. But it’s an easy one to regain: invest in a good pair of boots, break them in properly, and start walking.

(Friday: What I Did This Week To Prep)

*review Walk A Mile In Your Shoes, Part 1