Momma Bear’s August Preps

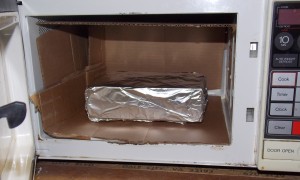
August has been madhouse crazy for us with plenty of work and personal commitments. We have not done as much prepping as I would like. BUT, when we are too busy for physical preps I can always use the time to learn new things. This month’s field of study focused on EMP’s. I found two sites to be particularly informative. The first, The Commission to Assess the Threat to the United States from Electromagnetic Pulse Attackincludes two reports that describe the recommendations for how we should prepare for an EMP strike. It is interesting to read,  because you quickly grasp that this report was essentially poo-poo’d by our government and we remain ridiculously unprepared for such an attack. The second is a website that talks about home-made faraday cages designed to protect small electronic devices. After reading this, my son and I built a small faraday cage out of an old microwave; then placed our small shortwave radio inside.
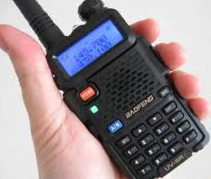
This month we also made a few purchases. Following Trace and Sarah’s lead, we ordered the Duracell 813-0807 800 Watt DC to AC Digital Power Inverter. For the time being, we have opted not to buy a generator and this will be our interim solution. With three vehicles, we can surely spare one to power some things here at home. My second purchase was a ham radio. We are absolute beginners with ham radios and are not really looking to broadcast (just to receive information from a distance in an emergency), so we opted for a small, inexpensive hand-held model. We ordered the BaoFeng UV-5R 136-174/400-480 MHz Dual-Band DTMF CTCSS DCS FM Ham Two Way Radio, for less than $60. There is a more basic model available, but after reading some reviews we felt this one was a better choice. All that said, even this basic model is a complex item that is going to take some research to understand. Thankfully, there is always the internet and YouTube to answer our questions. And, of course, once we get this thing mastered it will also be going into the faraday cage. Our goal is that eventually all the BOB’s will have either shortwave or ham radios in them as well. I will report back next month on how the ham radio learning is going!

Last for this month, I continue to harvest tomatoes as they ripen and can them as tomatoes, salsa or ketchup. We have finally gotten over the real HEAT of the summer here so the garden isn’t quite so “needy” any more. We currently have green onions, cilantro, and baby spinach coming up in containers. These are probably our most eaten/purchased vegetables so we are really enjoying the fruits of our labor at the moment!

How did your month go, and how’s your garden growing?

(Monday: September is National Preparedness Month)

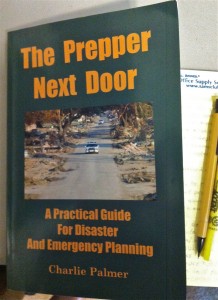
What I Learned From Charlie In ‘The Prepper Next Door’

As I reviewed Charlie Palmer’s book, The Prepper Next Door: A Practical Guide For Disaster And Emergency Planning, I kept a notebook and pen beside me and a highlighter in hand. His book contains a lot of good information and I highlighted or wrote down notes about: stuff that I wanted to remember, stuff I knew that I needed to be reminded of, things I thought of while I was reading, and some brand new (to me) ideas. I appreciate that Charlie doesn’t hesitate to recommend products, resources, and websites; there are many I now need to follow-up on and learn more about.

Here’s a sampling of my notes/highlights from his book:

  • N95 masks effectively block the H1N1 virus
  • purchase masks with air exhalation valves so your glasses don’t fog up
  • have back-up water even if you have a well, your well could become contaminated
  • add two more 55-gallon rain barrels
  • add two more 5-gallon water jugs
  • consider rain collection on our greenhouse
  • 4 mm plastic sheeting has a variety of uses
  • research Katadyn Survivor 35 water filter, it’s expensive but it can desalinate water
  • use Pool Shock (calcium hypochlorite) for water purification (store extra for neighbors)
  • watch Twilight Zone episode “The Shelter”
  • add two more cases of MREs
  • look up nitro-pac.com
  • research XL50 Maglites (3 AAA) flashlight
  • research Tech 40 flashlight
  • look up brightbuy.com
  • research Sanyo Eneloop rechargeable batteries (we just bought some)
  • buy small battery powered (AA or AAA) AM/FM/shortwave radio (consider Eton Mini 300 PE)
  • look up NorthernTool.com
  • stock up extra spark plugs (can the same ones be used for all vehicles and the generator?)
  • look up OBXSOLWIND’s Youtube channel for DIY solar and wind power
  • put lithium batteries in flashlights in the cars and BOBs (if they need to be used around the house, substitute rechargeable batteries)
  • look up YouTube: The Survival Bookshelf (review of prepper books)
  • research Ruger Mark III .22 and Browning Buckmark .22 pistols
  • look up gun-test.com for gun reviews (no paid advertisers)
  • look up sootch00prepper for gun reviews from a prepper angle
  • research ArmaLite AR-10
  • consider 20 gauge shotgun for Sarah
  • reseach Ruger SP101 (8 shot revolver 22LR)
  • research body armor at Youtube channels MrLockandload and CitySurvivalist, and website bulletproofme.com
  • to find your home’s security weaknesses, consider how you would break-in to your own home if you had to…
  • look up lorextechnology.com for security cameras
  • the Bug Out Bag chapter is a great guide on getting started and/or assuring you have everything you’re ‘supposed’ to
  • most of his BOV chapter was a learning experience for me; mechanical things (including cars) are not my strength
  • The welding part was also interesting; I don’t know anything about welding, but would like to learn
As I stated in my review, “the book isn’t just for novices, there are many things a seasoned prepper will learn.” I learned a lot, I’m glad I read it, and I consider it a valuable resource.


What We Did This Week To Prep 8/24/12

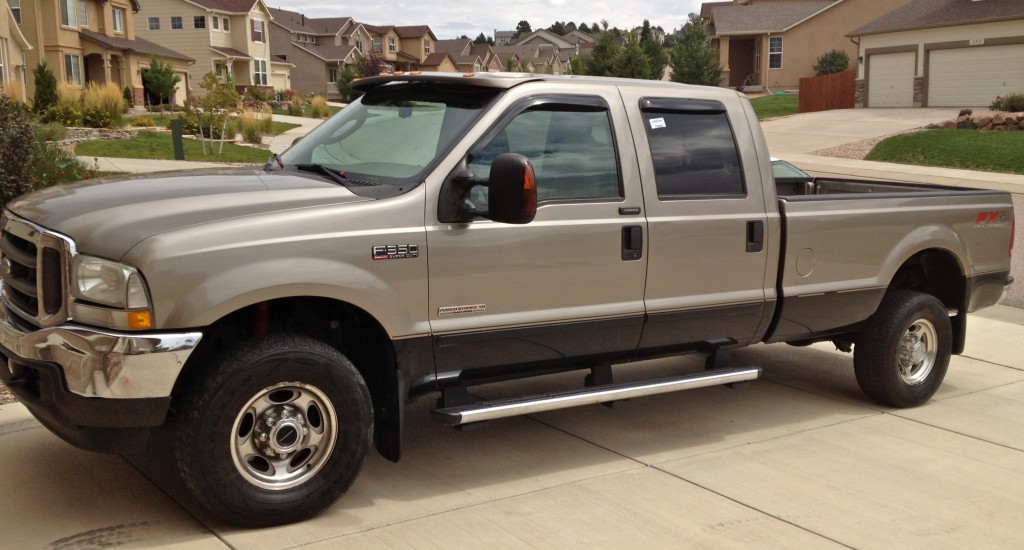
We are now truck owners! Sorta. We have a friend who attends the car dealer auctions in Colorado and we recently arranged with him to find us a truck. Yesterday he found one and bought it. Of course, we still need to pay him and pick up the truck from Colorado, but we’re much closer than we were. It’s a ’04 Ford F350 Diesel, 4×4, crew cab, long bed — exactly what we asked for. Originally we were going to Colorado to pick it up over Columbus Day weekend in October, but now we’re looking at going sooner (I try to be patient, but it’d be hard to wait that long). I’ve wanted a truck for years, but had never been able to really justify one. But since we’ve been so involved in our prepping, gardening, and building projects there have been more times we’ve needed one; I get tired of asking a friend to either use theirs or to help me out. It’s kind of a big deal too because we’ve been saving for it for over a year (so we could pay cash for it), it was also one of our goals for 2012. If we decide to go forward with the purchase of a 5th wheel travel trailer we now have the truck to pull it. And, if we ever have to bug-out, we have the space to bring a lot more stuff, and a vehicle that’ll have the best chance of getting us there safely.

In the garden, the cucumbers, squash, and tomatoes are finally producing and the other plants continue doing well. If the sun lasts a few more weeks I think we’ll be able to call it a successful gardening year. Either way, we’ve learned a lot and continue to improve.

Under the category of: There’s Not An App For That, this week we played a game of bocce ball with the kids and their friends. When I was young, playing outside was nothing worth mentioning–everyone did it–not so much now. We’re very informal with our bocce ball game, we don’t have a court, we just roll it through the grass. We played a mini-three way tournament; it was good to see the kids having fun with an activity that didn’t involve any electricity. If we ever do have a collapse–big or small–or even a power outage that lasts several days, lack of a normal routine and activities can cause additional anxiety. Plan ahead and incorporate board games, card games, and outdoor games into your daily life. This may sound trivial now, but in the future, creating a feeling of normalcy, unity, and just fun may be very important.

What did you do?

(Monday: What I Learned From Charlie In The Prepper Next Door)

Momma Bear: Our Favorite Military Things

Just to clarify (again), being in the military is NOT synonymous with being a prepper. But, it does give you an edge on preparedness. So, I thought I would highlight some of our family’s favorite military items that we use and have in our GOOD (Get Out of Dodge*) bags and/or car kits.

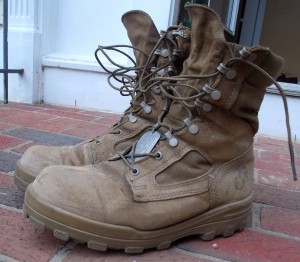
Military boots have come a LONG way since Vietnam and even Desert Storm. There are a number of  “military-approved manufacturers” these days and the boots come in a variety of styles to fit the working conditions. Gone are the days of just “steel toe” or “no steel toe”. There are quality boots for hot weather, cold weather, ultra lightweight, steel toe, and everything in between. The least expensive cost about $100. My husband’s favorites (and mind you, shoes/boots are a very personal choice) are the Bates Durashocks Hot Weather boot, which run about $140. These are a medium weight, suede boot in a natural leather color. He wears these even in cold weather because he says the cold weather boots make your feet sweat unless temperatures constantly stay below 35 degrees. Around military bases there are still shoe repair places (cobblers), so it is common to have your favorite boots resoled and repaired rather than buying new ones.

When it comes to staying warm and dry, layering is the best method. Two invaluable items, in the military, for this are: Gore-Tex and liners. Gore-Tex is a high-end trademarked fabric used for making outer apparel water-proof and breathable. Most commonly you will see these as big, hooded camo jackets with matching pants. These can be expensive when purchased for personal use, but can be found used and are truly worth their weight in gold. The second component, which you can also find used–and these are inexpensive–are the jacket and pants liners. These are made of a ‘poofy’, olive drab, quilted fabric very similar to a parachute. They are very light weight, easy to compress, and excellent for layering under coats. We purchased a 10-pack of used jacket liners for about $35, including shipping, from eBay. I personally am terrible about NOT wearing coats, even in the winter, so I keep a couple of these stashed in my kit in the trunk of my car.

The last thing I will mention is the military poncho liner, affectionately known in the military as a “wooby”. It is made from the same parachute type quilted fabric as the jacket/pants liners. It is also easy to compress and pack along. BUT, in my opinion, it’s greatest strength is that things don’t stick to it. That means I can use it in sand or dirt, then just pick it up and shake it off. Even pet fur tends to just slide right off. Also it will not only keep you warm, but when used in a warm climate it feels cool against your skin (you won’t sweat up against it). Since the military changed to a digital camo pattern, there are plenty of these for sale in the outdated “woodland” camo pattern. They can be found online from about $10-30. Our family owns several, keeps them in our GOOD Bags, and also packs them along whenever we travel.

All of these items are easy to find online through military supply sites, or eBay. Most of them originally came from military sources; when the military discontinues items, they put them up at bulk auctions and people buy them in large lots (for example “400 mixed size jacket liners”). Dealers will buy these large quantities and then resell them in smaller lots or even individually, thus giving you access to genuine military-issue gear.

Building a good GOOD kit/BOB doesn’t have to be expensive or fancy, even when it comes to things to keep you warm and dry. You can get some pretty good deals using old military surplus items. Imagine, your very own veteran wooby could be just a mouse click away!

(Friday: What We Did This Week To Prep)

*A complete list of acronyms used can be found in the ‘Check Here…‘ tab at the top of the page.

Book Review: The Prepper Next Door

The Prepper Next Door: A Practical Guide For Disaster And Emergency Planning, by Charlie Palmer, covers about every topic a beginning prepper would need. But the book isn’t just for novices, there are many things a seasoned prepper will learn (there are many things I learned).

Charlie Palmer is a prepper. He writes as a prepper for preppers. His advice goes through his prepper filter, i.e. “From a pure prepping standpoint, I probably wouldn’t spend the money…”

He begins each chapter with the basics–clearly defining terms–then delves to a level that covers the topic well, with good insight and understanding. I was pleased with how much I learned in each chapter. Then I really like how he ends his chapters with an action paragraph, i.e. “what’s the minimum a prepper should do with regard to . . . ?”, presenting a good summation of initial goals to reached.

Unlike some instructional prepper books this one was easy to read, and even includes some humorous insights and comments (more than once I laughed out loud)–Charlie definitely doesn’t take himself too seriously.

I appreciate that he recommends specific brands. Sure we can all “Google” things ourselves, but it’s nice to have personal recommendations that the author likes and uses. I also like that there are things he recommends, but admits that he doesn’t use — but would if he could (or needed to). And I completely agree when he stresses, a “…general rule of prepping, whenever possible, test your preparations. Things don’t always work out as you’d expect.”

However there are things I didn’t agree with him on. For example, he believes you should only store a small amount of fuel for a generator and/or bug out vehicle, for safety reasons. I think you should do the math, figuring out how long you’d like to run your generator and/or how far you’d need to drive your bug out vehicle, then store that amount of fuel and have an established system to rotate it so it doesn’t go bad.

I also didn’t agree with some of his first aid chapter; but that is, in part, because I worked as a paramedic and have different insights and skill-sets. For example I disagree about not using pet antibiotics. I also think that his information about clotting agents, and his statement discouraging the use of tourniquets, are outdated. He breezed over topics I would have covered more, but he’s not a medical professional and he does recommend several resources for the layman. But I strongly agree with his statement that, “learning first aid isn’t something you can easily do on your own.” It’s a tough skill-set to learn without practice, and it’s hard for the non-professional to get that practice.

Recommendation

I thoroughly enjoyed Charlie’s book. Sure I didn’t agree with everything, but when an author goes into so much depth and detail about so many subjective topics there’s no way everyone will agree. I also don’t agree with all of his opinions, advice, or recommendations but I was pleased that he was willing to make them, that he defended them well, and gave so many sources of additional information. He also doesn’t hesitate to give the opinions of others he respects, and he by no means implies that he knows all or that there isn’t a different–even better–way to do things.

I would strongly recommend The Prepper Next Door it to anyone interested in prepping. This isn’t just a reference book but one that can, and should, be read cover to cover. I think people will be surprised with how much they learn — even (especially) if they think of themselves as a veteran prepper.

In fact, I got so many good ideas from Charlie’s book that next Monday my post will be entitled: What I Learned From Charlie In The Prepper Next Door.

(Wednesday: Momma Bear)

What We Did This Week To Prep 8/17/12

After I discovered the ease and convenience of recharging batteries, with our Goal Zero Nomad 7 Solar Panel and Guide 10 Power Pack, I decided we needed to expand out into the world of rechargeable batteries. This was a new thing for me, the rechargeable batteries that I was used to were the old fashioned kind that were expensive, didn’t last long, developed memories, and over-all not worth the hassle. The new kind can be charged over 1500 times and developing memory is no longer an issue.

I also recently learned about this topic on The Survival Podcast when Jack interviewed Steven Harris on Dealing with a Large Scale Blackout. Steven discussed how people could have been better prepared for the recent east coast power outage, and of course any future power outages, in some very simple ways with some very straight-forward products.

Steven Harris is a guru of all things ‘energy’. Yea he’s slightly goofy and tends to ramble a bit, but his knowledge and ability to easily explain the complex world of energy is incredible.

The products that he recommended–not his products, just ones he’s thoroughly tested and provided links to on his site: SOLAR1234.com–that we chose to order were:

  • Powerex Eight Cell Smart Charger (MH-C800S). An 8 AA or AAA battery charger that charges in one to two hours; it also has a large LCD screen showing the status of each battery. This will give us an easy, relatively low energy draw, way to have an almost infinite supply of battery power.
  • Sanyo 1500 eneloop 8 pack AA, and AAA, NiHM Precharged Rechargeable Batteries. (For use with the above charger.) We ordered one of each, Costco also carries these and we can get more there after we test them out. These can also be recharged with our Goal Zero Solar Panel and Power Pack.
  • Duracell 800 Watt DC to AC Digital Power Inverter (813-0807). It runs at 150 watts through your car’s cigarette lighter, or 800 watts when clamped directly to your car’s battery (comes with cables for each method). It has a display that shows: voltage in, voltage out, and watts (power) that you are currently drawing. With this your car becomes an improvised generator and power is stored in your car’s battery (800 watts is enough to power your refrigerator).

And the item we’re most excited about:

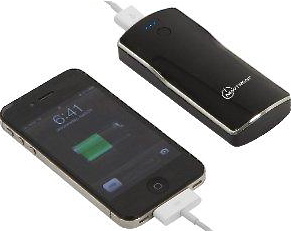
  • Trent iTorch IMP52D 52mAh External Battery Charger (for ANYTHING USB). It’s a portable rechargeable lithium battery that holds enough energy to completely charge a dead iPhone 3.5 times! We ordered one for both Sarah and I (and Sarah’s Dad, who happened to be here at the time). We’ve been searching for a product like this to add to our get-home bags (GHB) and this one comes very highly recommended. I plan on thoroughly testing, then reviewing the iTorch.

On another topic, we had to find a way to keep our rabbits cool this week. While I know we won’t get much sympathy from the rest of the country, it actually got hot here in Western Washington. We had temperatures in the mid-90s, which is really hot for us (keep in mind hardly anyone here has air-conditioned homes). To put that temperature in local perspective, I had a co-worker who would say, “Any time it gets above 80 degrees it’s god’s way of showing me what hell would be like.” Yes, the Pacific Northwest is temperate. Anyway with the “hot” temperatures we had to find a way to keep our (Western Washington, not used to the heat) rabbits cool. Sarah did some research and found one of the easiest ways is to put a frozen 2-liter water bottle into each of their hutches and they can lean against it if they get hot. It seemed to work well, the rabbits looked less agitated and seemed to be panting less.

What did you do?


Product Review: Nomad 7 Solar Panel and Guide 10 Plus Battery Pack

Yesterday I took the first step into the solar power world. It was a small step, but for the first time I harnessed energy from the sun.

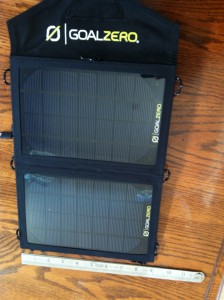
I did it with a Goal Zero Portable Solar Power Pack Kit that we bought from Costco. The kit came with a Nomad 7 Solar Panel and a Guide 10 Plus Battery Pack (also included: Luna LED light stick, 12V car adapter port, and a set each of AA and AAA rechargeable batteries) and cost about $100.

We all know “buying stuff is easy”; so it was time to get everything out, read the directions, and actually used it.

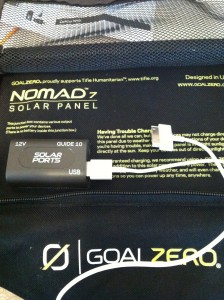
Both the Solar Panel and the Battery Pack appear to be solidly built with good construction and design; a nice zip pocket is built into the back of the Solar Panel that can carry all the accessories including the Battery Pack. Both products are stated, and appear, to be “weather-resistant.”

The Solar Panel can be used independently to charge devices; but it’s more efficiently used in conjunction with the Battery Pack.

Solar Panel
The Nomad 7 Solar Panel is designed to be backpack portable (including being used, open and charging, attached to a pack while hiking). It folds up small: 9 inches wide x 6.5 inches long x 1 inch thick; open it is still small: 9 inches wide x 17 inches long x 0.1 inch thick, and weighs only 0.8 pounds. It’s rated at 7W with a monocrystalline cell type and a converting efficiency of 17-18%. Goal Zero states this “delivers more power per square inch than any other solar technology on the market.”

Attached to the back of the Solar Panel is the Solar Ports junction box, with: a USB port, a Battery Pack port, and a 12V output port for a car charger adapter.

The Solar Panel’s directions are simple, essentially: open, angle toward the sun, then plug your device into the appropriate charging port. I plugged my iPhone 4 into the Solar Ports junction box USB port and positioned the panel toward the sun. The literature said it should charge a smart phone in 2 – 4 hours. My phone started at 50% battery capacity. At one hour it was at 85%, and it was fully charged at an hour and a half. So for my phone, with full sunlight, about 35% charge per hour — not bad at all.

The Solar Panel can charge “most hand-held USB devices, like: cell phone, smart phone, GPS, MP3 player, Goal Zero products”.

Battery Pack
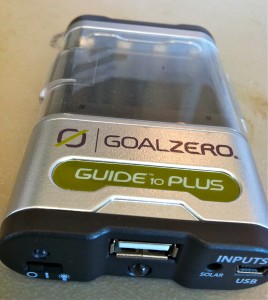
The Guide 10 Plus Battery Pack is designed to charge AA or AAA NiHM batteries (comes with a AAA adapter). The most efficient way to charge a smart phone is to plug the Battery Pack (with batteries in it) into the Solar Panel and then plug the phone into the USB port on the Battery Back. This way the batteries are charging the phone and the Solar Panel is charging the batteries. The device has a standard USB and a mini-USB port. It also has a small built-in LED flashlight that puts out “100+ hours of light per charge”; kind of a neat little bonus — not that you’d be setting up your Solar Panel in the dark, but it is designed for camping and an extra flashlight never hurts. And it’s easy to carry around at only 0.4 pounds (plus battery weight).

The Battery Pack holds four AA or AAA batteries. All four batteries must be charged at the same time, but not all batteries need to be empty (I believe this is standard with rechargeable batteries). The literature states “three hours expected charge times in good sun”; so I put discharged batteries in the charger, positioned the solar panel, and came back three hours later to fully charged batteries. Once you have charged batteries, the Battery Pack USB ports can be used to charge your devices without the Battery Pack being connected to the Solar Panel. So I then charged my iPhone from the (disconnected) Battery Pack without any issues. In summary, charge the batteries up when there is sun and use the energy stored in the batteries when needed.

Recommendation

It’s a pretty cool, compact, affordable system. It seems to work very well and couldn’t be much simpler. It looks rugged and practical enough that I wouldn’t hesitate to throw it in (or on) a pack and take it with me anywhere.

As a prepper–trying to be prepared in case of emergencies or disasters–communication is very important. Sure the cell network can go down, but if it’s up and available it’d suck if you couldn’t access it just because your phone’s battery is dead. This is a product that can help prevent that from happening.

I’d definitely recommend the Goal Zero Nomad 7 Solar Panel and Guide 10 Plus Battery Pack. Not only would it be great for hiking/camping, it would be a big asset to keep you more prepared in case of a disaster.

Here’s a short video by Goal Zero that shows their devices being used (I’ve discussed their small Battery Pack, they also have a medium and large Battery Pack that are shown in the video.)

http://www.youtube.com/watch?v=4-pgoafc_bk&feature=player_embedded

(Friday: What We Did This Week To Prep)

What We Did This Week To Prep 8/10/12

Prior to leaving on our vacation to Colorado last month, Ryan and I tried to get an automatic watering system for the rabbits in place. While I had never worked with PVC piping before it didn’t seem like it would be too difficult. The concept was easy enough but we didn’t take enough time to ensure everything was properly glued and that led to it leaking. We reverted back to the water bottles for a couple of weeks until we could get it fixed/redone. This week, with the benefit of our previous experience (isn’t everything easier the second time around?), we re-did the project using new PVC, better glue, and clamping the spouts in place while they dried; this time everything worked flawlessly. The project still isn’t done, I plan on putting “gutters” on top of the rabbitry roof to collect rain water, and eventually extend it to the lower level (when we add a second row of hutches). But the rabbits now have plenty of water and the 5-gallon bucket will only have to be refilled every week or so.

Ryan also made two more “pasturing hutches”. Essentially the same thing as the hutches they live in, but these were made without bottoms so the rabbits have access the grass, clover, and other assorted things growing in the back lawn. Previously we only had one so I’d get each rabbit out, one at a time for an hour each, to let them each graze. It was a bit of a hassle because I pastured them each day before I’d give them their store-bought feed (so they’d wake up hungry and maximize their opportunity to eat fresh greens), so I had to be around and move along each morning to get them all out and fed. Now I can just take all three of them out and let the eat at the same time. Much easier and smoother.

Per Momma Bear’s recommendation we ordered a new prepper book: Preserving Food without Freezing or Canning: Traditional Techniques Using Salt, Oil, Sugar, Alcohol, Vinegar, Drying, Cold Storage, and Lactic Fermentation.

Amazon describes it, in part, as:

Typical books about preserving garden produce nearly always assume that modern “kitchen gardeners” will boil or freeze their vegetables and fruits. Yet here is a book that goes back to the future—celebrating traditional but little-known French techniques for storing and preserving edibles in ways that maximize flavor and nutrition. . . this book deliberately ignores freezing and high-temperature canning in favor of methods that are superior because they are less costly and more energy-efficient. . . says in his foreword, “Food preservation techniques can be divided into two categories: the modern scientific methods that remove the life from food, and the natural ‘poetic’ methods that maintain or enhance the life in food. The poetic techniques produce… foods that have been celebrated for centuries and are considered gourmet delights today.” . . . offers more than 250 easy and enjoyable recipes featuring locally grown and minimally refined ingredients.

For those of you, okay mostly us, that were worried that we wouldn’t get tomatoes this year — we finally have a bunch of green tomatoes on our vines! We’re pretty excited about it and keep telling ourselves that our patience – in our temperate growing region – will pay off. Hopefully in the next couple of weeks we’ll be eating fresh tomatoes and maybe even canning the extras!

What did you do?


Sarah’s View: Rules vs Principles

Seattle recently passed a bag law, well actually a bag ban. This rule PROHIBITS stores from providing customers with single-use plastic bags. In addition, it REQUIRES stores to charge a minimum of $0.05 for paper bags (stores can’t choose to absorb the cost, they MUST pass it along). However, it wasn’t until I walked by The Gap Store today that I realized they would no longer be allowed to provide their signature (plastic) drawstring bags. It hadn’t occurred to me that the ban included clothing and retail stores. Yes, I know the law states retailers, but in the news we only heard about it affecting grocery stores. Now, suddenly, I find myself irritated and frustrated with the city and unlikely to do much shopping downtown.

I can understand and appreciate the motivation behind the law. But, what if the city had simply asked each retailer to put up a sign that said “We, along with the City of Seattle, support reducing waste. Please think about combining purchases into one bag or reusing the one we provide you. Here are some ideas: . . .”? Seattleites are already very good when it comes to recycling and reducing waste.

But, what about the tourists? Instead of leaving frustrated and without purchasing anything (because they don’t have a ‘reusable bag’ with them and, without a bag it’s difficult to get it back to their hotel), they would leave the store thinking “huh, what a great idea”.

I think something positive, that encourages individuals to act on a principle (in this case reducing waste), would go far in influencing their long-term behavior.

Rules vs Principles

The problem I see with rules is they must cover every detail. We’ve all experienced that feeling of being told something is not allowed, and suddenly that is all we want to do. A rule can be broken. A principle doesn’t break. A principle offers flexibility and choice; it provides the opportunity for a society to govern itself from a position of what works for them, at that time, in that situation.

When a rule is broken the perpetrator must be punished. But if the group operates by principles, there is room for consensus, for understanding, for situational consequences.

What on earth does this have to do with prepping?

In a collapse the law of the land will change. While some groups will try to continue to live by the rules of the pre-collapse society, I believe those that adapt and learn to live by principles will be much more successful. When forming a post-collapse community, principles such as Safety, Respect, and Autonomy will be more useful than trying to get a group to agree on a list of rules. For example, perhaps an individual wants to ban the wearing of orange clothing because it’s too bright and attracts attention. Instead of making a rule banning orange, the principle of Safety could come into play: there may be times when orange should not be worn (moving through an area at night) but there may be times when orange promotes safety (hunting in a group) .

Not only that, but by living within a system that promotes consequences for behavior as it relates to each situation, I honestly feel like people would be more likely to think through what they are doing. Instead of trying to break a rule to get what they want, they could collaborate with friends and neighbors to obtain it in a manner consistent with the group goals. Instead of “this rule is stupid for this situation, I’ll break it and see if anyone notices”, we would have, “I would like to get this done, I wonder what is the best way to make it happen”.

It’s unlikely we could ever live exclusively by principles, but consider starting with that goal; then adding rules only when absolutely necessary.

(Friday: What We Did This Week To Prep)

Sharpening Knives, Part 2: Actually Doing It

Last week I wrote Sharpening Knives, Part 1: Choosing The Right Sharpener. As I stated, “what makes it easier to sharpen a knife is to have the right sharpener”. Now that you have a good ‘whetstone’, how do you get a good edge on your knife?

Knife Sharpening is the process of making a knife or similar tool sharp by grinding against a hard, rough surface, typically stone”.

Assuming you have a DMT folding sharpening stone (like I prefer/recommended) start by holding the stone in your non-dominant hand and holding the knife in your dominant hand. If your blade is dull start sharpening it on the coarse side of the stone; if it has a decent edge maybe you can start off with the finer side. As you sharpen the knife you don’t need to apply much pressure, just a gentle firm push/pull across. As you work the blade across the stone some people like to imagine that they’re trying to shave off a very slim piece of the stones surface.

When you’re sharpening a knife the most difficult part is finding, then maintaining, the correct angle. You want to position the knife at approximately 20 degrees (or about the angle that is already visible on the blade’s edge) against the stone. It takes practice to develop a “feel” for the correct angle. There are sharpening guides available that hold the knife at the proper angle–but as a prepper I believe it’s worth taking the time to learn the skill. The smaller the angle the sharper the knife will become, but the less strength the edge itself will have and it will bend much easier (e.g. a straight razor has a much smaller angle to produce the razor edge, it is then stropped each time to make sure the edge is straight and polished). Practice. You’ll get it, then you’ll get faster.

Both sides of the blade need to be sharpened equally, when you’re working on the coarser side of the stone it’s easier if you do about half-dozen on one side before you turn it over and do the other side. Make sure to do the same number of strokes, maintaining the same angle, holding the same amount of pressure, over the entire surface of the blade’s edge. Once the knife is noticeably sharper, switch to the finer side of the stone and this time alternate strokes one on each side of the knife.

The knife is sharp when you think it is. You’re not going for a razor edge, unless you’re sharpening a razor. For most knives sharp enough is good enough. As you practice it’ll become smoother, faster, and more natural. As you develop the habit of keeping up the edge you’ll find you just need to do a few strokes across a fine stone to keep it ready.

Here’s a good, how-to, knife sharpening video that sums all this up:

http://www.youtube.com/watch?v=nWJMEWck3WI&feature=relmfu

(Wednesday: Sarah’s View)