Nuts & Bolts with Nick: Getting To Know Your Home Utility Shut-Offs

by Nick Romaniello -

“Shut ‘er down!”

While knowing where your home’s utility shut-offs are located may seem like common knowledge — I routinely run into homeowners who have no idea where they are or how to operate them, so I feel it should be addressed. If you are already familiar with your home’s shut-offs then this is an opportunity to brush up (or share with your other family members). Most on-grid homes utilize three basic utilities: Electric, Gas and Water. While most of the pipes and wires hiding in the basement should be left to the professionals, knowing how to shut off each of your utilities in an emergency is your responsibility. The place and method for which they enter your home vary from one municipality to another, so take the time to familiarize yourself with your area’s specifics. Call your local utility company, a plumber, or electrician if you have specific questions; but I will address the basics here.

Water
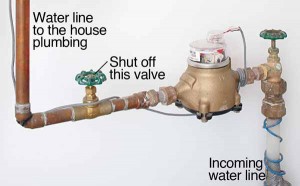
Water generally enters the home from underground to prevent the lines freezing in winter. The water meter will usually be located in a basement, or utility room, and will have a shut-off on each side of the meter to allow the water utility to easily change the unit. The shut-off will usually be either a lever, or a knob, or possibly one of each. Operating the shut-off on either side of the meter will stop the flow of water throughout the house. Hard water can corrode shut-offs that have not been operated in years so it’s a good idea to regularly make sure your water shut-offs are in operating condition. If they are stuck in the on position they must be replaced immediately. A non-functioning shut-off is a major hazard and should not be ignored.

Gas
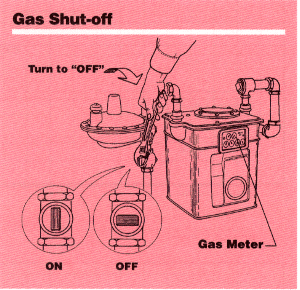
Your gas meter may be located inside or outside your home, as natural gas is not affected by freezing. Gas meter shut-offs do not have handles or valves since they are not intended to be regularly operated by home owners. The gas meter will require a wrench to operate. Usually an adjustable wrench will work, but some meters use specialty wrenches; find out what your meter uses before hand and keep it near the meter. Following natural disasters (i.e. earthquakes, tornadoes, hurricanes) many devastating fires are fueled by ruptured gas lines, so shutting off your natural gas can help prevent home damage from becoming total home loss. ONLY shut off your natural gas service in an emergency. Once it is off all of your pilot lights will go out; turning the gas back on without proper knowledge and equipment could release natural gas into your home and become deadly.

Electric
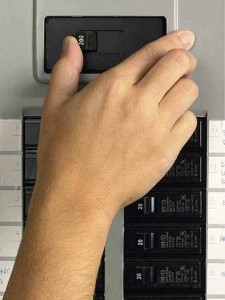
Depending on the age of your home you will either have a fuse box (older) or breaker box (newer). A breaker or fuse (often placed at the top and away from others inside the box) should be labeled as ‘main’. To disconnect electricity either flip this breaker or remove this fuse. If you have fuses, consider contacting an electrician about upgrading to breakers for convenience and added safety.

Take the time now to locate all of your utility shut-offs and be sure that they are not obstructed. Being able to access them in a hurry or in the dark may be necessary. Shutting off your utilities during a natural disaster, or before an evacuation, can add a layer of protection against possible utility-fueled fires, floods, or explosions should your home sustain damage. There are many variations that I couldn’t cover in a single article so be sure to take time to learn your particular system or consult a professional if you are unsure.

 

What We Did To Prep 11/23/12

As winter arrives again we took the time to get the cars winterized: checking wiper fluids, anti-freeze levels, putting the sleeping bags and extra warm clothes back in the car, replacing wipers, and ensuring ice scrapers are available. Many times when we discuss the SHTF we think of major disasters or apocalyptic events, but–especially this time of year–it’s useful to consider what would happen if the shit your it YOUR fan (SHYF). It’s far more likely that your car slides off the the road into a ditch and you’re stranded for a few hours (or overnight), than the Yellowstone Volcano erupting and changing the North American landscape as we know it.

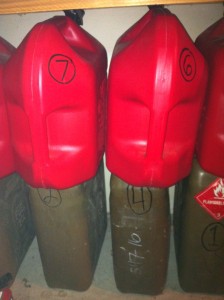
We added a couple of additional 5-gallon cans of gasoline to our stores. After the shortages of gasoline following Hurricane Sandy (or any major power outage event), we decided a little bit more couldn’t hurt. As always, we added Sta-Bil so it will reliably last for a year or longer (for a refresher on storing fuel see my post, The Hassles of Storing Gasoline). I also realized that the fuel in my generator will be a year old in January, and that’s more difficult to rotate. I’ve decided, when it comes time, I will syphon it out into an empty gasoline can and then add it to the car’s fuel tank and then refill the generator with fresh, stabilized gasoline. Speaking of generators and storing fuel, a great resource for additional information is Steve Harris’ (from solar1234.com) interviews on The Survival Podcast: Fuel and Fuel Storage for Preparedness, Generator Show Part 1 – How to Pick a Generator, and the followup Generator Show Part 2 – Powering You House and Natural Gas or Propane Fuel Options. I learned a lot during these interviews, and I was pleased I was doing most things basically right already. I determined that the generator we have–a Generac GP 5000–is fine for now, but when we get our own place I’ll upgrade to a tri-fuel higher quality one, likely a Honda or Yamaha 10k+ watt one. Also I need to look into the PRI-G fuel stabilizer; it’s suppose to stabilize fuel for years and actually improve old fuel, that has began to separate from age, making it usable again.

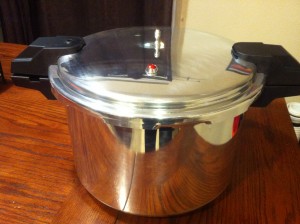
Finally, we recently bought a pressure cooker/canner (one recommended by Homestead Fritz). This weekend we’re cooking up an additional two turkeys with plans to can the meat, in mason jars, using the pressure cooker. We’ve never done this before, heck we’ve never used a pressure cooker before, so it should be interesting and educational. But we really like the advantage of being able to add quality meat to our food storage that doesn’t require a freezer. If this works then we’ll keep and eye on the meat sales and can additional meat as it comes available.

What did you do?


Momma Bear: Long Term Food Storage Specifics

For our family, as I discussed in last month’s post, there are a number of obstacles to long term food storage. It is not only about packaged vs. fresh foods, but some of the traditional prepper foods and storage methods are EXPENSIVE! Food that comes in #10 cans can be very pricey, and putting away my own foods in mylar and buckets was just not working for me (though I did it heavily in those first few months). Last is a common prepper notion that anyone will eat anything if they are hungry enough (and by this people usually mean beans and rice). That is just not a realistic approach with kids, especially if you are trying to get them to support your prepper habits. At our house we have embarked on ways to incorporate long term food storage into everyday life so that if the SHTF, the food will not be foreign and mysterious (aka “ICKY”).

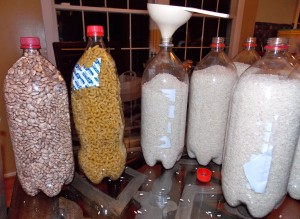
The ideal of prepper packaging for the apocalypse seems to be centered around big mylar bags and 5-gallon buckets. I personally hate both of these things. I hate the big bag because it costs money, it makes it almost impossible to check on your food or to use it in any sort of rotation. And I really hate the buckets because they are round which wastes space on shelves. They also weigh a ton and make it impossible for me to move without assistance, which I may not have in an emergency. I do occasionally use the thick gallon sized mylar bags for food storage, but more frequently I recycle other containers. Currently I am storing beans, rice, flour, oatmeal and macaroni noodles in 2-liter soda bottles with two 100cc oxygen absorbers. On the internet you will see some debate as to the long term viability of these bottles, but I think as long as you are using the thicker PET bottles, there is no reason not to use them. Please note that water bottles are much thinner than soda bottles and I only use those for water. I feel the pros outweigh any cons. So far they have a beautiful air tight seal (as evidenced by their deflation caused by the 02 absorbers), I have the ability to visually check my product, they are much easier to move around by myself, and I can use my long term food storage as needed in smaller quantities without opening an entire 5-gallon bucket of something. The other container that I have taken to re-using is small mylar bags from some of our regular food items. For instance a bunch of candies and even prunes come in small mylar bags with ziplock seals on the top (at our house it’s Raisinettes). I clean these bags out and use them for storing popcorn (my husband’s favorite treat) and bean sprout seeds. These smaller bags are the perfect size for both. I treat them just like any purchased mylar bag: insert my food, drop in a 100cc O2 absorber and heat seal it as usual (but just below the ziplock seal area).

I find those #10 cans to be a bit of a mystery. Typically, the types of foods that I buy in #10 cans or in buckets are things that I cannot store myself, primarily protein items and vegetables that are tough to store/delicate to handle, or luxury items like butter and sour cream which would dress up storage foods for recipes. TVP, powdered eggs & cheeses, spinach and broccoli are items that we have recently been purchasing in cans. We had absolutely no experience with them and were not sure if we even wanted to buy them in cans or buckets without trying them first (Costco and Sams sells in bucket sizes). Fortunately, on their websites Auguson Farms and Shelf Reliance sell most of their products in small soup sized cans/mylar containers that are perfect for sampling. We ordered an assortment and are working our way through them to see which we want to buy in bulk. I will mention that on the Costco website, one of the food manufacturers (Thrive) sells their items sealed in a mylar pouch, in a bucket with a gamma seal (reusable lid), while many other companies only put the item directly into a traditional bucket with a one time use lid. In any event, like everything else, these dehydrated foods take practice to be able to use them effectively. And by trying the sample sizes, we feel we are making more specific choices about which ones we would truly use in an emergency.

So what do I store that makes all this food storage work for our family? How do I tie it all together to get the kids to eat it and still make it nutritional? For us it is all about the components. As long as the food contains a main item that my kids recognize, they can usually be coaxed into eating it. For us that is usually vegetables. My kids will never willingly drink powdered milk, so I make sure I have a bunch of their favorite cereals stored in mylar for long term (stashed away where they don’t see it in the pantry). Ramen anyone? It’s filled with empty pasta calories and high sodium, right? But after living in Japan, ramen is a staple in our household, much like rice, pasta and potatoes. I buy the low sodium ramen and then I start adding the nutrition in, normally fresh stuff. But with a little retraining, we are using chicken TVP, dried mushrooms, green onions and spinach (all that I dehydrated myself and vacuum sealed in mason jars), and fresh bean sprouts (that we grew ourselves in only a few days inside the house). Dried spinach seems to have a much stronger flavor than fresh (so don’t use as much). Another item that I store is curry powder, which can be added to any bean or rice dish for flavor (for us this is a familiar flavor after living overseas for so long). I have also started routinely using dehydrated vegetables in our regular recipes and have discovered that the kids often don’t recognize the difference. We also have a favorite “no-bake” cookie recipe which uses oatmeal, chocolate, sugar, and peanut butter and is made on the stove top (perfect without electricity!). It has been hard, but I am really trying to find ways to store foods that are familiar. Also, your food preps aren’t any good if you don’t have a list of recipes to go with it. As for my husband the bean hater…he will willingly eat almost anything if I can promise him that bowl of popcorn at the end of the day!

So what secret food storage tips do you use?  Any special ingredients in your closet that we might like to hear about?

Sierra Kate: Reusables, Self-Reliance & Feminine Hygiene, Part 2 – How Do They Perform?

Last week I wrote Part 1: Options, about alternative reusable menstrual products from a prepper perspective. However, potential users of a new alternative feminine hygiene product will also want to know how well it performs/functions. That is what I am here to discuss this week.

FIRST – OUR CHOICES:

Disposables

  • Pads & Tampons – semi-synthetic rayon
  • Pads & Tampons – cotton
  • Menstrual Cups – elastomer

Reusables

  • Pads – cotton
  • Tampons – natural sea sponges or cotton
  • Menstrual Cups (bell-shaped cup used internally) – natural latex rubber or medical-grade silicone

Let’s compare our options, shall we?

Reusable Menstrual Pads

Reusable Tampons – Sea Sponges

Reusable Menstrual Cup


SECOND – REVIEWING PERFORMANCE:

1. Comfort

  • Interior winner – Menstrual Cups. No internal options are felt, but cups win because they are non-drying and do not interfere with one’s healthy and natural lubrication or secretions.
  • Exterior winner – Unclear. It’s a trade-off; next to sensitive skin the winner is probably the more bulky cotton pad that is soft and breathable. But some prefer the thinner, less breathable rayon,  but it does have potential irritants.

2. Convenience

a) Capacity

Winner – Menstrual Cups. The 1-ounce cups have double the capacity of a max-absorbency tampon. That means half the bathroom trips!

b) Portability and Active Living

Winner – Menstrual Cups. You only need one cup at any time, they are easy to clean and there is no trash to hide. Cups are popular with outdoor enthusiasts, including wilderness backpackers. Also, the non-drying cup can be put in the day before you expect your period.

3. Cost

Winner – Menstrual Cups. Both reusable cups and pads last at least 5 to 10 years. A cup costs about $30 to $40; a commercial set of reusable pads about 2 to 3 times that. A set of two sponges costs $13 and last 3 to 12 months.

4. Health

a) Hygiene 

Winner – ALL. No menstrual products are sterile; however they are all sanitary with proper care.

b) Harmful Substances

Winners – Reusables. Processing rayon requires a lot of chemicals that are potential toxins or irritants that may leave traces in the final product.

c) TSS and Microbes

Internal Winner – Menstrual Cup. The cups smooth surface does not lend itself as easily to microbial growth; tampons, especially high-absorbency, seem to be associated with TSS, along with causing micro-abrasions.

d) Odor

  • Internal winner – Menstrual Cup. The menstrual fluid is not exposed to any air, which eliminates odor.
  • External winner – Cotton pads. Cotton allows moisture to evaporate, which reduces odor.

5. Environmentally friendly

Winners – Reusables

6. Anatomical Fit Concerns

For cups a good rule-of-thumb is if the person (this includes virgins) has no problems using tampons then they should be able to use cups. If you can’t use disposable tampons, but dislike pads, consider trying sea sponge tampons. At the bottom I’ve included a link to a positive review of them by a women affected by pelvic organ prolapse.

7. Learning Curve

Cups are more hands on, and require you to be comfortable, or willing to become so, with your body and intimate anatomy. Most users say it takes 2-3 cycles to get the hang of easily inserting and removing them.

8. Customer Service

Winner – Reusables. Companies of reusables are knowledgeable and helpful. They have to be, they mostly advertise by word of mouth.

9. Care, Cleaning, and Storage

Reusable winner – Menstrual Cup. The cup’s smooth surface is simple to clean. It is also easier to care for away from home than the reusable absorbent options. In a pinch, after emptying, if both the cup and your clean hands do not come into contact with anything else then it isn’t necessary to wash the cup before reinserting.

10. OKAY, but are they pretty?

Really…? Sigh. Yes! They have cute pouches. Many pads do come in awesome colours and patterns. A few cups come in bright pretty colours. Sponges, I think, already look decorative. And then you can make your own pads, tampons or carry pouches as beautiful as you like. What I find beautiful is how well reusables work. The disposable synthetic products, to me, are a disappointment, not just environmentally but from a health and performance point of view.


Disclaimer: I claim no special medical knowledge. I wrote from my personal experience with rayon products and menstrual cups; most of the rest was obtained from Internet research.


RESOURCES

Disposable 100% cotton pads and tampons:

Disposable menstrual cup: http://www.softcup.com/faqs

Reusable cloth pad brands:

Pads4Girlshttp://lunapads.com/about-us/donate-pads

To make your own cloth pads:

Reusable sea sponge tampons

Reusable menstrual cups

Lastly, the following is a link to a story with a very rare concern with tampons that is not about rayon, dioxins, chemical irritants or even TSS bacteria. Open at your own risk of being utterly and horrifyingly grossed out: http://www.wfaa.com/news/consumer/Test-Results-Confirm-Mold-on-Tampon-147404735.html


Sarah’s View: What Are You Waiting For?

Please accept my apologies for this rant as I know, if you’re reading this, I’m likely preaching to the choir.

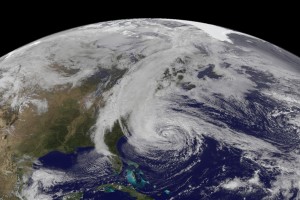
There are many articles out there about what the government officials, government entities, and utility companies could/should have done differently to prepare for Hurricane Sandy. I can’t name the number of times I’ve heard some member of the public exclaim how they keep waiting for help and are so frustrated that it hasn’t yet arrived. Now, I don’t mean to lessen the true needs of many, but I’m tired of the helplessness, the lack of personal responsibility and, yes, lack of preparation.

What made the government responsible for your well-being? Especially in a disaster like Sandy where there was warning days in advance. Yes, the government is responsible for those items that you pay for with your taxes – highways, bridges, schools, basic communications. However, they are NOT responsible for you having food, water, clothes, even a house. That is your responsibility.

A friend of mine, who’s been through hurricanes before, posted these recommendations on an online forum I belong to:

  • Make sure you have cash. ATM machines don’t work without power and when stores begin to open they will only be able to accept cash since power and phone lines might still be down.
  • Fill your freezer full of anything you can fill with water.  I was able to turn my freezer into an old school “ice box” and kept my frozen foods frozen for 5 days without power. Probably not as tough given the temperatures in the area, but it was huge when we were dealing with 90+ temps after our hurricane. When I would get ready to defrost something frozen to eat, I would move it into the refrigerator and it would help to keep the refrigerator cool.
  • Make sure your vehicle is full of gas. Gas station pumps do not work without power.
  • Make sure you can charge your cell phone with your car. It was only during the hurricane that I realized we no longer own a phone that doesn’t need electricity to run.

This is incredibly reasonable and sound advice. It makes complete sense to stock up on water, food, cash, gas, and warm clothes when you know a disaster is approaching. But – why is this only sound advice when a known disaster is approaching, but in “normal” life doing these things is odd, weird or extreme?

Our family was fortunate, since we live in the Pacific Northwest and were not directly affected by Sandy; nor were any of our extended family or friends on the East Coast greatly impacted. In fact, we are won’t ever experience a hurricane. We are likely, however, to experience an earthquake. I’ve lived through two big-ish ones and countless smaller ones in the 25 years I’ve lived in Washington. There is no warning with an earthquake; no advanced radar or news reports letting us know what time it will “make landfall”. If we were caught in the “big one” it would almost be reasonable for us to expect the government to swoop in and help, after all we would have had no idea an earthquake was going to strike – how could we possibly have known to prepare?

Yet, we won’t be waiting for the government. We will be prepared. What are you waiting for?


Sierra Kate: Reusables, Self-Reliance & Feminine Hygiene, Part 1 – Options

Contributed by Guest Blogger: Sierra Kate

Question: What can make you self-reliant for longer that uses up less space and money? Answer: Using reusable items instead of one-use disposables. I am here to discuss a much-neglected category under disposables: Menstrual Products. <Crickets>. Humour me for a moment and contemplate this, I read about one family that had an estimated seven years of tampons stocked. You want an idea better than that right? Consider reusables menstrual products. Believe it or not reusables are better in many ways, but that is literally a whole other post.

Pads, tampons, and menstrual cups all come in reusable forms. Reusable cloth pads are typically made of cotton, a breathable absorbent fabric. Commercial cloth pads are about $10 per pad. Many people make their own pads to reduce costs; there are plenty of how-to instructions on-line (see Momma Bear’s post: Home-Made, Reusable Sanitary Napkins). Cloth pads last 5 to 10 years. Commercial cloth tampons, or patterns to make them, are much harder to find, but they are out there. One non-cloth option is reusable tampons made from natural sea sponges, a 2-pack is $13, and they can last 3 to 12 months.

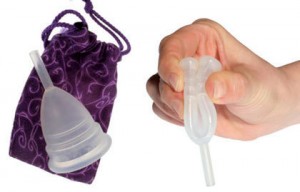
I favour the reusable menstrual cups. They are bell-shaped and are typically made from natural latex rubber, or silicone. About the size of a shot glass, they sit internally and collect menstrual fluid instead of absorbing it. They cost about $30 to $40 and last 5 to 10 years. You can easily increase your self-reliance by stocking up. Doing the math, 4 to 8 individual menstrual cups (or sets of cloth pads) could last a woman until menopause.

What about being able to make them yourself and be truly self-sustainable? Most people wouldn’t consider it on this matter, because it requires a lot of research and hard work, and the above options for self-reliance don’t take up a lot of space. But, out of curiosity, “what if”?

If you are interested in self-sufficiency when it comes to menstrual products you have a few options. Start with growing a natural fiber. Cotton (a sub-tropical bush), soft and absorbent, is the best option. The second best would be low-THC hemp (wide geographic range), however daft legal issues currently abound on this topic. Natural sponges have been harvested for millennia as luxury items; however this is dependent on a viable sponge population living nearby (such as Florida). Lastly, ones made from rubber. Natural latex rubber has many uses, and is created by curing latex, a milky plant sap. A tropical tree is used commercially; other sources of latex are guayule and common dandelions. Silicone rubber is made from silica (a sand used in glass-making) and other compounds and has been produced for about 60 years. You can find rubber mold-making-kits if you want to tinker, as rubber has all sorts of uses. The Native Americans made latex rubber for millennia but theirs may not have had the quality or consistency of modern rubber production.

Ironically, there are many other good uses for disposable tampons after TEOTWAWKI. There are a total of ten(!) survival uses in this article: The Swiss Army Survival Tampon – 10 Survival Uses.

So from a  self-reliance prepper perspective, stocking reusables is great. But perhaps you, or a fellow prepper, are not convinced. If you are wondering if this will work well from a user perspective, I use menstrual cups and I’ll tell why it is better in next week’s Part 2 post.

Sierra Kate’s Bio
Kate currently lives in small-city Canada and has just come across the world of prepping. What initially grabbed her interest in prepping is how well it fits in with her own intellectual inclinations and desires for a healthy lifestyle that has sustainability, self-reliability, utility and minimalism in mind. She enjoys solitude and her hobbies include reading and biking.


What We Did This Week To Prep 11/9/12

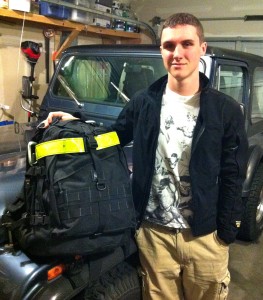
Since we’ve added a Ford F350 truck to our household we needed to get a bug out bag (BOB) in it. We’ve got top-notch ones in each of our two primary, daily use, vehicles; then a pretty good one in the Jeep CJ-7. We took the one from the Jeep and put it in the truck. Now Ryan (my 18 y/o son), who is now the primary driver of the Jeep, is in the process of building his own BOB. He has a Maxpedition Vulture II pack and we’ve gathered some stuff for his kit; he’s got a decent start and has made a list of items to round it out. It’ll be good for him to build his own BOB so that when he goes off on his own he’ll have his kit that he knows and has confidence in.

It was interesting seeing all the views of my blog during and after Hurricane Sandy. It got double the hits in that week than I get in an average month. It’s ironic how being prepared all of a sudden becomes “common sense” when a disaster is on the way (or after it has already struck…). It’s also interesting to see which posts people are searching/reading. In the near future I’m going to add a new page that has a list of all of the top viewed posts that people seem to find the most valuable. By far the most popular post during this time was How To Wire Your Gas Furnace To A Generator by guest contributor Rick Brodersen; it received hundreds of views daily. Plus Rick has been a great resource, he has personally answered each of the comments in the section and has been directly responsible for several people being able to heat their homes when their power was out.

Last spring Momma Bear wrote a post entitled Home-Made Reusable Sanitary Napkins. It was a valuable topic that may, one day, be very relevant to almost half of our population. Recently “Kate” wrote in the comments section of that post about menstrual cups. Her knowledge and experience were quite extensive and she wrote a great summary. I contacted her and asked her if she’d be willing to write it as a blog post for us and she pleasantly agreed. So Monday (10/12) I’ll post the first of her two-part article on menstrual cups; first-hand knowledge is always invaluable.

Well the time for having baby rabbits came and went. Apparently, despite some maternal indications, Clover was not pregnant. She did gain weight (though we fed her more thinking she was pregnant) and she did go through a nesting phase, but no babies. Apparently it’s not that easy to tell when a rabbit is pregnant, and determining it mostly comes down to experience and knowledge (neither which we have yet). So this weekend we’ll try breeding our other doe, Artemis. I’ve done some additional reading and feel more confident about how to maximize our chances of fertilization. Who ever thought breeding rabbits would be hard??

What did you do?

Rural Relations with Josh: Lessons Learned, Part III – Is Rural Living Right For You?

When considering the purchase of a rural home it’s important to look at how much it will change your life. It’s convenient living in, or near, the city where stores, jobs, and services are nearby. There is also internet access and utilities that may not be available in a more rural area. Unless you have a steady income from retirement, or disability, or you’re independently wealthy, you need to have gainful employment. If you can handle these possible down-sides, living in a rural environment has a lot of up-sides that, I believe, more than make up for the negatives. It’s great to see wild life, enjoy the silence, and have room to raise animals and plants for personal and/or financial gain.

One of the challenges of moving to a rural area is commuting to the city for work, or finding a way to transfer a career to a more rural area. Other options include telecommuting or home-based jobs that provide the needed flexibility. I have an occupation which allows me to work from home 95% of the time. One of the greatest challenges that I have faced is finding good internet service. I rely on high-speed internet for work to join conference/video calls, solve customer problems, and generally enjoy the benefits the internet has to offer. Other challenges include commute time, gas expenses, and shopping availability. Since we often have to travel a lot further to shop we have to plan accordingly and stock-up.

Shortly after moving into our new house, about 30 miles from Seattle, I called around trying to find high-speed internet service. I was dismayed to discover that the options were limited to satellite, mobile hot spot, or a land line. I tried both satellite and a mobile hot spot with mixed results. Satellite internet provided sufficient bandwidth but with high latency it felt pretty sluggish. The mobile hot spot worked, most of the time, and was fast enough, most of the time, and had low latency, most of the time. In my line of work, quality/reliable high-speed internet is a requirement. I ended up signing up for a $435/month T1 connection that would provide 1.5Mb with unlimited usage each month. This type of connection is extremely low latency and no shared bandwidth which provides a consistent connection at a very high cost (relative to consumer prices). I remain shocked that living this close to Seattle I struggle to find quality affordable high-speed internet.

Another problem I face is commuting to various locations around the greater Seattle area. Even though downtown Seattle is only 40 miles away, it takes me up to an hour and a half to get there. Any time I have to drive to a job it’s a road trip. I pressure all of my clients to let me work remotely and work harder because of it. Working from home has saved me around $400/month in gas expenses.

Living this way also encourages personal preparation and self-reliance as help/resources are much further away, the power typically goes out more often, you are more likely to get snowed in, or have a tree fall across the driveway, law enforcement/EMS takes longer to respond, etc., etc.. But in the end, living in a more rural area is well worth it to our family. Raising our kids in an area where they can run out and play in the woods and explore and adventure is a big deal, that’s how I grew up.