Momma Bear: Birth Control

We have grown up in a world where birth control is readily available. Now that I am in my 40’s, my tubes are tied so you might think I wouldn’t consider it a high priority. But birth control should be a knowledge priority for every prepper. While I personally no longer need to remember how to practice natural family planning, I am the mother of children who will likely marry and have their own children. It is our job as preppers to be teachers and impart as much knowledge and as many skills as possible to the next generations in a post-SHTF world, birth control knowledge included.

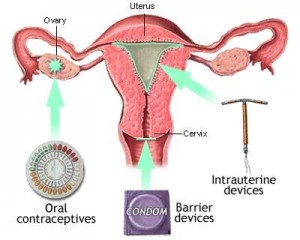
For those of you who currently use birth control but are done having children, I encourage you to look at a surgical procedure NOW to prevent unexpected conception. This is the same prepper approach of making sure we are all up to date on our medical and dental needs in case the SHTF (don’t put off the elective stuff!). For men, a vasectomy is a simple outpatient procedure with low risk of complications. For women, the tubal ligation is more involved and carries a higher risk of complications, but it is still considered a safe outpatient procedure. And both are considered routine elective surgeries covered by almost every health insurance plan. Should you choose not to go with the sterilization route, you can look at non-medication birth control like diaphragms/cervical caps. Although these will not last forever, they may be a more practical option than storing a case of condoms. One thing I would suggest to anyone who uses an “internal” form of birth control (such as an IUD or implant of meds), consider the potential risk of not being able to have them removed post-SHTF.
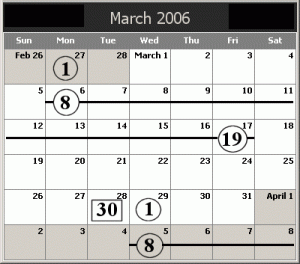
For knowledge and teaching purposes, we should all familiarize ourselves with the concept of natural family planning.  And by this I do NOT mean the old school rhythm method or anything like that. I know we have all had the classes in school about reproduction, but how many of us know the intricate details well enough to teach them? I feel that the best resources for learning to avoid pregnancies are the same ones that you study for trying to get pregnant: books about infertility. There are many more resources for infertility than there are for natural family planning. Infertility books focus, in minute detail, on the signs and symptoms of the fertility cycle. Basically, by studying how to get pregnant you can also learn how to avoid pregnancy–you are studying with a “WHAT NOT TO DO” approach; essentially learning when to avoid sexual activity. This is not 100% fail safe because women do not all have the same biology. But it is the best possibility we have of avoiding pregnancy without modern medicine.

There may be natural birth control products that you want to study and read up about. There are even a number of semi-useful ideas that evolved into modern-day birth control (bolstered by medications and chemicals). For instance, for centuries women made their own contraceptive sponges that they soaked in some liquid with sperm killing properties. This is an early predecessor to the Today brand contraceptive sponges. There are useful ideas out there, but you will need to weed out the old wives tales from the practical knowledge.
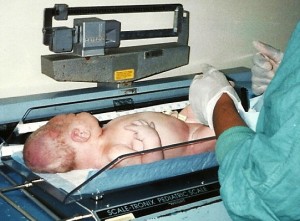
Why do I feel birth control is so important? Why do I think we all need to intimately understand natural family planning? Quite simply, pregnancy without medical care (i.e. a post-SHTF society) will mean an increased death-rate for women and newborns. My first child was over ten pounds and I had to have a complicated and risky C-Section (excessively large babies and twins run in our family.) In a post-SHTF world, that is a risk we would all want to avoid for our children. Remember that this topic is important and make sure you’re prepared with the knowledge to get it right when it is your turn to teach.

(Friday: What We Did This Week To Prep)

Momma Bear: Home-Made Reusable Sanitary Napkins

Just because the SHTF, the monthly cycle will still continue. Sooooooo… what are the ladies in your family going to use for their long-term feminine hygiene needs? Sure, you can stockpile a lifetime worth of sanitary napkins, but what are you going to do with the used ones? They do not compost, and because they are both plastic and filled with blood borne pathogens, you cannot burn them. It is a much better idea to have something reusable ready. So what the heck does that mean???

I found two options: First is something called a “menstrual cup” which comes in both a disposable and reusable form. I am sure from the name you have an idea of what it does, but I had never heard of it before. Ladies can research for themselves to see if that is something they would like to try.

The second option is the old school idea of reusable/washable sanitary napkins. What I was amazed to find out is that people are making these already and selling them on ebay, and other crafting websites, for a RIDICULOUS amount of money (around $10 for one washable pad)! I am here to tell you that anyone with a sewing machine or the patience to hand sew can make their own for a fraction of the cost. They can also be made by recycling old towels and flannel sheets, thus reducing your cost to nothing but thread and labor.

I recently sat down my 13 year-old daughter and broke the “reusable pads” idea to her. It was a great teaching opportunity. I started with a simple question and answer; asking her what she thought ladies did back before plastics, mass manufacturing, and easy access to stores. I explained that if there was a true emergency, resulting in a long-term power outage, we had to go with something washable. I was surprised that she was so open to the idea. So we hit the internet and found Tipnut.com, it’s a great site with MANY different kinds of tutorials on making sanitary napkins.

Because we don’t have surplus flannel sheets, we opted to hit up Wally world for some fabrics. We picked out some nice flannel for close to our skin (a yard for each of us) and something thick, fluffy, and cotton for the inner layers (three yards for the two of us). You can see from the photos that we are using the basic “wings” style pad with a snap for the underside. These are a two-part napkin consisting of the outer “liner” and then an inner “pad” for absorption. Although we used a pattern off the internet, you can just as easily trace what you have in the cupboard.

First, we made copies of our pattern and compared them to the store-bought stuff. In this case the top layer of the liner is one solid piece with wings, and then there are two bottom layers which are about 2/3 of the top pattern each with one wing. This is so that those two pieces (on the bottom) will overlap, allowing you to insert your inner absorption pad. These top/bottom layers are stitched together with the flannel (fuzzy sides) facing each other, then they are turned right side out, ironed, then overstitched again all around the edges. I also stitched an extra line around the pad area, to provide a crease point right about where the wings flip down, thus ensuring the pad wont slip around. Last, we added snaps to the wings.

After sewing all the liners we made the pads. These are anywhere from two to four layers of padding just sewn all together to make a firm rectangular pad. These are the interchangeable inner pads (this would be towelling or absorbent fabric) that are made in different thicknesses for the different levels of flow (*in the photo the opening to insert the inner padding is face up, but this would normally be face down toward the inside of the panty). While we opted for removable inner pads, there is no reason why you couldn’t just make them part of the liner and stitch the whole thing together. We just liked the idea that we could add more pads or take them apart for a more thorough washing. Because of the snaps these are foldable into little square packets for easy storage.

I personally do not sew on a regular basis and found curvy type napkins difficult to make, hence ours look kind of rectangular. I will also caution any novice sewers to make sure they wash and iron their fabrics, before beginning this project, because cotton shrinks. I have to admit that I had trouble with that stupid “snap kit” (and I lost my patience); instead opting to hand sew old school snaps on. Also of mention, we made multiple sized pads because 13 year olds and moms don’t necessarily use the same size of anything. I think in total we spent $23 on fabric and snaps and made ten liners for each of us and 30+ inner pads of different thicknesses. This was a pretty simple project over all that anyone can make.  No insanity required.

(Friday: What We Did This Week To Prep)

Trace’s Note: Be sure to also read our follow up posts by Sierra Kate: Reusables, Self-Reliance & Feminine Hygiene Part  1- Options, and Part 2 – How Do They Perform?

Being Prepared In Body, Mind, and Spirit

If we knew the world around us was going to collapse tomorrow we’d hope that we were as prepared as possible. We’d hope we had adequately covered our five basic needs of food, water, shelter, security, and energy. We’d hope we had built in redundancies for the unavoidable failures and shortcomings. We’d hope we had developed some type of community knowing we can’t survive alone.

But what kind of condition would your body be in? How are you physically, mentally, emotionally and spiritually?

In the past couple of weeks I have gone to see both my dentist and my doctor (actually nurse practioner). Both visits were just normal check-ups. But the medical appointment was the first physical I have had since getting out of the military 13 years ago. What motivated me to finally go (medical-type people are the worst), was the same thing that’s motivated me on most of my projects and new endeavors over the last few years — the desire to be prepared.

Motivators in are lives our important. Most of us are intelligent and aware enough to know what we should do, but finding the time, desire, and motivation is hard. Most of need more motivation than, “just because I should.”

For example we all know that physically we should:

  • Exercise regularly. Thirty minutes of moderate, varied exercise five days a week.
  • Eat well. A moderate intake of a healthy variety of quality foods.
  • Drink plenty of fluids (especially water). Experts say that the amount should be two to three liters of water per day (more in hot weather or if you’re exercising heavily).
  • Get enough sleep. This means seven to eight hours of sleep, every night.
Prophylactically we can/should:
  • Have a physical exam. At my exam I found out my cholesterol was a little high and my Vitamin D was low; both things I can easily correct now that I know about them.
  • Have dental exam, and complete any needed work. I had the beginning of a couple of cavities; I’m sure they could wait, but I chose to get them taken care of now when there is easy access to dental care. Personally I’d rather avoid dental work during a collapse.
  • Ensure immunizations are current. I’m not talking about things like the flu shot (I choose not to get those), but I found out I needed a Hepatitis A vaccine and a tetanus booster. Both of those are diseases that could be rampant in a collapse.
  • Consider getting lasix eye surgery to correct your vision. Or stock up on lots of extra glasses, imagine going without.

But there are other ways to stay “fit” that we don’t  think of as much, like what do you do to keep your mind active? If you’re a prepper you’ve got this one covered already, because there is always so much out there to learn. But simple activities like doing crossword puzzles, sudoku, playing games, math in your head, anything that keeps the cognitive function, um, functioning and challenged on a regular basis.

What about your emotional health? This is one that many of us prefer to ignore, because “we’re fine, thanks.” But it is crucial to have a good emotional support system. How do you release the built-up stress of day-to-day activities? Maybe through exercise, meditation, music, talking, pets; it doesn’t really matter as long as you know what it is, and it is working for you. Knowing who you can you talk to when you’re down, a friend, a family member, a spiritual leader, a counselor; again the choice is yours, but there must be someone — there are times we all need someone to lean on.

Then there’s spiritual. This is an interesting one because we tend to be dichotomically divided here. Either religion/spiritualism/belief is a big part of our lives, or it isn’t at all. But I feel that people need something to believe in, something they see as bigger than themselves, something to strive for beyond this life.

Statistically speaking we know the world isn’t going to collapse tomorrow, or probably not even the next day. But I think we all believe that the world, as we know it, is going to have some major changes in the relatively near future. In a collapse I can only imagine that everything that can go wrong will go wrong. Physical problems will surface with the increased amount of physical effort required. Stress, anxiety, depression will be compounded exponentially. Little issues, that we all have and may just be inconveniences now, will no longer be able to be hidden away when you’re hungry, tired, scared, in pain, cold, worried, and lonely.

No one can be responsible for taking care of your body but you. It’s not being selfish to take care of yourself; if you don’t take care of yourself then you can’t take care of anyone else. Make it a priority to be ready.

(Wednesday: Momma Bear)


Teaching The Kids (& Learning More Myself) – Trauma First Aid

Teaching About Pressure Dressings, Tourniquets, QuikClot Bandages, and Israeli Battle Dressings
– –
Because of my background–as an Army medic and civilian paramedic–I sometimes forget that not everyone understands the basics of first aid. To me it’s very logical: if there’s bleeding – you need to stop it; if they’re not breathing – you need to try and restart it; if they’re pale and dizzy – lay them down and keep them warm, etc. I forget that hurt and/or sick people frequently make others uncomfortable. I forget that blood can be scary and that people don’t know it’ll be slippery, then sticky. I forget that crying out in pain isn’t as easily ignored by others, as you’re calmly and systematically evaluating the source of that pain. And the list continues.

However, I do try to remember to teach first aid skills to my family. Not to make them experts, but so they will know the basics and recognize the major symptoms. Also, since in most collapse situations I’ll be the medic for whatever group I’m with, maybe one of them will learn enough to help me care for others (or themselves, or me…)

I’ve recently made personal trauma FAKs* for Sarah, Ryan, and Brynn (Emily and Alison have less space and a much abbreviated version), and I want them to know how to use the contents when they’re needed (and I’m not around). This week we reviewed pressure dressings and tourniquets (I’ve taught them before), then introduced stopping bleeding with a QuikClot bandage and how to apply an Israeli Battle Dressing.

Pressure dressings were a review (with varied amounts of correct recall). To create an effective pressure dressing, to stop moderate to heavy bleeding, I taught them (using a “wound” drawn on my forearm) to start by folding up a piece of gauze and putting it directly over the wound. Then, while applying direct pressure, use a tightly rolled cravat (aka triangular) bandage to apply more pressure over the initial dressing. To make the actual pressure dressing, take a second cravat and, folding it so it covers the pressure cravat, wrap it around the limb. Wrap it tightly and then tie the ends, in a square knot, on top of the pressure dressing. A pressure dressing done this way will stop all but the worst wounds, i.e. one’s with arterial bleeding (remember arteries are deep blood vessels, coming from the heart, carrying oxygen, under pressure).

For “the worst wounds” I’ve taught them to apply a tourniquet. Again we use cravat bandages, this time two (or three for a leg wound). This is hard to show (maybe I’ll make a YouTube video, if there’s interest – never done that before). Tie it securely around the limb about two inches wide and about two inches above the wound. Make sure it is secured tight enough to stop the artery from flowing (and thus bleeding). Then tie off the tourniquet, placing the knot over the artery. To check that it’s effective, when practicing, see if you’ve stopped the distal pulse.

I recently bought QuikClot bandages at the gun show. I hadn’t used them before, so I read reviews and watched YouTube training videos. Then, using an accordion folded three-inch gauze roll to simulate the (rather expensive) $14 QuikClot, we practiced. I had them feed it directly into the (simulated) wound, right into the bleeding, until the bleeding slows; then use the rest, rolled tightly, right on top of the wound as a pressure dressing and secure it with a cravat. I also had everyone watch the training video.

Lastly they each applied the Israeli Battle Dressing (IBD), aka the Emergency Bandage. I love IBDs, but I feel they are too big for easy day-to-day carry in a small FAK (and a pressure dressing or tourniquet can be made with cravats). But we do keep them in our BOBs and our larger home FAK. I’m not even going to try and describe how to put one on (you need to watch the video). They are a great tool to stop heavy bleeding and I highly recommend them (but again, they’re just another tool).

We’ll continue practicing these skills–medical skills are perishable and easily forgotten–until they can do them competently, in a dark room with their flashlight. Each time I will introduce new ideas and scenarios.

Teach your kids–and spouse–the skills you know; you may not be around when they are necessary. And remember, “To teach is to learn twice.” (- Joseph Joubert)

(Wednesday: Sarah’s View)

*For my list of abbreviations and other information, open the above ‘Check Here…’ page tab.

What’s In Our Personal First Aid Kits

“Quick Grab The First Aid Kit!”
– –
There are many pre-packaged first aid kits (FAK*) out there, but I believe you should build your own. To help you do that I’ve included what I do, and don’t, include in my own personal FAK; my choices are based on over 10 years working in emergency medicine as both an Army medic and a civilian paramedic. When it comes to first aid kits (FAK*) I definitely believe in the KISS principle of: keep it simple stupid. My primary goal, for these kits, was to be able to stop bleeding–big or small–quickly and efficiently. Almost all items in the kit are related to that purpose – this is essentially a prepper personal trauma kit.

What is in our Personal Trauma Kits

  • cravat bandages – I believe cravats are the cornerstone to any FAK. I use them as pressure dressings, tourniquets, to dress wounds, and as slings – if one isn’t long enough, tie two together (or three). I prefer white ones so you can see if blood is soaking through, the military type are green which is good for camouflage, but bad to see blood.
  • 3×3 gauze pads (it’s what I had, 4×4 would be fine too)
  • assorted size band-aids – Because common things happen commonly and it’s important to control small bleeding also.
  • Quik-Clot Combat Gauze – A lifesaving product when it comes to bleeding. Applied correctly you can stop almost any bleeding in less than three minutes. (It’s expensive though, about $15 each.)
  • Wet Ones antibacterial wipes – To clean away dirt, grime, and blood.
  • Gorilla Tape (Gorilla Glue’s version of duct tape, without the sticky residue) – We made our own rolls containing about 25 feet of tape. It costs less than medical tape and works better. Always ‘tab‘ the end of any tape to make it easy to find and unroll. (If you already have medical tape, use the two-inch variety.)
  • trauma shears – Heavy-duty scissors to cut away clothing or cut bandages.
  • rubber gloves – I don’t believe gloves are essential, especially when working on family members, but they’re nice to have. They help protect you from blood borne diseases, i.e. HIV or Hepatitis (put in a couple of pairs, they can tear).
  • pouch – I like a clear one so it’s easy to see contents, but any small pouch will work.
  • red carabiner – (This is a ‘Trace original’). You/or someone else will have to be able to quickly find your FAK while blood is flowing. The red carabiner is attached with a cord to the FAK, then it is clipped to the outside of your backpack. When the FAK is needed, find the carabiner, open the closest zipper and pull out the kit attached to the cord. (We also use this on our BOB.)
  • LED keychain flashlight (not pictured) – These things always happen in the dark. Yes you have one on your keys (EDC), but it’s good to be redundant on some things.

That’s it, pretty simple and small; if it’s too big, people won’t carry it. Sarah keeps hers in her work backpack and the kids’ are in their school packs. All our kits are the same, so any family member could easily grab any kit and know what it contains. Could it contain more? Sure. There are even some items that would be nice to have that I didn’t include because of space. There are also many other commonly included items that I didn’t include because I  don’t believe they are necessary.

What’s Not In Our Kits:

  • medications – Though some OTC meds are nice to have available, they don’t belong in here.
  • alcohol or iodine wipes – The antibacterial wet ones are much more effective at cleaning, and less caustic on the sensitive damaged skin.
  • cold or heat packs – They’re useful, but they’re not about stopping bleeding. They also take a lot of space.
  • suture kit (or steri-strips) – Even if you have the knowledge to use them, wounds shouldn’t be closed until they are thoroughly cleaned. They should never be closed in the field.
  • sterile gloves – Why? Yes you should have gloves, no they don’t need to be sterile.
  • first aid manual – When blood is flowing it is not the time to be looking things up. Learn the basic skills required and leave the books at home.
  • CPR mask – We’re focused on stopping bleeding, if they require CPR–and you choose to do it–the mouth-to-mouth method can be used.
  • medical tape – It’s more expensive and other types work just as well.
  • emergency survival blanket – Space blankets sound good in theory, but they’re not so great in practice. They also take up too much space in a small trauma kit.
  • pre-cut eye pads – Overly specific item that can be improvised if needed.
  • abdominal dressing – Too big.
  • antibiotic ointment (i.e. Neosporin) – Clean the wound as best you can with the wet ones, then dress it. Worry about a more thorough cleaning and ointments, if necessary, later.
  • burn cream – Again, nice to have, but not in this kit.
  • Israeli Battle Dressing – I love these things (and have them in my home and BOB FAKs), but they were too big for this kit. I believe a properly applied cravat bandage can achieve the same goal.
  • ACE Bandage – I also like these a lot, but again too big. If you use them, wrap carefully to avoid tourniquet-like pressure – unless that is what you’re trying to do.
  • gauze bandage roll – Nice to have to dress a wound, but takes a lot of space.

Now build your own FAK. Think about what you are preparing for; remember back to injuries you, or others, have had and think what would have helped you treat those wounds. Put in what you want, know why it’s there and know how to use it – through practice, not just in theory. Own your FAK.

(Update: Since putting this list together I have also added a Combat Application Tourniquet (CAT), it’s a true 1-handed tourniquet that can be used on both upper and lower extremities. Also a pair of heavy duty tweezers (Uncle Bill’s Sliver Gripper Tweezers).

(Friday: What We Did This Week To Prep)

*For my list of abbreviations and other information, open the above ‘Check Here…’ page tab.


Knowing Your First-Aid Kit & How To Use It

“I’ll Figure It Out”

Your loved one is hurt. Blood is flowing, you can’t even tell from where. It’s too dark to see well. It’s cold. You’re alone. They’re scared. You’re scared.

We all know it’s important to have a good first aid kit (FAK*). But even more important is basic, solid first aid knowledge. It’s easy to buy a super-duper, has everything–including field surgery equipment–FAK and think that you are covered when it comes to any first-aid scenario. But buying stuff is easy, you must learn the skills–especially when it comes to first aid.

Fortunately learning basic first aid skills is pretty easy: opening the airway, stopping bleeding, protecting the injury, treating for shock, cleaning wounds, etc. Unfortunately developing the proficiency to be able to quickly react and appropriately deal with these emergencies is much harder. Medical knowledge isn’t like riding a bike, it’s perishable – if you don’t use it, you do forget. That’s why medical professionals, at all levels, are constantly taking continuing education classes, re-certifying, and teaching others. I can show you how to put on a pressure dressing and you can practice a time or two – but a year later, when blood is flowing and must be stopped, you may not remember. You must develop the basic skills needed and then regularly practice them.

Back to the pre-packaged super FAK. Do you even know what’s in that kit? By knowing, I mean, can you identify each item, explain why it’s there, and do you have experience using it? My problem with pre-packaged kits is that everything comes in a nice pretty package, neatly stored in it’s own container, perfectly fit in it’s proper spot. Most of us prepper types–whether we want to admit it or not–are a bit OCD; we like things organized, and neatly put in their proper locations. So when it comes to that pre-packaged kit we do not want to open up all the little packages and see what’s in them, or move them around; we want them left alone, neatly packaged away, for a time we might need it.

But when we do need“it” too many people have the mindset: I’ll figure it out if/when I need to. That thought process implies that you’ll very quickly–under a stress-filled, potentially life-threatening situation–figure out what equipment you have on hand (and what you don’t) and how to skillfully apply it. That’s not the way things work; we don’t rise to the occasion like that. Instead we revert to the level of training we’ve developed proficiency at.

What I recommend, when it comes to your FAK, is to build your own (I differ from some other medical people on this). There are medical people who say that FAKs aren’t like putting together a fire building kit or a BOB; that people don’t really understand what is needed in a medical kit. My response to that is if they don’t understand it, it shouldn’t be in their kits. If it is important to you to have a good FAK, then it’s important to take the time to assemble it and know what each item is and why it is in there.

Also, the side benefit of making your own kit is that you will save money. Anything that is labeled for medical purposes and/or individually packaged costs more. Once you understand what an item is you may not have to buy the medical version of it, ie. a cravat bandage and a bandana are about the same thing. And it’s always cheaper to buy items in bulk.

On Wednesday I’ll write about the FAK my family members carry on a regular basis. What we put in them and why. It’ll be sort of anticlimactic because it’s really just a simple kit. But each of them know where their FAK is, what it contains, and how to use each item in it.

(Wednesday: Quick Grab The First-Aid Kit!)

*For my list of abbreviations and other information, open the above ‘Check Here…’ page tab.

Book Review: Where There Is No Doctor

by David Werner with Carol Thuman and Jane Maxwell

After posting my review of The Doom and Bloom Survival Medicine Handbook, I’ve had questions about how it compares to Where There Is No Doctor. Where There Is No Doctor is a medical reference that many have heard of, but few know much about. I thought it would be useful to review this also, and allow people to make the comparison themselves.

Where There Is No Doctor is published by Hesperian Health Guides. Hesperian is a altruistic nonprofit organization that publishes medical guides to “provide knowledge for action, and inspire action for health”. They have an open copyright and encourage the free and wide dissemination of all their material. They have many additional references available including: Where There Is No Dentist, Where Women Have No Doctor, A Community Guide to Environmental Health, and Water for Life.

Where There Is No Doctor is an incredibly useful reference that all preppers should have. NO EXCUSES, IT’S FREE! Just download the PDF. I’d recommend both printing it (it’s about 450 pages), and also storing it in a digital format (like a flash drive) that you can easily take with you.

The Hesperian publications are known for their simplicity of expression and copious illustrations. Their goal is to make them suitable for use by ordinary people in their homes and communities. They were originally written for rural Western Mexico, for a tropical and subtropical environment. They cover, in appropriate detail and diagrams, almost every medical problem and injury that is likely to occur in those areas. Their focus is primarily a third-world village audience.

Since the native culture, baseline medical understanding, and society is different than ours, much of that isn’t directly relevant to us. For example, they discuss the efficacy of traditional medical beliefs and whether they work or not – and why. However, in a collapse, our world will not be vastly different than theirs is today. Ironically, with their understanding of local plants and traditional healing methods, they will be better prepared than those of us who today depend on our family doctor or local ER.

There is also an involved discussion on diet and nutrition. While this is not as relevant in our current day-to-day lives, in a collapse–when you will be required to make each meal from scratch with locally available products–it would be very useful.

At the end are “The Green Pages”, 60 pages of prescription drug information. This section  contains appropriately detailed directions of how and when (and when not) to use prescription medications. The book concludes with a helpful glossary, index, and list of additional resources.

Because they are aware that some villages are very remote and medical assistance can be difficult to reach, they give as much information as possible to facilitate local care. But this book wasn’t written for a collapse, and they do encourage seeking out, or traveling to, additional medical assistance as necessary. Of course in collapse, as Dr. Bones and Nurse Amy stress, there won’t be much additional medical assistance anywhere.

Don’t underestimate or disregard this book because you feel it’s for those people in those countries. Yes, they discuss some regional and societal issues, but most health problems are similar for all of us no matter where we live – especially in a collapse.

My recommendation: download and print yourself a copy (it’ll only cost you the price of the paper) review it, and keep it in your medical reference library next to your copy of The Doom and Bloom Survival Medicine Handbook. Both of these books are very good; used together I believe they provide the best collapse medicine resource library available today.

(Wednesday: Sarah’s View: Time To Order Seeds)

Book Review: The Doom and Bloom Survival Medicine Handbook

by Joseph Alton, M.D. and Amy Alton, A.R.N.P.
(aka Dr. Bones and Nurse Amy)

Dr. Bones and Nurse Amy, of the Doom and Bloom Hour, are my definitive ‘collapse medicine’ experts. So I was thrilled when I heard they had published a  medical survival book and I immediately ordered a copy. When it arrived, I spent several days pouring through it.

I could not be happier, it is outstanding! Dr. Bones and Nurse Amy have written a first of it’s kind, an incredible medical reference in the–previously non-existent–category of collapse medicine.

They tell you what to do when, “Help is NOT on the way” ever.

Collapse: The situation after a TEOTWAWKI event; modern society, infrastructure, and systems as we know it will no longer exist.

Collapse Medicine: Medical care that will be provided when “there is no access to modern medical care, and there is NO potential for accessing such care in the foreseeable future.”

First aid books tell us, when treating a critical patient, to first stabilize then transport to a hospital emergency room. This one doesn’t. This one can’t – in a collapse there won’t be any. This book is written in plain easy to understand English, and it is written for you. You, the non-medical provider who takes it upon his or her self to assume the medical responsibilities for the group; doing your best to keep your people as healthy as you can.

The book begins by teaching you how to become a medical resource. It provides detailed lists of Likely Medical Issues You Will Face, Medical Skills You Will Want To Learn, and Medical Supplies you’ll want/need (including a thorough list of what to stock in your medical kit).

There is not only a valuable section explaining Natural Remedies (including a chapter on Essential Oils) but, whenever possible, it shows you how to effectively use them in conjunction with traditional (allopathic) pharmacology. Someday the only medicines available may be the ones you can grow and gather.

This book is as all-encompassing as I believe it can be. From respiratory infections to fractures to hypothermia to pregnancy and delivery, the chapters and the knowledge continue. There is even a detailed chapter on suturing; including when–and when not–to close a wound. If you can think of a medical problem that you may have to deal with in a collapse, there’s information about it in this book and more. Then, to further your medical education, they include a list of medical reference books you can add to your library and YouTube videos that demonstrate the procedures discussed.

The book concludes with information I don’t believe you’ll find written anywhere else; on the medically controversial topics of stockpiling medications (prescription and over-the-counter), how to use antibiotics (without a doctor’s guidance), and what drug expiration dates really mean.

Finally, I especially appreciate that they dedicated the book to me – okay, all of us. We, who will take on the medical responsibilities when there are no others; the ones who your group will affectionately call ‘Doc’. To us, Doctor Bones and Nurse Amy write, “…we both dedicate this book to those who are willing to take responsibility for the health of their loved ones in times of trouble. We salute your courage in accepting this assignment; have no doubt, it will save lives.”


Walk A Mile In Your Shoes, Part 2*

Boot Selection and Common Hiking Injuries

Boot Selection

Before you walk too far–either by choice or circumstance–I’d strongly encourage you to get a good pair of hiking boots. What I believe you need (as an individual striving to be prepared) is a heavy boot made of leather, at least six inches tall, with a quality sole, and preferably with a water-proof lining. These boots will be a relatively expensive initial investment, ranging from $200 – $300. But, if well cared for, they will last for years and you (and your feet) will never regret that purchase.

A trail shoe, or light weight boot may feel very comfortable, but it won’t hold up to serious walking; especially off-trail and/or for multiple days. A heavy boot will be rigid enough to support your feet (arch and toes), will provide shock absorption for your joints (all the way up to your lower back), will provide good ankle support, and it will last.

If your feet get wet and/or cold you will be miserable. To keep your feet dry, I recommend you buy a boot with a waterproof (such as Gore-Tex) lining. To keep your feet warm, insulated boots are available. Boots insulated with 200 grams of Thinsulate will keep them warm in temperate climates, 400 – 600 grams will work well in cold climates, 1000 grams will ensure warm feet in extreme conditions.

The biggest disadvantage of a heavy boot, other than the initial cost (and the weight), is that they are stiff and require a break-in period. We’ve discussed before that you can’t  buy stuff to have ‘just in case’; this is especially true with a heavy hiking boot. You need to walk in them, start with shorter walks and build up. Figure out how to adjust and lace them up comfortably, and what kind of sock(s) to wear. As endurance improves, start going on longer walks, on dirt trails, carrying a pack.

Common Hiking Injuries

Blisters are formed when skin is damaged by friction (this is accelerated by wetness). Fluid collects between the upper layers of skin, attempting to cushion the tissue underneath and protecting it from further damage. Wet feet, poorly fitted boots, boots not properly broken in, and unconditioned feet all can result in blisters.

Shin splints–pain when you lift your toes to take a step–are frequently caused by a muscle imbalance, specifically tightness of the calf muscles and weak shin (tibialis anterior) muscles. Too quickly increasing intensity and duration of walking causes these lower leg muscles to become fatigued and makes it difficult for them to absorb the shock of the impact from each step. This impact is worse when walking uphill, downhill or on hard surfaces; wearing poor or worn-our shoes also contributes.

In addition to muscle soreness in your feet and legs, your lower back muscles can become fatigued and sore as they are forced to stabilize, along with the abdominal muscles, the upper body each step you take.

Once you throw on a pack your shoulders and neck may become sore from the additional weight. Loading a pack efficiently, with proper weight distribution, takes practice and experience. Remember to use the waist strap, and consider using the chest strap, to redistribute the weight.

We take our ability to walk for granted. We assume that if we need to we can walk as far as is required. But–in the modern, inactive, motorized world we live in–distance walking is becoming a lost skill. But it’s an easy one to regain: invest in a good pair of boots, break them in properly, and start walking.

(Friday: What I Did This Week To Prep)

*review Walk A Mile In Your Shoes, Part 1

Rain, Rain Don’t Go Away

Thoughts on Rain Barrels

In last week’s post, What Goes In Must Come Out, I discussed using water collected in rain barrels to flush the toilet. I’ve been asked for more specifics about rain barrels and how much water would really be available.

There are a lot of resources on how to build a rain barrel. A good article is Make Your Own Rain Barrel and a useful YouTube video is Urban Survival’s, How To Make A Rain Barrel. There are specifics you will have, such as what type of barrel you use and how you will deal with the overflow. But all rain barrels need to have three plumbing features:

  1. a downspout that drains the roof water into the barrel: I cut our downspout and diverted the water with a couple of downspout elbows
  2. a faucet at the bottom
  3. an overflow near the top: I used three-inch PVC pipe (and a downspout adapter) to channel the water back into the original downspout, which goes into the ground

How much rain water can you collect? To figure that out go to save-the-rain.com. Enter your address and a Google Earth picture of your neighborhood will come up. Zoom in on your house, click each corner of your house until the roof area is covered, then hit Finished. The following Results will be displayed:

  • the area of your roof is, in square meters. (To convert to square feet multiply the square meters by 10.76.)
  • the amount of rain your area receives in a year, in millimeters. (To convert to inches multiply millimeters by 0.039)
  • the amount of water you could harvest, in liters. (To convert to gallons multiply by 0.264.)
  • and how many times, using that water, you could flush the average toilet. They are estimating the average flush to be 6 liters (or 1.58 gallons). Our toilet tank holds 3 gallons, so I’m basing my math on that number.

At our house here in Western Washington (where rain is plentiful) our results were:

  • roof area: 168.6 sq m = 1814.8 sq ft
  • average annual rainfall: 1100 mm = 43.3 in
  • potential rainwater harvest: 185,450 l = 48,990 gal
  • toilet flushes: 16,330 (3 gal tank) [flushes per day for a year: 45]

For comparison, using the same roof area, Colorado Springs, CO (where I grew up) has an average rainfall of 19.6 inches (less than half of ours).

  • potential rainwater harvest: 22,174 gal
  • toilet flushes: 7,391 (3 gal tank) [flushes per day for a year: 20]

There’s a lot of water draining off your roof available for collection. These numbers are assuming you collect all the water that lands on your roof (we’re collecting from two of our four downspouts). How much you store, and how you use it, is up to you.