Sierra Kate: Reusables, Self-Reliance & Feminine Hygiene, Part 2 – How Do They Perform?

Last week I wrote Part 1: Options, about alternative reusable menstrual products from a prepper perspective. However, potential users of a new alternative feminine hygiene product will also want to know how well it performs/functions. That is what I am here to discuss this week.

FIRST – OUR CHOICES:

Disposables

  • Pads & Tampons – semi-synthetic rayon
  • Pads & Tampons – cotton
  • Menstrual Cups – elastomer

Reusables

  • Pads – cotton
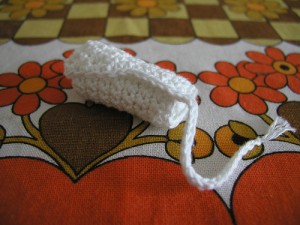
  • Tampons – natural sea sponges or cotton
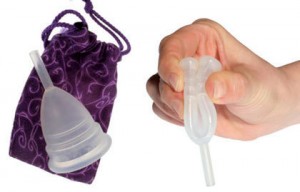
  • Menstrual Cups (bell-shaped cup used internally) – natural latex rubber or medical-grade silicone

Let’s compare our options, shall we?

Reusable Menstrual Pads

Reusable Tampons – Sea Sponges

Reusable Menstrual Cup


SECOND – REVIEWING PERFORMANCE:

1. Comfort

  • Interior winner – Menstrual Cups. No internal options are felt, but cups win because they are non-drying and do not interfere with one’s healthy and natural lubrication or secretions.
  • Exterior winner – Unclear. It’s a trade-off; next to sensitive skin the winner is probably the more bulky cotton pad that is soft and breathable. But some prefer the thinner, less breathable rayon,  but it does have potential irritants.

2. Convenience

a) Capacity

Winner – Menstrual Cups. The 1-ounce cups have double the capacity of a max-absorbency tampon. That means half the bathroom trips!

b) Portability and Active Living

Winner – Menstrual Cups. You only need one cup at any time, they are easy to clean and there is no trash to hide. Cups are popular with outdoor enthusiasts, including wilderness backpackers. Also, the non-drying cup can be put in the day before you expect your period.

3. Cost

Winner – Menstrual Cups. Both reusable cups and pads last at least 5 to 10 years. A cup costs about $30 to $40; a commercial set of reusable pads about 2 to 3 times that. A set of two sponges costs $13 and last 3 to 12 months.

4. Health

a) Hygiene 

Winner – ALL. No menstrual products are sterile; however they are all sanitary with proper care.

b) Harmful Substances

Winners – Reusables. Processing rayon requires a lot of chemicals that are potential toxins or irritants that may leave traces in the final product.

c) TSS and Microbes

Internal Winner – Menstrual Cup. The cups smooth surface does not lend itself as easily to microbial growth; tampons, especially high-absorbency, seem to be associated with TSS, along with causing micro-abrasions.

d) Odor

  • Internal winner – Menstrual Cup. The menstrual fluid is not exposed to any air, which eliminates odor.
  • External winner – Cotton pads. Cotton allows moisture to evaporate, which reduces odor.

5. Environmentally friendly

Winners – Reusables

6. Anatomical Fit Concerns

For cups a good rule-of-thumb is if the person (this includes virgins) has no problems using tampons then they should be able to use cups. If you can’t use disposable tampons, but dislike pads, consider trying sea sponge tampons. At the bottom I’ve included a link to a positive review of them by a women affected by pelvic organ prolapse.

7. Learning Curve

Cups are more hands on, and require you to be comfortable, or willing to become so, with your body and intimate anatomy. Most users say it takes 2-3 cycles to get the hang of easily inserting and removing them.

8. Customer Service

Winner – Reusables. Companies of reusables are knowledgeable and helpful. They have to be, they mostly advertise by word of mouth.

9. Care, Cleaning, and Storage

Reusable winner – Menstrual Cup. The cup’s smooth surface is simple to clean. It is also easier to care for away from home than the reusable absorbent options. In a pinch, after emptying, if both the cup and your clean hands do not come into contact with anything else then it isn’t necessary to wash the cup before reinserting.

10. OKAY, but are they pretty?

Really…? Sigh. Yes! They have cute pouches. Many pads do come in awesome colours and patterns. A few cups come in bright pretty colours. Sponges, I think, already look decorative. And then you can make your own pads, tampons or carry pouches as beautiful as you like. What I find beautiful is how well reusables work. The disposable synthetic products, to me, are a disappointment, not just environmentally but from a health and performance point of view.


Disclaimer: I claim no special medical knowledge. I wrote from my personal experience with rayon products and menstrual cups; most of the rest was obtained from Internet research.


RESOURCES

Disposable 100% cotton pads and tampons:

Disposable menstrual cup: http://www.softcup.com/faqs

Reusable cloth pad brands:

Pads4Girlshttp://lunapads.com/about-us/donate-pads

To make your own cloth pads:

Reusable sea sponge tampons

Reusable menstrual cups

Lastly, the following is a link to a story with a very rare concern with tampons that is not about rayon, dioxins, chemical irritants or even TSS bacteria. Open at your own risk of being utterly and horrifyingly grossed out: http://www.wfaa.com/news/consumer/Test-Results-Confirm-Mold-on-Tampon-147404735.html


Sierra Kate: Reusables, Self-Reliance & Feminine Hygiene, Part 1 – Options

Contributed by Guest Blogger: Sierra Kate

Question: What can make you self-reliant for longer that uses up less space and money? Answer: Using reusable items instead of one-use disposables. I am here to discuss a much-neglected category under disposables: Menstrual Products. <Crickets>. Humour me for a moment and contemplate this, I read about one family that had an estimated seven years of tampons stocked. You want an idea better than that right? Consider reusables menstrual products. Believe it or not reusables are better in many ways, but that is literally a whole other post.

Pads, tampons, and menstrual cups all come in reusable forms. Reusable cloth pads are typically made of cotton, a breathable absorbent fabric. Commercial cloth pads are about $10 per pad. Many people make their own pads to reduce costs; there are plenty of how-to instructions on-line (see Momma Bear’s post: Home-Made, Reusable Sanitary Napkins). Cloth pads last 5 to 10 years. Commercial cloth tampons, or patterns to make them, are much harder to find, but they are out there. One non-cloth option is reusable tampons made from natural sea sponges, a 2-pack is $13, and they can last 3 to 12 months.

I favour the reusable menstrual cups. They are bell-shaped and are typically made from natural latex rubber, or silicone. About the size of a shot glass, they sit internally and collect menstrual fluid instead of absorbing it. They cost about $30 to $40 and last 5 to 10 years. You can easily increase your self-reliance by stocking up. Doing the math, 4 to 8 individual menstrual cups (or sets of cloth pads) could last a woman until menopause.

What about being able to make them yourself and be truly self-sustainable? Most people wouldn’t consider it on this matter, because it requires a lot of research and hard work, and the above options for self-reliance don’t take up a lot of space. But, out of curiosity, “what if”?

If you are interested in self-sufficiency when it comes to menstrual products you have a few options. Start with growing a natural fiber. Cotton (a sub-tropical bush), soft and absorbent, is the best option. The second best would be low-THC hemp (wide geographic range), however daft legal issues currently abound on this topic. Natural sponges have been harvested for millennia as luxury items; however this is dependent on a viable sponge population living nearby (such as Florida). Lastly, ones made from rubber. Natural latex rubber has many uses, and is created by curing latex, a milky plant sap. A tropical tree is used commercially; other sources of latex are guayule and common dandelions. Silicone rubber is made from silica (a sand used in glass-making) and other compounds and has been produced for about 60 years. You can find rubber mold-making-kits if you want to tinker, as rubber has all sorts of uses. The Native Americans made latex rubber for millennia but theirs may not have had the quality or consistency of modern rubber production.

Ironically, there are many other good uses for disposable tampons after TEOTWAWKI. There are a total of ten(!) survival uses in this article: The Swiss Army Survival Tampon – 10 Survival Uses.

So from a  self-reliance prepper perspective, stocking reusables is great. But perhaps you, or a fellow prepper, are not convinced. If you are wondering if this will work well from a user perspective, I use menstrual cups and I’ll tell why it is better in next week’s Part 2 post.

Sierra Kate’s Bio
Kate currently lives in small-city Canada and has just come across the world of prepping. What initially grabbed her interest in prepping is how well it fits in with her own intellectual inclinations and desires for a healthy lifestyle that has sustainability, self-reliability, utility and minimalism in mind. She enjoys solitude and her hobbies include reading and biking.


What We Did This Week To Prep 10/19/12

We started off the week making salsa. After picking all the remaining tomatoes from our garden (red and green), digging up a couple of onions, and picking the last of the cucumbers (because they were there), we set to work cutting everything up. Last year was our first salsa making experience and though it came out pretty good, I wanted to try a new recipe this year. A couple of months ago I had seen a post on The Homestead Fritz – How To Make Great Salsa; there he mentioned that his coworkers described it as, “the best salsa they have ever eaten.” With that recommendation, I decided we’d give it a try. With all six of us cutting stuff up: tomatoes, onions, pepper, jalepenos, garlic, cilantro, and cucumbers (again because we had them, figured it’d make it more chunky) the process went fairly quickly. After everything was mixed together and cooked up, Sarah and I spooned the salsa into the canning jars (we didn’t have pint size so we used quart jars — but with the size of our family those will go quickly). Since Fritz didn’t mention it, we weren’t sure how much it’d make. We followed his recipe (our only addition was the extra cup of cucumbers) and we came out with three quarts of salsa, plus one 1/2 pint jar (that we gave as a gift to friends). Next year we’ll double it (or even triple, we like salsa), and use the pint size jars so we can share more with friends and neighbors.

My good friend, and fellow prepper, Mike recently gave us the book, So Easy To Preserve put out by the Cooperative Extension of The University of Georgia. Since we have very limited canning experience (blackberry jam and salsa last year) it came in handy reminding us of the steps involved in the water bath method. It’s a good reference book that thoroughly covers: canning, pickling, jellies, freezing, and drying.

Inadvertently, you could also call it busy or lazy, we had a small test of our store what your eat (SWYE) food storage. We normally shop every two weeks. Well life got busy, we missed a shopping trip, and we went a full month without grocery shopping. It’s interesting that with our food storage we really didn’t notice it all that much. Sure we were missing the items that have shorter shelf lives: fresh fruit, most fresh vegetables (though we were able to add some from our garden), and milk. Since we’re not big milk drinkers we’d just mix up some of the powdered stuff when we needed to add it to a recipe. Another item we would have been out of is eggs, but we have a local farm source that we get them from regularly so we didn’t go without. It was interesting how uninterrupted our daily food supply was; between our SWYE pantry and our deep freezer we had plenty. It’s nice to know that if we HAD to go that long it wouldn’t be an issue at all; that alone gives us a certain feeling of safety and confidence.

I’m happy to announce our fourth (and most likely final) regular blog contributor, Nick. Nick is a general contractor and a prepper who specializes in “Sustainable Improvements, Repairs, and Installations“. He will be posting the fourth Wednesday of each month (starting next week, October 24th), focusing on what we can do to make our homes more sustainable and keep them in good repair — from a prepper perspective. I’ve now completed one of my goals for my second year of blogging, to have a guest contributor for each week:

  • Week 1 – Rural Relations with Josh
  • Week 2 – Sarah’s View
  • Week 3 – Momma Bear
  • Week 4 – Nick

These four share really good, and varied, perspectives–different than I’m able to provide–that I believe will add value to both my blog and the prepper community. For more information about each of them, and a list of the posts they’ve written, there’s a link to Guest Contributors in the top right hand portion of the Home page.

Finally, I want to congratulate two of my closest prepper friends on additions to their families. From our prepper coffee group, both Mike and Rick had newborn sons this month! They’re both great dads who I know will raise their kids up to be “properly” educated, self-sufficient, and independent.

What did you do?


City Cousin: My Plan

WHO, WHAT, WHERE, WHEN, AND HOW

Using my template (see my last post, Making A Plan) this is what I did, and am doing, to be prepared. I’m specifically focusing on the very real earthquake peril here in Seattle.

Prepare Short Term (72 hours) Medium Term (Six Months) Long Term (over Six Months)
Who Me.  (Single man, no dependents)

Done

Putting the “prepared bug” into friends and coworkers.

Ongoing – but I am surprised how open people are to it!

Compile a list of resources in my neighborhood then circulate to my neighbors.

To Do

What Peril:  Earthquake – at home

Done

Earthquake – for additional 7 days and being mobile if needed.

Done

Review what I’ve prepared, have things changed?

Ongoing

Where Prepared home.

Done

Preparing home for additional 7 days.

Done

Storing additional provisions at friends’ place in case home is unavailable.

Ongoing

When Goal was establish years ago.

Done

Items I need to replace and or secure:

  • Replace sleeping bag
  • Replace camp stove
  • Water purification system

Ongoing

Annually, on April 1st, I inspect my provisions and make sure everything is current, rotated, or if anything new needs to be done or secured.

Ongoing

How Research needs:

  • Set goals with start and end dates within financial constraints
  • Secure what is needed.
  • Figure out appropriate storage.

Done

If things were not done you can set up start and end dates in your “when” columns.

This has been an ongoing process including choosing where to live. My apartment building is a wood frame building that meets or exceeds earthquake building codes and having been in it during the 2001 Nisqually quake, I am reassured that this building will be standing after another earthquake. This does not address preparing your home itself for an earthquake (i.e. securing bookcases to walls, etc.). This was just used for basic resources (food, water, medical supplies, etc.) needed if those resources are not available after a major earthquake or other disaster. My goal is to be prepared after the incident until help arrives or I can safely leave the area.

After securing your supplies, in a small home where do you store them? Creativity is the key. Since I also want to make sure things are mobile, I have put my supplies in a backpack and fanny packs that can be Bug Out Bags, if necessary. A backpack fits nicely in the back of my closet.  Fanny packs can be hung over the coat rail in the closet. I have a large cooler, on wheels, that I can put food and water in if I need to leave my building; this fits under my hanging coats. Remember to keep together where they are readily available. You don’t want to bury things and have to dig them out if you are in a hurry. I feel better knowing that I am prepared even if it is just with basic needs.

Commercial emergency packs are available. That may provide an easier way to get started for you. I put my own kits together, but looked at what these sites had in theirs. Two good sites are: BePrepared.com and EssentialPack.com.

Prepping in an ongoing process. As circumstances change, what you need to do to face unexpected challenges ahead may change as well.  Once you know the road you are taking, having the mindset and a method for preparing will give you a peace of mind. And I have a simple challenge for you if you think you’re all prepared: Go a week without going to a store or gas station and see how you do. You’ll find out what you missed and it’s a chance to use and replace items you have store. In any case, enjoy the journey.

The City Cousin’s Bio
I come by prepping by growing up watching the example my father set; he was always prepared for whatever situation would arise. Now, as a single man living and working in Seattle, I have opted to live near downtown in a small apartment. For me this is a comfortable space; trying to be “green” it has reduced my use of resources from electricity to gas for my truck. With limited space, I have reviewed what I can reasonably be prepared for in my urban environment.

(Friday: What We Did This Week To Prep)


The City Cousin: Making A Plan

Contributed by Shawn (aka The City Cousin)
(Shawn is writing a series of posts about prepping in an urban environment.)
– –
If your car’s tank is almost always near empty, or you are constantly running out of toilet paper, shampoo, milk, etc. then you are not a natural prepper! Fret not, few of us are. As with many skills and mind sets, most have to be learned. Here are some experiences that motivated me, and a system I’ve developed to become better prepared.

I was living in Seattle, in 2001, during the Nisqually earthquake (a 6.8 quake that lasted 45 long seconds). After the initial quake ended, I immediately called my parents to let them know I was okay. Then, I knew we still had electricity because the TV was  on; I checked that I had running water and then filled the bathtub; I checked my apartment and then the building for damage; I moved my truck out of the garage, under my building, and parked it where nothing would fall on it if there were more quakes. All good initial reactions to an earthquake, but how did I plan afterward to be better prepared for the next time? What had I learned? To be honest I didn’t do anything. I felt good, and rather smug, about my actions and resourcefulness after the Nisqually quake. But, I wasn’t really prepared for what COULD HAVE happened.

It wasn’t until I saw the pictures of the aftermath of Hurricane Katrina in New Orleans, in 2005, that I recognized I have to be prepared for a big disaster and for at least the ‘FEMA suggested’ 72 hours. And, after seeing how FEMA and the military responded in New Orleans–a city that is located much closer to government resources than Seattle–I decided I needed to be personally prepared to handle things for a minimum of five to seven days before outside help will likely arrive to the city.

So my project management experience kicked in and I developed a chart to help guide a household discussion to prepare for likely perils. I again focused on my journalism questions of Who, What, Where, When, and How.

Prepare Short Term (72 hours) Medium Term (6 Months) Long Term (over 6 Months)
Who You, your immediate family, significant others. Condo/homeowners association, neighbors. Neighborhood (consider becoming an advocate for your local government.)
What Select the perils that might affect you: earthquake, flood, tornado, etc. After prioritizing the perils you want to address, prepare for the first one. Then expand to cover the remaining perils. Review what you’re preparing for, have things changed?
Where Preparing your home and/or car(s).  Consider alternative locations. Determine meeting points in case you and your family are separated. You might focus on your home first for the initial 72+ hours then on your car or alternative locations. Develop alternative location(s).
When Set a start date and end date for each Term’s goals.  Costs and preparation for longer term goals can be researched and set. More expensive items can be budgeted for and a priority list  can be developed for when to get them. Set up an annual/regular review to make sure everything is current in your preparations, i.e. check batteries, rotate food and water.
How Research! Read, take classes, use the internet.  For this section one of my favorite online resources is 72hours.org. How also plays into when depending on cost and time needed to prep. Continue learning. Stay informed. Network with others. Review new information.

This is a great exercise for a household of any size to get organized and take the first steps, or for reviewing what you’ve done, or confirming you’re on the right road with your preparations. This discussion will help everyone have input and feel involved (the “buy- in” to the project), and tasks can be assigned based on age and experience. Make lists and write down your goals; studies have shown, when we write things down we are more likely to remember and act on them. Once we have a plan in place, and we know which road we’re taking, we can get prepared.

Next month: I will discuss what I have in my apartment to prepare for the perils I have identified, some of the resources I’ve tapped, and how and where you can store things with limited space.

The City Cousin’s Bio
I come by prepping by growing up watching the example my father set; he was always prepared for whatever situation would arise. Now, as a single man living and working in Seattle, I have opted to live near downtown in a small apartment. For me this is a comfortable space; trying to be “green” it has reduced my use of resources from electricity to gas for my truck. With limited space, I have reviewed what I can reasonably be prepared for in my urban environment.

(Friday: Momma Bear’s April Preps)

The City Cousin: A Different Perspective On Prepping

“Yes, Preppers Should Have Insurance Policies.”

Contributed by Shawn (aka The City Cousin)
(Shawn will be writing a series of posts about prepping in an urban environment.)

I’ve had a varied background, career wise, over the past forty years. My first job, after graduating from college, was as a Welfare Fraud Investigator for the State of Utah. This hadn’t been my plan. Initially I was in a prelaw program via a political science major, then two quarters before graduation, I changed my major to Spanish as I was offered a Teaching Fellowship in the Language Department. My goal was to attend grad school and become a Spanish professor. Unfortunately, this is when quotas were first being developed for racial and gender balance in organizations. I saw the handwriting on the wall (not being a Latino or a woman) that future job prospects in that field would be minimal, so I started interviewing for any job. Which brought me to two conclusions that I’ve found to be true: first, if you don’t know where you’re going, it doesn’t matter which road you take; and second, journalism classes do pay off.

In the interview for the welfare investigator position I was asked what I felt was needed to prepare a good investigation summary. I flipped through my ‘mental rolodex’ (for those of you under 30, a rolodex is a round file that we used for phone numbers, addresses, etc. Google it and you will be amused at that technology) and came up with those questions any article should answer: Who, What, Where, When and How. I got the job.

When I started thinking about getting more prepared, I began with a list of perils and what I needed to do to prepare for them. Then I applied my questions: Who, What, Where, When and How. Living in Seattle we have some unique perils, as well the perils we all face.

Peril is an insurance term which describes those events or risks a policy covers (yep, I worked for an insurance company along the way as well). I believe, since fortunately most perils are not catastrophic in nature, all preppers should begin with good insurance coverage. I realize this is a different approach to prepping. But a homeowners/renters policy provides (prepares) us with coverage for the perils of fire, theft, wind damage, lightning strikes, etc. It has liability coverage, which covers you in the event someone is injured on your premises, or sues you for libel/slander. There is also coverage for ‘loss of use of premises’, which covers temporary housing and living expenses. As a prepper, take the time and make sure you understand what your insurance policy covers, as the perils and benefits depend on your state, your insurance company, and policy type. Earthquake and earth slides tend to be coverage you have to add to your standard policy. Flood insurance is purchased through the federal government. Insurance works as a tool to manage risks by transferring to the insurance company coverage for a loss; your deductible is the risk you are willing to cover in a loss (the higher the deductible the more of the risk you assume).

Prepping is another form of insurance, and perils is another word for disasters. So what are the perils I have defined and, other than having adequate insurance, what have I done to prepare for them? Living alone, in a 500 square foot one bedroom apartment, it can be an interesting process. Next month I will share with you what I have come up with and the resources I’ve used. With preparation we define the road we are taking and we know where we are going.

The City Cousin’s Bio
I come by prepping by growing up watching the example my father set; he was always prepared for whatever situation would arise. Now, as a single man living and working in Seattle, I have opted to live near downtown in a small apartment. For me this is a comfortable space; trying to be “green” it has reduced my use of resources from electricity to gas for my truck. With limited space, I have reviewed what I can reasonably be prepared for in my urban environment.

(Friday: Momma Bear’s March Preps, instead of my weekly summary the last Friday of each month Momma Bear will sum up what she and her family did that month to prep.)

How To Wire Your Gas Furnace To A Generator

Contributed by Guest Blogger: Rick Brodersen
of Rick’s DIY (HVAC & Electrical DIY)

Wiring your gas furnace to a generator is a project that’s frequently either over-thought or not thought of at all. Some people think you need a high dollar transfer switch wired to your breaker panel, requiring an electrician, or you have to temporarily rewire the breaker to the generator and then rewire everything again once the power comes back on.

But this isn’t the case, NEC (National Electric Code) only requires that appliances be on their own dedicated circuit. So, by simply rewiring your furnace you have the ability to use your furnace with a portable generator (or other auxiliary power). Then when the power goes out, just disconnect the furnace from the outlet and connect it to your generator, and use it like you normally would.

video: How To Wire Your Gas Furnace To A Generator

Materials:
The cost of the materials was less than $20, and all of the items can be found at most hardware stores.

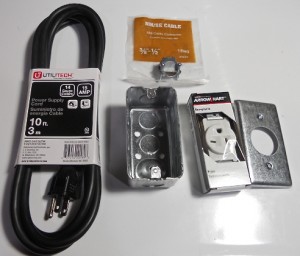
  • Outlet Box
  • Single Outlet Receptacle
  • Outlet Cover Plate
  • Power Supply Cord
  • Cable Connector
  • Misc Wire Nuts, Electrical Tape & Mounting Screws

Tools:

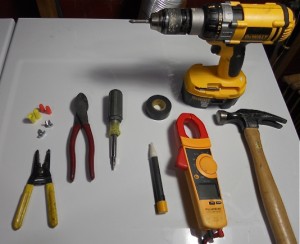
  • Hammer
  • Screwdriver (multi-tip)
  • Side Cutters
  • Wire Strippers
  • Multi-Meter
  • Voltage Stick (optional)
  • Drill (probably a little overkill but if you’re installing the outlet box onto your furnace with sheet metal screws it will be needed)

How To Do It:
Everytime you’re working around electricity you MUST check that the power is OFF and then CHECK AGAIN. You can never be too careful when it comes to this point. (Even after all these years I occasionally still get shocked.)

Turn Off the breaker that controls your furnace. (Keep in mind that a many breaker panels are mislabeled.) Open your furnace and find where your power is coming in from and follow it to the junction box (or in my case, the circuit board.)

Pull off any covers and then test for voltage. I like to use the Fluke Voltage Stick first (ensure it works on a live circuit and then you can test it). After you have verified the power is off, carefully remove the wire nuts and test with a voltmeter. Once you are darn sure there is no power then you are safe to work on it.

Write down, or label your wires, the BLACK (hot), WHITE (neutral) & GREEN (ground). (Some might be red, orange, brown, etc.) You must rewire it exactly as it was: Black to Black, White to White, and Green to Green/Ground. Pull the wires out to the outside of the furnace.

First, install the OUTLET BOX. I put the conduit with the wires coming from the breaker into the outlet box and then level it where I would like to mount it. Screw it to the wall or furnace with the appropriate screws.

Next, you need to wire in your Single Receptacle Outlet. You may need to cut back your wires and strip them. (This is hard to explain in text and is better understood in the video.) Wire your Black (or hot) to the smaller bladed side of the outlet (if you’re facing the outlet this will be the right side) this screw is normally brass/gold in color. The White (or neutral) wires up to the larger bladed side, this screw is usually silver in color. Then the Green (or ground) goes to the last terminal that is bonded with the metal framework of the receptacle, sometimes this screw will be green colored (but every manufacturer is different).

Once wired, carefully push the receptacle back into the outlet box and screw it in, put on the COVER PLATE and we’re ready to move onto the final part.

To install the POWER CORD we have to add in the CABLE CONNECTOR to where the old power cable came into the furnace. Once you have the cable connector in, you can pull the power cord through and secure it.

Next, rewire the power cord to the connections on the furnace. If you’re using wire nuts be sure to Double Check that the wires are secured by tugging on each individually and then taping the connection with electrical tape (you can further secure with tie straps if needed).

Make sure to replace any cover plates, double-check that everything is wired properly and secured. Turn the power back on and check the outlet with your meter (this is not shown in the video) to make sure everything is wired properly. Finally, plug in your furnace and check operations.

video: An Overview: How To Wire Your Gas Furnace To A Generator

ALL DONE
Now that you’re done, test it out with or without your generator. I recommend a test run on a dark, rainy night so you know what it’s going to be like when you’re actually going to have to use it.

Bio
Rick Brodersen is an HVAC/R Mechanic and has worked in the Seattle area for over 15 years, specializing in the commercial service industry. He has instructed at local trade schools and now continues teaching at RicksDIY.com. He is also an avid prepper, hiker, and fisherman who, along with his family, enjoys taking in all the Pacific Northwest has to offer.

Read Rick’s Disclaimer

NOTE: Comments have been closed for this post. Please feel free to read the many, many replies Rick has given, if you still need his help he has asked you contact him directly through his site at RicksDIY.com

(Wednesday: Book Review: The Doom and Bloom Survival Medicine Handbook)