What We Did This Week To Prep 10/19/12

We started off the week making salsa. After picking all the remaining tomatoes from our garden (red and green), digging up a couple of onions, and picking the last of the cucumbers (because they were there), we set to work cutting everything up. Last year was our first salsa making experience and though it came out pretty good, I wanted to try a new recipe this year. A couple of months ago I had seen a post on The Homestead Fritz – How To Make Great Salsa; there he mentioned that his coworkers described it as, “the best salsa they have ever eaten.” With that recommendation, I decided we’d give it a try. With all six of us cutting stuff up: tomatoes, onions, pepper, jalepenos, garlic, cilantro, and cucumbers (again because we had them, figured it’d make it more chunky) the process went fairly quickly. After everything was mixed together and cooked up, Sarah and I spooned the salsa into the canning jars (we didn’t have pint size so we used quart jars — but with the size of our family those will go quickly). Since Fritz didn’t mention it, we weren’t sure how much it’d make. We followed his recipe (our only addition was the extra cup of cucumbers) and we came out with three quarts of salsa, plus one 1/2 pint jar (that we gave as a gift to friends). Next year we’ll double it (or even triple, we like salsa), and use the pint size jars so we can share more with friends and neighbors.

My good friend, and fellow prepper, Mike recently gave us the book, So Easy To Preserve put out by the Cooperative Extension of The University of Georgia. Since we have very limited canning experience (blackberry jam and salsa last year) it came in handy reminding us of the steps involved in the water bath method. It’s a good reference book that thoroughly covers: canning, pickling, jellies, freezing, and drying.

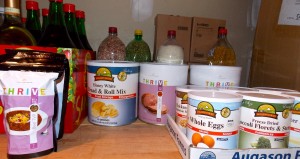
Inadvertently, you could also call it busy or lazy, we had a small test of our store what your eat (SWYE) food storage. We normally shop every two weeks. Well life got busy, we missed a shopping trip, and we went a full month without grocery shopping. It’s interesting that with our food storage we really didn’t notice it all that much. Sure we were missing the items that have shorter shelf lives: fresh fruit, most fresh vegetables (though we were able to add some from our garden), and milk. Since we’re not big milk drinkers we’d just mix up some of the powdered stuff when we needed to add it to a recipe. Another item we would have been out of is eggs, but we have a local farm source that we get them from regularly so we didn’t go without. It was interesting how uninterrupted our daily food supply was; between our SWYE pantry and our deep freezer we had plenty. It’s nice to know that if we HAD to go that long it wouldn’t be an issue at all; that alone gives us a certain feeling of safety and confidence.

I’m happy to announce our fourth (and most likely final) regular blog contributor, Nick. Nick is a general contractor and a prepper who specializes in “Sustainable Improvements, Repairs, and Installations“. He will be posting the fourth Wednesday of each month (starting next week, October 24th), focusing on what we can do to make our homes more sustainable and keep them in good repair — from a prepper perspective. I’ve now completed one of my goals for my second year of blogging, to have a guest contributor for each week:

  • Week 1 – Rural Relations with Josh
  • Week 2 – Sarah’s View
  • Week 3 – Momma Bear
  • Week 4 – Nick

These four share really good, and varied, perspectives–different than I’m able to provide–that I believe will add value to both my blog and the prepper community. For more information about each of them, and a list of the posts they’ve written, there’s a link to Guest Contributors in the top right hand portion of the Home page.

Finally, I want to congratulate two of my closest prepper friends on additions to their families. From our prepper coffee group, both Mike and Rick had newborn sons this month! They’re both great dads who I know will raise their kids up to be “properly” educated, self-sufficient, and independent.

What did you do?


Momma Bear: Figuring Out How To Make Food Storage Work

At our house food storage is a complicated issue. We all face obstacles to our prepping, whether it is financial, lack of family support, or just being unknowledgeable. I grew up poor, so you might say I have “food issues.” And when I say poor, I mean that I really only finished my senior year of high school because they provided low-income families two free meals a day; for me the school part was just the filler between my meals.  But what I did not realize until recently, thanks to the article: The 5 Stupidest Habits You Develop Growing Up Poor, is that growing up that way affects how I shop for food even today. After 20 years of marriage, with a much more substantial income, I was still shopping paycheck to paycheck. I had the mentality of only buying exactly what we immediately needed.  But once I became a prepper, I had to retrain myself to “buy extra.”

One obstacle of the ‘poverty cycle’ I was able to break, was my love of packaged foods. Packaged foods are cheap, have a long-shelf life, and feed more people than fresh foods do. Poor people eat lots of these, essentially training their bodies to expect high fat, high carb, and high sugar as the core of their diet. This causes their bodies crave these foods and, as a result, they tend to be frequently overweight, even obese. I was able to overcome this and have raised my children on fresh, home-made meals with plenty of vegetables. Though the flip-side of this is that it’s really hard to reconcile my love of fresh foods and wanting to stock my long-term food storage. To combat this personal conflict, we have been gardening and canning foods at home. I feel that at least then I can control exactly what ingredients are in my “canned” foods. (It has also been a great teaching tool for my children.)

I do not believe that there is only one way to have/create/do food storage. I believe that how we choose to store food needs to be a reflection of our families and who we are as preppers. Here is my take on different types of food storage:

Food Storage Theory 1: Most preppers live by the simple motto “store what you eat, eat what you store.” This is the simplest way to store food, one giant pantry that is in a constant rotation as part of your daily household diet. Most commonly you will see shelves filled with canned and packaged foods, and buckets of rice and beans. It makes prepping very easy because your goal is to store the same things in increasingly larger quantity, and you never run the risk of waste because you know you will use it. I applaud people who do this because they are able to use everything without risk of waste.  Although I have increased the amount of beans and other previously unknown foods my family eats, they will never be lovers of beans or packaged foods. This storage method simply doesn’t work for our family.

Food Storage Theory 2: This is the idea of having two separate food “pantries”, one that is for your regular rotational use and one that is exclusively long-term food storage (that you won’t eat unless the SHTF). The rotating pantry contains basic items that wouldn’t be the core of any diet, but that you do regularly eat, and could enhance the longer term food storage. At our house this is condiments, oils, canned vegetables, powdered broths, etc. The long-term food storage then consists of large quantities of beans, pasta, rice, TVP, and an assortment of canned and packaged foods that are NOT even part of our regular diet. This is a more expensive way to prep because you run the risk of possibly never using that long-term food storage and at some point you will have to decide what to do with it as it ages. This is how our family is storing food.

Food Storage Theory 3: This is a combination of the first two Theories, plus fresh foods from a garden and a renewable protein source raised at home (chickens, rabbits, goats, etc.). These are the people that are pushing for the greatest level of self-sufficiency should the SHTF. Many of us may never be able to attain this goal for a number of reasons. For instance, local ordinances restrict us from owning chickens, and although we are allowed to have rabbits, “processing” them at home is illegal. Even if we could, I’m not sure we would chose some of those options; I applaud those that can achieve this level of self-sufficiency.

My post next month will focus on specifics of food storage: container choices, canning and dehydrating, and purchasing bulk items from Costco or Sams Club. I would love to hear feedback from other preppers as to how they store food.

Sarah’s View: Knitting

I started working on a number of knitting projects in the last few weeks and realized that, while I tend to knit for fun, it’s also a worthwhile prepping skill. I originally tried knitting in high school, but never quite got the hang of it. Periodically I would try again, but it wasn’t until a few years after college that I really got it, to the point where I could follow a pattern without someone nearby to assist. I’m pretty sure my first (and second and third) project was a scarf. Not a bad item in a disaster, it’s amazing what a difference keeping your neck warm can make!

My knitting tends to go in phases as I usually knit during my commute and it just isn’t comfortable to have a knitting project on my lap in the warmth of the summer. So, around October I start to think about knitting again. I find my unfinished projects, sitting since spring, look through my bag of yarn and get started again. This leads to many more unfinished or abandoned projects than completed items. For example, my most recently completed project is a baby blanket. The child the blanket was originally intended for is now three years old; I will need to find it a new home. Over the years I have attempted many projects and managed to complete a number of them. Some of my successful items include: hats, Christmas stockings, drawstring bags, more scarves, stuffed hippos (possibly my favorite project as I created the pattern myself) and fingerless gloves.

In some ways knitting is a great prepper skill and in others it’s probably not as useful. I would still be dependent on yarn as we don’t currently, nor are likely to, have a natural supply via an alpaca or sheep (not to mention the sheering, carding and spinning involved). I could, with a supply of yarn, probably create a blanket, at least one sock (since I’ve done Christmas stockings just never two matching socks), and I likely could manage a sweater. It is also requires no electricity, keeps fingers and mind occupied, which is useful when the power is out. As a (wife of a) prepper I should work on more useful projects, but at this point it is just nice to know that while most of my knitting is for fun/gifts these days, if necessary I could provide warmth and comfort for family and friends, even if they didn’t fit quite right.


Rural Relations with Josh: Lessons Learned, Part II – You Can’t Choose Your Neighbors

There’s a story of a realtor showing a house to a couple from out of town, and the couple asked, “What are the people like here?” The realtor replied, “What are the people like where you live now?” The couple responded, “They are great to hang out with, respectful, and genuinely good people”. The realtor replied, “The people here are just like that!” The next couple to come through had the same question, met with the same question from the realtor. The couple responded, “The people where we live are rude, unfriendly, and generally ignore us!”. To this, the realtor responded in kind, “The people here are also rude and unfriendly”.

This story, which was para-phrased from an unknown source, attempts to provide a simple explanation for those who might feel they have less than ideal neighbors. While neighbors can be great, and add value to your neighborhood, differences can arise. I feel it’s important to bond with neighbors early on, so that when issues come up you can work together to solve them. If you add an HOA (home owners association) into the mix, some neighbors will never get along as the HOA becomes a tool of manipulation by the [popular] majority.

I live in an HOA controlled neighborhood consisting of 22, 5-acre lots. I have some neighbors I really like; I drink beer and BBQ with them and our kids play together. But not long after moving in I discovered that there were a number of feuds in the neighborhood; they originated primarily from property lines and HOA disagreements.

Lesson I:  Get a Survey
An example of a dispute was when a two adjoining neighbors decided to “share” their property, across property lines, to have a larger motocross track. After a while, one neighbor decided to bull doze an area to create a banked turn which the other party felt was on their property. This turned into a situation where they both withdrew their share option and left a disputed area where neither knew where the lines were as there were no recorded surveys or marked corners.

The only recorded surveys in the neighborhood are on my lot and my immediate neighbor, as we went in together to get a good deal before I put up my fence. In my opinion, it’s absolutely critical to get a survey performed and recorded before closing on the property to resolve any issues or line disputes. After getting my survey, I found that I had actually “gained” an acre or two (on a 5-acre lot) over what I thought I owned. Also, get your immediate neighbors to go in with you on the survey (if they don’t already have one), this will minimize the potential for disputes over the surveyors work. I got a chuckle out of putting up a fence through my neighbors back yard; luckily it was inhabited by renters, had the owner still lived there it would have likely caused a dispute because he would have assumed I was encroaching.

driveway in the summer

Lesson II:  No Easements through the Property
A few months after moving in, the neighbor beyond us on the last property on our dead end road (who has a legal easement through our property) put his house and shop up for rent, as two separate units, after being unable to sell. This immediately took us from having no traffic through our property to seeing traffic day and night on that easement. The ride out to the neighbor’s property is pretty long and winding, and folks are going pretty fast by the time they reach our lot as they want to get to their destination.

driveway in the winter

Soon after, renters moved in: a couple in their mid 40’s from California in the main house, and a young local guy in the shop. We welcomed them all to the neighborhood with fresh baked bread and open arms; we wanted to get off on the right foot. We became good friends with the guy in the shop, but we had a number of issues with the other couple, mostly related to speeding through the property which put our kids and animals in danger. Other neighbors also asked them to slow down as well.

One day I was working in the yard and my kids were outside with me on the play set, but with my wife gone in one vehicle and my truck in the shop it might look like no one was home. I heard the neighbors driving in and saw their SUV coming down the driveway. Just as I was about to wave to them, I heard the engine rev up as he hits the gas — thinking we were not home, and he has a free ride that last 100 feet through our property. After about two seconds of V8 acceleration, he sees me standing there with my mouth open in shock, whereupon he slams on the brakes and the SUV nose-dives considerably. I have no idea how to deal with a person like that in a positive manner and our relationship was poor until they moved out after a year. I had a conversation with the woman before they left (“stopping by to ask you to slow down, again, ma’am”) and she indicated that they had never had such a poor experience in any neighborhood in their entire life and felt victimized by the rest of us. Best of luck to you in your new neighborhood…

Lesson III:  No Home Owners Association
Finally, if you live in an HOA controlled neighborhood you voluntarily chose to allow your freedom to be severely limited. A couple of the rules in my neighborhood are, 1) only low flow faucets and fixtures are allowed in homes, and 2) no discharge of any weapon, including firearms, BB guns, slingshots, or bows. This is not quite what I envisioned moving out into a rural wooded area with 160 acres of unoccupied woodland to the north of me. Before moving in I had inquired of the HOA president and a number of neighbors who assured us that the HOA was there only for the road maintenance. This turned out to not be the case; unfortunately HOAs are often a lever of convenience. Don’t risk it.

I am happy to report that we do not have any issues with our current neighbors. There are new couples in the house and shop at the end of the road and they are respectful and friendly. We do the best with what we have, but before you buy your own rural property look carefully at these issues.


Momma Bear’s September Preps

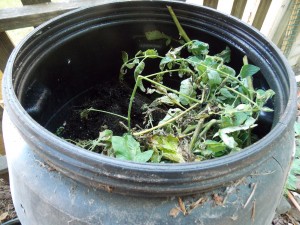
September has arrived and we are seriously looking forward to cooler weather! We decided to shut down the garden a little early in expectation of heavy duty leaf raking. I filled my two compost barrels with the old plant foliage and with the dirt from my container gardens (except the one I am waiting to go to seed). We will be augmenting the barrels throughout the winter with egg shells, coffee grounds, etc. The plan is to use the two barrels of compost to refill the containers in the spring.

As mentioned, my ham radio came and, as I thought, it’s complicated! But I am signed up to take my licensing classes next month. I even discovered that my town has a ham radio store!

Last week Trace mentioned the website aGirlandherGun.org. I met “Girl” at a mutual friend’s house where we had gathered to watch a football game.  Having never met her before, we were talking and something set my antenna buzzing. I finally looked at her and said, “Are you a prepper?” She is the first local prepper I have met! We had a great evening with lots of discussion about guns and self-protection. If you have not yet had a chance to check out Girl’s website, please do. She is a firearms instructor, and is also taking EMT courses with her husband. You will see that prepping is relatively new to her also, and for a very serious reason. Interestingly, Girl is the second woman fire-arms instructor I know (the other being Pistol Packing Ladies, LLC). So along that train of thought…the husband and I will be taking our gun class next week at the Nation’s Gun Show outside of Washington, D.C. This will allow us to apply for our concealed carry permits. Though neither of us have decided yet if we will carry, we want to at least prepare and get permits.

Lastly, I have moved fish antibiotics (see Trace’s post Antibiotics In Your Preps?), and books on medications, to the top of our prepper purchase list. This last week the husband “humped” out of the field with a very deep blister in the ball of his foot (If you are not familiar with this phrase, it means Marine Corps camping in which you train and hike 20 or so miles with a 70-80 pound pack, carrying everything you need to eat, sleep, and shoot). He had done everything right: changed his socks regularly, removed his boots to sleep, powdered his feet, etc. But he still managed to get one really deep blister. As a long time Marine and marathoner, my husband teaches others on the importance of foot care. Initially it looked okay, and there were no visible breaks in the skin. Medical opted not to drain the blister because it was so deep, saying he was “good to go” (military slang for fine). But within 36 hours his foot was swollen, red and angry-looking, and he was running a fever. It looked like he had a Fred Flintstone foot that was about ready to split open. We both knew he had a raging case of cellulitis and needed antibiotic treatment. Cellulitis is a bacterial infection which, if left untreated, can lead to a more serious–even life-threatening–type of infections known as sepsis. It can also be resistant to antibiotics, and it is not uncommon to have to take IV antibiotic treatment. In any event, my husband was fine once he started his antibiotics. I personally am allergic to a number of antibiotics, including the one he was treated with, so it is imperative for us to carefully stock the right antibiotics. This was a good reminder of how something as common as a blister can quickly lead to a serious health risk; imagine how you would treat this in a post-collapse situation…

What’s next on your prepper training schedule?

Momma Bear: MRE’s For Your Preps?

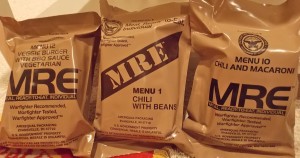
‘Meals Refused by Everyone’ is a not-so-affectionate term for Meals Ready to Eat (MRE). MREs are the field rations that our military eats whenever they are out training or on military operations. Though some preppers have chosen to stock up on cases of MREs, there are many who have avoided MREs due to their mystery and the stereotype of bad military food. Having grown up with a step-dad who served in Vietnam (and into the 1980’s), I was pretty familiar with the old school military C-Rations, which came in cans and required the use of a small personal can opener. The only redeeming quality found in those early rations was the cardboard like caffeine-laden chocolate bar that I loved. But today’s MREs are not only much better tasting, but have a better variety of foods, and meet a rigorous nutritional standard.

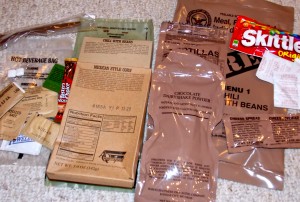
An MRE is made up of roughly 1300 calories: 169 grams of carbs, 41 grams of protein, and 50 grams of fat. Yes, that is a LOT of carbs and fat!  But remember that this nutritional standard was designed for our military, classified as ultra-athletes, “exercising” in a combat environment. A typical MRE is made up of a: main course, side dish (fruit/vegetable usually), bread or snack item (pound cake, tortillas, crackers, candy, peanut butter, jelly, etc.), beverage of some sort (coffee, tea, kool-aid, an electrolyte-type drink, and/or hot cocoa), matches, gum, condiments, and a spoon.

They come in a sealed plastic package and weigh 1.5 pounds. They also contain a “flameless ration heater”,  a chemical pouch that heats up when activated with water, to heat your main course. The average service member only consumes about one or two of these a day, because they are just too dense to eat as three square meals. Also, most service members “field strip” their MREs down to the parts they know they are going to use to reduce their bulk.

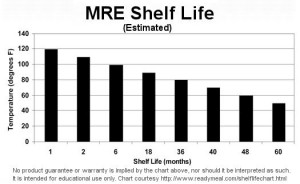
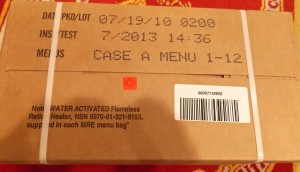
There are 24 MRE menus. The meals come in two case lots: menus 1-12 and 13-24 (and include specific vegetarian and religious meals). MREs are considered to be shelf stable for six months at 100 degrees and three years at 80 degrees (see side bar chart). There are two ways that packaging dates are listed on MRE cases: 1) A standard pack date (as shown in the photo of a military issued case) and 2) A numeric date, listing the last digit of the year followed by the Julian date of packaging (so my husband’s same box is: 0200, meaning it was packed on the 200th day of 2010). Currently, the military uses three manufacturers for production of MREs: Wornick Company, SOPAKCO, and AmeriQual; I mention this because there are a lot of pseudo-MREs out there.

My husband unofficially rates MRE’s in three categories: good, okay and nasty. His “goods” include: chili with beans, beef ravioli, chicken with noodles, chili & macaroni, spicy penne pasta w vegetarian sausage. His “okays”: meatballs with marinara, cheese tortellini, beef patty, spaghetti with meat sauce. And his “nastys”: beef brisket and beef stew. These are his ratings, I’ll ask around in the next few months for some reviews by my husband’s troops. Personally, I find the spicy types of MREs to cause killer heartburn, and I wouldn’t want to be in the field without a good antacid! Though the meals claim to be balanced in the fiber department they need to be consumed with sufficient water, or they will literally leave you in a “bind”. But overall–as long as you are not eating more than two a day–they are a good, handy meal that certainly has a place in most preppers’ food storage and Bug-Out Bags.

Also of mention, the MRE heavy plastic pouch itself is extremely durable and can be used for holding/carrying water.  While the packaging is not currently being recycled or made from recycled materials, the package does certainly have multiple uses that are only limited by the imagination. While serving in Somalia, my husband reported that the local children would salvage the packages out of the trash to be used as shingles on their homes.

The Operational Rations of the Department of Defense provides a pdf file that gives the entire background on MREs, and includes the complete menus for 2011 and 2012.


Sarah’s View: Learning To Save Seeds

When we started gardening this year I hadn’t really thought much beyond learning more and what produce we could get out of it. But, as the season continued I started thinking about next year and, being cheap, I started wondering if I could save seeds from this year’s garden instead of buying more. Turning to my good friend Google, I started researching how to save seeds for our more unique garden items.

The first I looked for was Calendula. I’m not sure why I started there exactly, except that there weren’t many seeds in the seed packet. Not only that, but the Calendula seeds had looked really odd and I couldn’t come up with where on the plant they would be. It turns out, as the petals wilt the center is surrounded by seeds. Now, these seeds don’t look like any others you might have seen, or at least not like any I’d ever seen. But, once I knew where to look they were remarkably easy to harvest. Some had dried on the plant, others I dried in the house and then stored the dried seeds in a small plastic bag. (Plastic isn’t ideal, I’d prefer to use small envelopes so as to prevent moisture building, but the coin envelopes just seemed pricey – see, I’m cheap.)

Once I figured out how to harvest Calendula seeds I was excited to see what else I could save. I next looked into radishes and garbanzo beans. These are both rather easy – they have pods which form on the mature plant and the seeds inside the pods are dried and saved for planting. Granted, we didn’t plant radishes for eating (we planned on them flowering to attract pollinators) so all our plants flowered and then formed pods. If you were growing radishes to eat and still wanted to harvest seeds, you’d need to let a couple of plants flower so they form the pods.

Next, I started researching the herbs. These are a bit trickier as their flowers, and therefore seeds, tend to be significantly smaller and not easily harvested right off the plant. From what I’ve read, the best way is to clip a few of the flowering stems and put them in a paper bag (lunch bag size) and hang to dry. The paper bag helps with moisture control, keeps out light, and prevents seeds from being lost as they fall off the drying plant. I’m still on the drying stage with my herbs, so I’m not sure how successful it will be.

With any luck I can harvest seeds from most of my plants this year. I still plan to buy seeds for spring, but hopefully they will be more for back up as well as to increase the variety in our garden.

Rural Relations with Josh: Lessons Learned, An Introduction

(Josh is our newest regular Guest Contributor and will be posting, Rural Relations with Josh, the first Wednesday of every month.)

Three years ago, this December, I stumbled across a real estate listing on Craigslist; it described a heavily treed 5-acre lot with a distressed rambler, built in ’88, in need of a new owner at a fantastic price. The current family had taken out a second mortgage and was in the foreclosure process with a trustee sale a mere three days away. A quick call to the listing agent and we had an appointment the following day to view the house.

Our first impression of the property was of a cosmetic fixer, on a dead-end road, two foot tall field grass in the yard, various junk strewn in and around the house, and tree branches behind the house attempting to reach inside as nature made a valiant attempt to overtake this small piece of civilization before humans could reign it in. Trees had fallen all over the property during snow and wind storms, blocking all trails and access except by foot beyond the driveway. The list of tasks to make it livable was relatively short as the structure and foundation were solid: remove and replace all flooring and trim, repaint floors, ceilings, and walls, and replace a few doors. Except for those projects, this place had some serious potential and was perfect for a young family with three kids and a dog.

Beyond the first impression there were two issues to consider, 1) the neighborhood is controlled by an HOA (home owners association), and 2) there is an easement through the south end of the property to a single home at the end of the road. After careful review and talking with the HOA president and a few neighbors, it was determined (and repeatedly stated) that the only reason for the HOA was to maintain the two miles of asphalt road that wound through the development. (The fee for this maintenance was $45 a month, for each property.) Review of the HOA documents revealed that excessive control was possible, although nothing else appeared to be enforced or in place. The easement, we decided, was something we could work with and would not be an issue.

Outside those two issues the home and property were great for a prepper! It is one mile from the nearest county road, six miles from the nearest small town, and 20 miles from the nearest mid-size city. It is heavily treed with wood heat; and there is a 160 acre wood lot to the north and a few acres of nature preserve on the east boundary. The only downside is there is no pasture or cleared land other than the yard and house area.

Six months later, through the trustee sale deferral and short sale process, we were first time home and property owners on an adventure with no idea how much we were going to learn.

Please join me in this multi-part series as I write about lessons we’ve learned from our first “homestead” property purchase; lessons that we will apply when we buy our next one.

Josh’s Bio:
Josh is a small business owner, in the greater Seattle area, focused on implementing open source software solutions (think Linux).  He grew up in Eastern Washington living several different places with a mother who moved around quite a bit. At 19 years old, Josh joined the Navy; he spent four years on a fast attack submarine stationed at Pearl Harbor, with visits across the Pacific Ocean. He now lives with his wife and three young kids in a rural development, where they have a garden, two dogs and 12 chickens.

(Friday: What We Did This Week To Prep)

Momma Bear’s August Preps

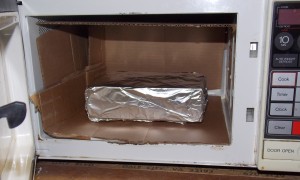
August has been madhouse crazy for us with plenty of work and personal commitments. We have not done as much prepping as I would like. BUT, when we are too busy for physical preps I can always use the time to learn new things. This month’s field of study focused on EMP’s. I found two sites to be particularly informative. The first, The Commission to Assess the Threat to the United States from Electromagnetic Pulse Attackincludes two reports that describe the recommendations for how we should prepare for an EMP strike. It is interesting to read,  because you quickly grasp that this report was essentially poo-poo’d by our government and we remain ridiculously unprepared for such an attack. The second is a website that talks about home-made faraday cages designed to protect small electronic devices. After reading this, my son and I built a small faraday cage out of an old microwave; then placed our small shortwave radio inside.

This month we also made a few purchases. Following Trace and Sarah’s lead, we ordered the Duracell 813-0807 800 Watt DC to AC Digital Power Inverter. For the time being, we have opted not to buy a generator and this will be our interim solution. With three vehicles, we can surely spare one to power some things here at home. My second purchase was a ham radio. We are absolute beginners with ham radios and are not really looking to broadcast (just to receive information from a distance in an emergency), so we opted for a small, inexpensive hand-held model. We ordered the BaoFeng UV-5R 136-174/400-480 MHz Dual-Band DTMF CTCSS DCS FM Ham Two Way Radio, for less than $60. There is a more basic model available, but after reading some reviews we felt this one was a better choice. All that said, even this basic model is a complex item that is going to take some research to understand. Thankfully, there is always the internet and YouTube to answer our questions. And, of course, once we get this thing mastered it will also be going into the faraday cage. Our goal is that eventually all the BOB’s will have either shortwave or ham radios in them as well. I will report back next month on how the ham radio learning is going!

Last for this month, I continue to harvest tomatoes as they ripen and can them as tomatoes, salsa or ketchup. We have finally gotten over the real HEAT of the summer here so the garden isn’t quite so “needy” any more. We currently have green onions, cilantro, and baby spinach coming up in containers. These are probably our most eaten/purchased vegetables so we are really enjoying the fruits of our labor at the moment!

How did your month go, and how’s your garden growing?

(Monday: September is National Preparedness Month)

Momma Bear: Our Favorite Military Things

Just to clarify (again), being in the military is NOT synonymous with being a prepper. But, it does give you an edge on preparedness. So, I thought I would highlight some of our family’s favorite military items that we use and have in our GOOD (Get Out of Dodge*) bags and/or car kits.

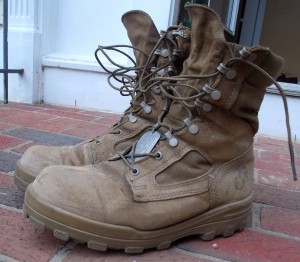
Military boots have come a LONG way since Vietnam and even Desert Storm. There are a number of  “military-approved manufacturers” these days and the boots come in a variety of styles to fit the working conditions. Gone are the days of just “steel toe” or “no steel toe”. There are quality boots for hot weather, cold weather, ultra lightweight, steel toe, and everything in between. The least expensive cost about $100. My husband’s favorites (and mind you, shoes/boots are a very personal choice) are the Bates Durashocks Hot Weather boot, which run about $140. These are a medium weight, suede boot in a natural leather color. He wears these even in cold weather because he says the cold weather boots make your feet sweat unless temperatures constantly stay below 35 degrees. Around military bases there are still shoe repair places (cobblers), so it is common to have your favorite boots resoled and repaired rather than buying new ones.

When it comes to staying warm and dry, layering is the best method. Two invaluable items, in the military, for this are: Gore-Tex and liners. Gore-Tex is a high-end trademarked fabric used for making outer apparel water-proof and breathable. Most commonly you will see these as big, hooded camo jackets with matching pants. These can be expensive when purchased for personal use, but can be found used and are truly worth their weight in gold. The second component, which you can also find used–and these are inexpensive–are the jacket and pants liners. These are made of a ‘poofy’, olive drab, quilted fabric very similar to a parachute. They are very light weight, easy to compress, and excellent for layering under coats. We purchased a 10-pack of used jacket liners for about $35, including shipping, from eBay. I personally am terrible about NOT wearing coats, even in the winter, so I keep a couple of these stashed in my kit in the trunk of my car.

The last thing I will mention is the military poncho liner, affectionately known in the military as a “wooby”. It is made from the same parachute type quilted fabric as the jacket/pants liners. It is also easy to compress and pack along. BUT, in my opinion, it’s greatest strength is that things don’t stick to it. That means I can use it in sand or dirt, then just pick it up and shake it off. Even pet fur tends to just slide right off. Also it will not only keep you warm, but when used in a warm climate it feels cool against your skin (you won’t sweat up against it). Since the military changed to a digital camo pattern, there are plenty of these for sale in the outdated “woodland” camo pattern. They can be found online from about $10-30. Our family owns several, keeps them in our GOOD Bags, and also packs them along whenever we travel.

All of these items are easy to find online through military supply sites, or eBay. Most of them originally came from military sources; when the military discontinues items, they put them up at bulk auctions and people buy them in large lots (for example “400 mixed size jacket liners”). Dealers will buy these large quantities and then resell them in smaller lots or even individually, thus giving you access to genuine military-issue gear.

Building a good GOOD kit/BOB doesn’t have to be expensive or fancy, even when it comes to things to keep you warm and dry. You can get some pretty good deals using old military surplus items. Imagine, your very own veteran wooby could be just a mouse click away!

(Friday: What We Did This Week To Prep)

*A complete list of acronyms used can be found in the ‘Check Here…‘ tab at the top of the page.