Teaching The Kids (& Learning More Myself) – Practicing With Escape Ladders

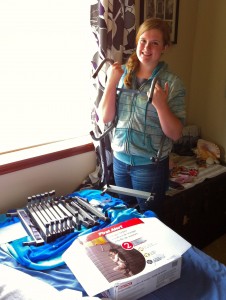
Recently we purchased two second story escape ladders. As previously mentioned we have two bedrooms with windows that are about 14 feet off the ground, our master bedroom and Emily’s room. We bought a ladder to keep in each room.

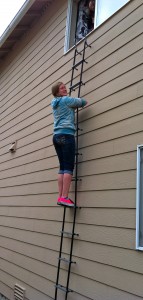
Because buying stuff is easy and it’s a good idea to practice with emergency items before you need them, we pulled the ladder out of the box and actually used it. I had Emily do most of the set-up because it will be in her room. I had to start off by explaining to the younger girls how to remove a window screen (don’t assume). Emily then hung the ladder handles from the window ledge and released the ladder to fall, against the side of the house, to the ground. Once I determined everything looked right and was secure, Emily climbed through the window and down the ladder. The rope ladder moved around a lot as she climbed down it, and she was more than a little nervous, but she did it. She was followed by Alison, also nervous, and Ryan, not nervous (Brynn was away at camp). We discussed that, in an emergency, Ryan would go last after ensuring everyone was out okay.
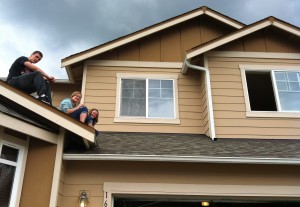
We then went to Alison and Brynn’s room which opens onto the roof above the garage (Ryan’s is next to theirs and opens to the same area). The screen was removed and the kids climbed out onto the roof. I was on the ground. My original plan was to have them hang from the roof and drop to the ground; having Ryan go first so that he can help the girls. After looking around I realized there was nothing safe to hold onto, the gutter was too weak and there were no other suitable edges. We decided to try the ladder, attached to the girls’ window down the roof and off the side. That worked okay and the kids were all able to climb down. I considered getting more ladders for those rooms but decided they probably weren’t necessary. We came to the conclusion that they could get out the windows, away from any potential danger, and wait on the roof for assistance; if they had to they could hang and drop from the gutters (but we didn’t want to practice this because we believe the gutters would be damaged from the weight).
It wasn’t rocket science to figure out how to use the ladder, and yes had there been an emergency we could have figured it out then. But the best time to learn a new skill, or a new piece of equipment, is not when an emergency is happening. There will already be anxiety, stress, and fear; possibly darkness, cold, and rain to deal with. Knowing how to use your emergency equipment will give you, and your family, the confidence needed to get through the disaster. And while a sudden life-threatening fire while we’re in the house–the most likely threat to cause people to escape through a window–is not a likely event, it is possible. We decided it was worth the purchase and practice to allow us to be prepared for that–or another similar–eventuality.

(Friday: What We Did This Week To Prep)

Teaching The Kids (& Learning More Myself) – Fire Building

Fire Building 101: An Introduction
– –
Fire building is an essential survival/prepper skill. Of our five basic needs, fire is energy. In the wilderness fire may be the ONLY type of energy available. I decided this would be the first prepper skill I formally teach the kids (after chainsaws of course…).

Last summer, when we were talking about building fires, I realized that Emily and Alison had never used a lighter or even lit a match. Somehow I had taken for granted that they had. But since we don’t have a fireplace or go camping very much (though this summer we hope to do more), and simply because they are the younger ones and have had fewer “outdoor” opportunities, they had never been taught. So I got out matches and lighters and demonstrated the safe way to use them. I had them both do it, then sent them outside to practice with the lighters and light as many matches as they wanted. In the interim months we’ve continued practicing with both, and now they feel pretty confident.

Yesterday I sat all the kids down in the family room (including Chanse), and discussed how to build a fire (classroom portion). We started off by reviewing that fire needs three things: 1) fuel, 2) oxygen, and 3) an ignition source. We briefly discussed hypothermia and how fire can literally be life-saving. I talked to them about the dangers of fire and how it’s important to keep your fire contained. Then, while still inside, I used some kindling to show them how to set up a small teepee-style stack (with pieces not much bigger than toothpicks), and how I’d leave an opening toward the wind. I laid out additional kindling, of gradually larger pieces, I’d have on hand to use to build the size of the fire. After all had practiced making their kindling teepee, we went outside for the ‘lab portion’ of the class.

It was a gray, chilly, and wet outside. They took their kindling and set it up on the grass. Since I wanted to maximize success, and teach them to use what we have in our kits, I had them use vaseline soaked cotton balls to start the fire (they had previously helped make them for our fire starting kits). They each built their kindling teepee, with the opening facing the wind, over top of their cotton ball (first pulling it apart to separate the fibers). They could use either lighters or matches; we discussed using your body to block the wind and cupping your other hand around the fire to protect it more. They got their fires going, then added larger kindling to make it just a little bigger. All were successful, though it took some longer than others (it’s hard with an age range of 10 to 17 in the same ‘classroom’).

Next time I’ll have them find their own kindling, including making a pile of shavings to get the fire started. Eventually I plan to get them, and Sarah and I, to the point of confidently making a fire with flint and steel.

Teach your kids–and spouse–the skills you know; you may not be around when they are necessary. And remember, “To teach is to learn twice.” -Joseph Joubert

(Wednesday: Sarah’s View)

Having Your Fire Extinguisher Ready

Only Seconds to React
– –
Fire is neither good nor bad, it just is. When the right combination of fuel, oxygen, and an ignition source combine there will be fire. It can be a lifesaving asset providing light, cooking, and heat – or it can be property and life destroying.

Though fire safety has many aspects* today we’re going to discuss fire extinguishers. As preppers we should build in redundancies and safety. If the power goes out, we start up the generator and cook over propane; if those fail, we light lanterns and cook over a small fire. But most of us aren’t use to using fire on a routine basis; we can get complacent or careless and accidents can happen. To mitigate those risks, and keep you loved ones and home safe, consider keeping a fire extinguisher within arms reach of an open flame. No one means to knock over the kerosene lantern, but if suddenly the counter is engulfed in flame you have seconds to make decision.

In that situation, if the fire is small and not spreading, grab the extinguisher. Start with your back to the exit, making sure the fire does not block your escape route. Stand about six feet away from the fire. Then, as fire departments teach, use the PASS word:

  • Pull the pin to unlock the fire extinguisher
  • Aim at the base (bottom) of the fire
  • Squeeze the lever to discharge the agent
  • Sweep the spray from left to right until the flames are totally extinguished

A typical fire extinguisher contains ten seconds of extinguishing power. You cannot use fire extinguishers more than once, they must be replaced or refilled if used.

For home use, there are typically two categories of extinguishers: 1) a less expensive, plastic top, disposable type and 2) a metal top, rechargeable type. Professionals recommend the rechargeable ones; they initially cost more, but are far more reliable, can be serviced, and have a longer shelf-life.

There are no laws regarding home fire extinguisher inspections, however it is recommended that twice a year you inspect your extinguisher. You should check:

  • the pressure gauge arrow to be sure it’s full (straight up on the gauge in the green area).
  • the hose and nozzle for cracks, tears or blockage.
  • the pin and tamper seal to ensure they are intact.
  • that the handle-locking device is in place.
  • for dents, leaks, rust, chemical deposits and/or other signs of abuse or wear.

At the end of your inspection turn the extinguisher upside down and hit the bottom sharply with your hand, then shake it well. This will prevent the dry chemical powder from settling or packing down in the cylinder, making it ineffective.

Most rechargeable dry chemical fire extinguishers, if properly handled and maintained, have a lifespan of 5 – 15 years. If your extinguisher is 5 years old bring it in to a local service center and have it inspected (costs about $20). If your extinguisher is over 12 years old, it needs to be hydrostatically tested and recharged by a qualified service technician (they’ll probably just swap you for one that’s been recently tested).

Remember fire doesn’t care, so you need to.

(Friday: What I Did This Week To Prep)

*Dr. Bones, of the Doom & Bloom Show, recently wrote posts on Smoke Inhalation and Natural Burn Treatments. Both of these topics are huge fire safety aspects; these posts  contain good information and are definitely worth reading.

Product Review: Emberlit Stove

In an emergency situation where hypothermia is a risk, my plan–using our BOB–is to quickly make a small fire, heat water, and get warm beverages into people. In our BOBs we have a good fire starting kit, containing: multiple ignition sources, multiple forms of fire starters, and dry kindling. We have a small cook kit, and carry instant coffee and hot chocolate. Having an efficient way to make a fire on a cold night can mean the difference between life and death – hypothermia can set in within a few hours at 40 degrees in a damp climate (i.e. most nights here in Western Washington). I didn’t have a camp stove in our kit, mostly to avoid the extra weight and bulk, and not wanting to carry extra fuel; I felt that our fire starting kit would be good enough to do the job. When I saw the Emberlit Stove it made me reconsider my feeling of ‘good enough’. I realized if being able to quickly and easily make a fire was one of my top survival priorities (and it is) that I needed a stove.

I looked at the Emberlit Stove some more and watched their video. I liked the apparent quality and strength, while balancing a relatively lightweight (11.3 oz) and very compact size. I ordered two from TSP Gear Shop, one for each of our primary BOBs.

our 2 stoves – left: assembled, right: unassembled

When the stove arrived I was immediately impressed by how small and simplistic it is. Unassembled it measures about four inches by five inches and stacks up less than a quarter-inch tall. It felt heavier than I had expected, but I think that’s because it’s so densely packed. It’s made of stamped, stainless steel sheet metal. It consists of three identical sides, a bottom, and a front piece; a total of five separate tabbed and slotted pieces.

The directions to assemble it are simple. The pieces are precisely cut and have very little tolerance. This is very good in quality and stability, but it’s also the cause of my one complaint: it’s a hassle to easily put together. With cold, wet hands and/or in the dark assembly would be very difficult. On the positive side, because of the way it’s designed it would be impossible to put together incorrectly.

Alison with Emberlit Stove

I assembled it and, using a fire starter and small twigs, we easily got a fire going. The front feeder port made it simple to maintain the fire, and the water boiled quickly. The wood burned with almost no smoke and only ash was left behind.

Because I wanted everyone in the family to get familiar with assembling it, and knowing that everything gets easier with practice, we had a Emberlit assembly night. While playing a card game, between hands, we took turns passing it around and each person practiced with it until we all felt proficient at assembling the stove. Sarah, Ryan, and I even tried assembling it blindfolded – that was hard and took a long time, but we were all successful.

Then, to add some stress to the learning process, we had a contest to see who could put it together the fastest. Each person had to sit on the floor, could not set the stove down until it was completed, and was timed. To put times into perspective, when we first got it in the mail Sarah and I, following the directions, each took about three to four minutes to assemble it. When we began timing ourselves it wasn’t long before everyone was able to complete it in less than one minute. Final results at the end of the night: Alison 3rd place with 34.9 seconds, I was 2nd with 27.4 seconds, and Ryan was the hands down winner at 18.5 seconds.

Aside from being a hassle to assemble, which can be mitigated with practice, I love this product. At $37, it’s well made, functions efficiently, is simplistic and would be almost impossible to break. Lastly, I want to mention the stove is made by a member of the TSP community, “By TSP For TSP”. I highly recommend adding the Emberlit Stove to your BOB.

five basic needs: 1) food, 2) water, 3) shelter, 4) security, and 5) energy

(Disclaimer: I have no association with this product or any other dealer or manufacturer. I researched and bought the product to add to my preps and I just wanted to pass along the experience I have had with it.)

When Others Are In The Dark

five basic needs: 1) food, 2) water, 3) shelter, 4) security, and 5) ENERGY

Nothing sends us back a century or two like an electric power outage. So much of what we call civilization lives or dies on the “juice” that we get with the flip of a switch.” (Discovery.com)

Modern energy and technology* is completely taken for granted in our society — until they no longer work. Of course, the world existed for millennia without our modern energy and there’s no doubt that human beings, as a species, can survive. But can we, today’s ultra-specialized, technology-dependent individuals?

What would we do without our cell phones and computers, microwaves and refrigerators, television and internet, central heat and air-conditioning, or simple “flip of a switch” to turn on the light as we walk into a dark room?

The power goes out. For how long? You don’t know. It could be a fallen tree, damaged power pole, lightning strike, ice/snow storm, high winds, or short-circuit from changing a routine part at a minor electrical substation; the list of inevitable ‘disasters’ continues. Since we prepare for the most likely emergencies first–not the Hollywood style mega disasters–let’s talk about what happens when we get sent “back a century or two” with a power failure. Most of us can fake it pretty well if the lights go out for a few hours to a couple of days. But what about after that?

What if it lasts longer? I’m not saying forever in the apocalyptic sense, just a huge storm that knocks out power for a few weeks? Suddenly we’d have to deal with all the disadvantages of not having power, and none of the advantages from “a century or two” ago of knowing how to heat, cook, and just exist on a daily basis without it (hell, the boredom alone would kill many of us).

We understand that to make fire it requires 1) fuel, 2) oxygen, and 3) an ignition source; and have all created it before. These days when most homes don’t even have a wood fireplace; frequently the only time we strike a match or a flick lighter is to light candle (or cigarette). Ironically if we do ‘make’ a fire in our gas fireplace or propane grill, it is literally “the flip of a switch”. But, making a successful wood fire–the key component in basic heat, light, and cooking–is getting to be a lost skill.

As preppers we should strive for far more than to be huddled around a fire to keep warm, turning our latest kill on a spit, and casting furtive glances into the darkness. We know there are systems that fail. We know that we are helpless to prevent them. So when the power fails, what is your plan to keep warm (or cool – though that’s not a big problem up here in Western Washington), cook, stay connected, and provide light?

This will be the last in the series of the ‘five basic needs’ posts. We’ve now established a baseline of those ideas and concepts which we will build on and refer back to.

(Wednesday: Product Review – Emberlit Stove)

*I won’t keep mentioning technology, but assume it’s implied knowing that it can’t exist without modern energy.