Product Review: Duracell Digital Inverter 800

  1. Do you live in an area where the power could ever go out?
  2. Do you own a vehicle (or, more accurately, own a vehicle battery)?
  3. Do you have small devices such as cell phones, laptop computers, tablet devices, power tools, or even lamps that you would like to be able to power during a blackout?
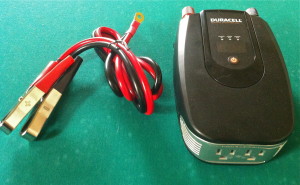
inverterIf the answer to all these questions is “yes”, do yourself a favor and spend about $65 and get a Duracell Digital Inverter 800 (or another comparable quality inverter).

How does an inverter work? To review, batteries store DC (direct current) power, while common household devices use AC (alternating current) power. An inverter converts stored DC power to useable AC power (anything with a two/three prong plug).

When people first begin thinking about backup power, they frequently discuss getting a generator. While a generator can be a good step — when it’s an informed decision, and it’s capabilities and limitations are understood. But a generator can be expensive, it takes up space, needs to be maintained, and storing gasoline for it can be a hassle. An easier first step to backup power is a quality inverter. If you already have a generator this adds a second level of redundancy, and might work even better for smaller devices and when you’re on the road.

I first heard about these inverters on The Survival Podcast in an interview with Steven Harris (here’s a list of the many interviews Steven has done on a variety of backup power topics).The Duracell Digital Inverter 800 is convenient and simple to use. It’s relatively compact (7.5” x 4.5” x 2.25”), solidly built, and light weight (1.8 pound). It has a nice LED digital display that shows input and output voltages, making it very easy to oversee and troubleshoot the inverter.
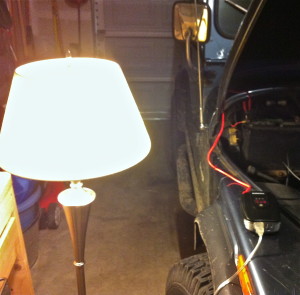
inverter in JeepTo use, connect the inverter directly to your car’s battery terminals (using the DC battery cables with alligator clamps). Then, I’d recommend, run a long 14-gauge extension cord into your house and plug it into a power strip. Plug your devices into the power strip; when you’re not using it, you can turn off the power strip to ensure you’re not inadvertently drawing power to an appliance. Of course you can always plug appliances, or tools, directly into the inverter.

When you’re using the inverter an alarm will sound when your car’s battery gets low, and the inverter will automatically shut off before the battery gets too low; this ensures you’ll never drain your vehicle’s battery further than you should. At that point you can either drive around for a bit, your car’s alternator will recharge your battery, or switch to another vehicle’s battery. For those that have a diesel pickup truck (like our Ford F350) you have TWO batteries, so twice the backup power potential. If you leave your vehicle idling, you can draw full power as long as you have available fuel; this is especially handy for larger devices (the inverter can handle devices that surge up to 1280W). The inverter also has a high voltage shutdown, an overload shutdown, and an overheating shutdown.

There are different size inverters, both higher and lower rated, but the 800 seems to fit the best for most of us. Their 400 is handy because it also comes with a DC lighter adapter allowing you to draw up to 150 watts without having to connect to the battery; very useful for road trips. (Despite what Amazon.com says, the 800 watt inverter does not come with a lighter adapter.)

Having an inverter will allow you–during a power outage, or anytime you’re away from an AC outlet (camping, job sites, etc.)–to convert the DC power stored in your car’s 12-volt battery into 120-volt AC power that you can plug electric devices into.

We tend to take electricity, and our access to it, for granted. When it’s not available our lifestyles quickly change. Having a Duracell Digital Inverter 800 around is an easy step to provide needed power for communication devices, tools, and light when needed.


Efficient Energy Usage, RE: Cooking Beans

Most preppers, our family included, have a fair amount of dried beans in their food storage. If you store beans you need to know how to prepare them.

Quick review, there are two steps to preparing dried beans: soaking and cooking. Soaking (typically overnight) allows dried beans to absorb water and rehydrate; cooking beans makes them tender and digestible. The beans need to be brought to a boil, then reduced to a simmer for 60 to 90 minutes.

As our family’s preparations become more involved, I find myself focusing more on the ENERGY aspect of our basic needs (food, water, shelter, security, and energy). While I’m not planning on powering all the electric amenities of our day-to-day lives in a power outage, we plan to power some basic lights and small appliances, have a warm house, and BE ABLE TO COOK FOOD.

Our family likes beans (and rice), and they are a core part of our long-term food storage, so I wanted to be able to prepare them as efficiently as possible. Cooking beans, even at a simmer, for 60 to 90 minutes uses a fair amount of energy resources.

dutch oven on induction cooktopTo increase our energy efficiency we recently bought an Aroma Induction Cooktop (Costco $50).Think of it as a very efficient (cooks/boils up to 70% more faster than traditional stove tops); very safe (immediately cools when the pot is removed) hot plate. During a power outage we’ll only have to power the induction cooktop, not the whole stove, to use an electric burner.

Our family’s plan–during a power outage–is to run the generator for a couple of hours in the morning to: recharge our battery bank, charge any rechargeable items, run the blower on the furnace, run the deep freezer, and cook food for the day.

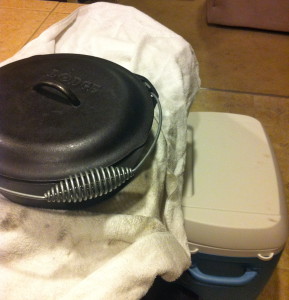
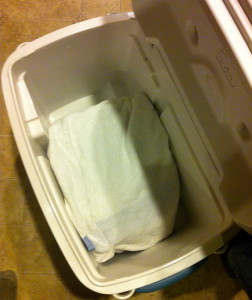
To prepare our beans we would soak them overnight so they are ready; then with the generator running, bring them to a boil in a cast iron dutch oven using our wrap it in a towelinduction cooktop (FYI induction technology only works with iron/magnetic metals). As soon as they begin boiling, turn off the cooktop–and here’s the energy savings part–wrap the dutch oven in a thick towel and place the entire dutch oven in a large cooler. Though we traditionally use insulated coolers to keep things cool, they will also keep things warm. (Fill any open spaces in the cooler, with a towel or newspaper or anything, to maximize heat retention.) Leave the beans in the cooler, and they will continue to cook, for about three to four hours.

We practiced this the other day and it was smooth and easy. place it in the coolerRemember, in a power outage any power you have comes from sources you have to provide, and–as opposed to traditional grid power–it is finite based on the amount of fuel you have stored. Plan, beforehand, to use this power efficiently.


Teaching The Kids (& Learning More Myself) – Lights Out Drill

When the lights go out (power failure) it tends to be during the worst times. Hopefully each of us has a plan, for our household, about what to do for light, heat (or cool), backup power, and entertainment. But does your family know your plan? Unfortunately many of us have a loose plan in mind and assume we’ll figure it out when it happens. But what if you’re not home or unavailable to help?

This week, during a calm time, we had a “lights out” drill. Sure the power was out, for real, in January, but Ryan was the only one of the kids at our house during that time (the girls were with their mom, and chose to stay there). The girls insisted that they’d be fine and had been through it all before, but I asked them to humor me.

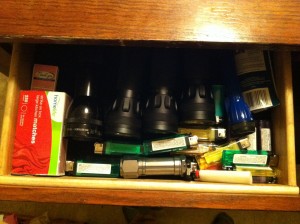
We waited until it got dark, so things would be a more realistic. I started by showing them where the circuit box was, and briefly explained it’s function and how to reset the circuits. We then turned off all the power (except to the refrigerator). I had them go get flashlights, carefully because it was now dark; they thought that was easy because they all know the flashlights are kept in the table drawer.

When they returned to the garage, I tried to show them how to open the garage door manually if the power was out. (Let me preface this by saying we recently got a new garage door opener.) I pulled the red cord to disconnect the garage door opener and it wouldn’t come loose. Sarah and I spent a few minutes trying to figure it out and were unable to get it to release or open the door. At that point we left it for later–and I still need to figure out why it didn’t work–but that was much better time to find out it didn’t work, then to find out when we NEEDED to get a car out of the garage and the power was out.

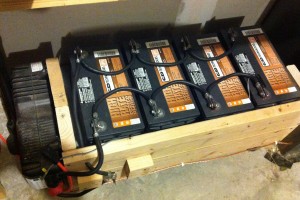
I then gave them a brief overview of our inverter and battery bank (with some hands-on) and showed them how to: check the battery levels, connect to to the inverter, turn it on, and reset it if necessary. I showed them which extension cords to use, how to plug-in the furnace, and then pulled the extension cord into the house. We discussed what we could power with the battery bank: lamps, TV/DVD, phone chargers, limited microwave, and what couldn’t be powered: refrigerator, oven, dishwasher, Tivo, coffee maker. We plugged in the standing lamps (with the LED bulbs), so we had light again. For practice, we got out the kerosene lanterns and lit them (and got out the fire extinguisher and set it nearby, just in case). Sarah then plugged in the TV and DVD player and we watched the movie Up, while the “power was out”.

After the movie I turned the power back on; I figured they already knew how to sleep in the dark. I finished up the following morning having Ryan make coffee without power, he used the hand grinder and the french press. I had meant to pull out the generator that morning and show the girls how to use it, but I forgot. Next time.

(Funny story though: A few weeks ago I got out the generator, in the middle of the afternoon, and started it up for our quarterly testing. One of the neighbors was working in his yard and asked if our power was out. I told him we were just practicing and checking the equipment, he replied, “That’s probably a good idea, easier now then when you really need it.” I couldn’t have agreed more.)

Our lights out drill went well. I tried to keep it simple and relatively painless. The kids were pretty good sports and are now more familiar with our procedure.

Teach your kids–and spouse–the skills you know; you may not be around when they are necessary. And remember, “To teach is to learn twice.” (- Joseph Joubert)

(Friday: What We Did This Week To Prep)

The Annual Rotation

Out With The Old…

The beginning of March is our family’s Annual Rotation (okay, this is the first annual rotation – but it will be this time each year, probably). This is when we go through all our preps and rotate, replace, and update as needed. We decided on March because it’s a relatively slow time of year, there aren’t any holidays (or birthdays) that require extra money, gardens haven’t gone in yet, and maybe there’s even a tax return to help add a couple of new prep items that we’ve wanted.

Here’s our Annual Rotation list to rotate, replace, update, and/or review:

  • BOB** food: We don’t rotate MREs or freeze-dried stuff every year, but peanut butter, power bars, tuna, snacks, etc. all get replaced with new. The old goes to (the front of) our pantry.
  • Batteries: in BOB, car and house flashlights, and smoke alarms and CO2 detectors
  • Evacuation/Bug-Out Documentation: Check phone numbers, maps, and routes. Review plan with family. New photos of kids. Ensure ALL copies of evacuation documentation get updated.
  • EDC wallet contact card
  • Short List (a check-list of items we’d quickly grab if we had to bug-out with little notice – more about Short Lists on Wednesday*)
  • Red Buckets (non-perishable food in red 5-gallon buckets, with orange gamma lids, pre-stocked to be quickly grabbed to supplement BOBs, also part of our Short List)
  • Flash drives in BOBs with home video inventory and PDF resources
  • SWYE: ensure inventory is accurate

In addition we do our quarterly review of stuff at this time:

  • Generator: run briefly to test
  • Extra car keys: check to make sure key in hidden magnetic box is still there
  • Furnace filter: replace (not a prepper thing, but needs to be done regularly)

Think of any other things you keep in your preps, but don’t use very regularly, such as:

  • Chainsaw (or other small gasoline powered tools): clean, inspect, and run briefly to test
  • Firearms: ensure cleaned and oiled
  • Firearm’s magazines: it’s a good idea to keep about half of your primary magazines loaded (to about 80% capacity); then each year change over and use the other half (this will help maximize the follower spring’s life)

One thing that isn’t listed above, is our backup gasoline. Gasoline, with stabilizers, can last one to two years. We stagger ours so it doesn’t all have to be rotated at the same time (keep accurate records).

If you’re like us, you’re busy and life is hectic. We tend to forget about our faithful preps that just sit, waiting, in case we need them. And yes, it’s a hassle to replace and update things – but you’re doing this because you believe it’s important and necessary, remember? So make your own list(s), track the age of the perishable items, and rotate to keep your preps fresh and ready. (Minor confession: we’re not done with all of this yet, but we’re working on it…)

(Wednesday: *Quick, Grab Everything Important!)

**For my list of abbreviations and other information, open the above ‘Check Here…’ page tab.

How To Wire Your Gas Furnace To A Generator

Contributed by Guest Blogger: Rick Brodersen
of Rick’s DIY (HVAC & Electrical DIY)

Wiring your gas furnace to a generator is a project that’s frequently either over-thought or not thought of at all. Some people think you need a high dollar transfer switch wired to your breaker panel, requiring an electrician, or you have to temporarily rewire the breaker to the generator and then rewire everything again once the power comes back on.

But this isn’t the case, NEC (National Electric Code) only requires that appliances be on their own dedicated circuit. So, by simply rewiring your furnace you have the ability to use your furnace with a portable generator (or other auxiliary power). Then when the power goes out, just disconnect the furnace from the outlet and connect it to your generator, and use it like you normally would.

video: How To Wire Your Gas Furnace To A Generator

Materials:
The cost of the materials was less than $20, and all of the items can be found at most hardware stores.

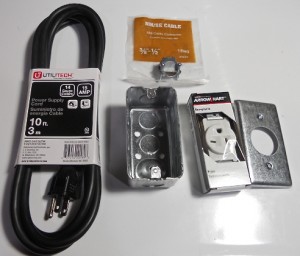
  • Outlet Box
  • Single Outlet Receptacle
  • Outlet Cover Plate
  • Power Supply Cord
  • Cable Connector
  • Misc Wire Nuts, Electrical Tape & Mounting Screws

Tools:

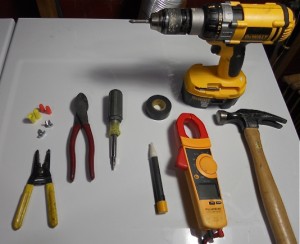
  • Hammer
  • Screwdriver (multi-tip)
  • Side Cutters
  • Wire Strippers
  • Multi-Meter
  • Voltage Stick (optional)
  • Drill (probably a little overkill but if you’re installing the outlet box onto your furnace with sheet metal screws it will be needed)

How To Do It:
Everytime you’re working around electricity you MUST check that the power is OFF and then CHECK AGAIN. You can never be too careful when it comes to this point. (Even after all these years I occasionally still get shocked.)

Turn Off the breaker that controls your furnace. (Keep in mind that a many breaker panels are mislabeled.) Open your furnace and find where your power is coming in from and follow it to the junction box (or in my case, the circuit board.)

Pull off any covers and then test for voltage. I like to use the Fluke Voltage Stick first (ensure it works on a live circuit and then you can test it). After you have verified the power is off, carefully remove the wire nuts and test with a voltmeter. Once you are darn sure there is no power then you are safe to work on it.

Write down, or label your wires, the BLACK (hot), WHITE (neutral) & GREEN (ground). (Some might be red, orange, brown, etc.) You must rewire it exactly as it was: Black to Black, White to White, and Green to Green/Ground. Pull the wires out to the outside of the furnace.

First, install the OUTLET BOX. I put the conduit with the wires coming from the breaker into the outlet box and then level it where I would like to mount it. Screw it to the wall or furnace with the appropriate screws.

Next, you need to wire in your Single Receptacle Outlet. You may need to cut back your wires and strip them. (This is hard to explain in text and is better understood in the video.) Wire your Black (or hot) to the smaller bladed side of the outlet (if you’re facing the outlet this will be the right side) this screw is normally brass/gold in color. The White (or neutral) wires up to the larger bladed side, this screw is usually silver in color. Then the Green (or ground) goes to the last terminal that is bonded with the metal framework of the receptacle, sometimes this screw will be green colored (but every manufacturer is different).

Once wired, carefully push the receptacle back into the outlet box and screw it in, put on the COVER PLATE and we’re ready to move onto the final part.

To install the POWER CORD we have to add in the CABLE CONNECTOR to where the old power cable came into the furnace. Once you have the cable connector in, you can pull the power cord through and secure it.

Next, rewire the power cord to the connections on the furnace. If you’re using wire nuts be sure to Double Check that the wires are secured by tugging on each individually and then taping the connection with electrical tape (you can further secure with tie straps if needed).

Make sure to replace any cover plates, double-check that everything is wired properly and secured. Turn the power back on and check the outlet with your meter (this is not shown in the video) to make sure everything is wired properly. Finally, plug in your furnace and check operations.

video: An Overview: How To Wire Your Gas Furnace To A Generator

ALL DONE
Now that you’re done, test it out with or without your generator. I recommend a test run on a dark, rainy night so you know what it’s going to be like when you’re actually going to have to use it.

Bio
Rick Brodersen is an HVAC/R Mechanic and has worked in the Seattle area for over 15 years, specializing in the commercial service industry. He has instructed at local trade schools and now continues teaching at RicksDIY.com. He is also an avid prepper, hiker, and fisherman who, along with his family, enjoys taking in all the Pacific Northwest has to offer.

Read Rick’s Disclaimer

NOTE: Comments have been closed for this post. Please feel free to read the many, many replies Rick has given, if you still need his help he has asked you contact him directly through his site at RicksDIY.com

(Wednesday: Book Review: The Doom and Bloom Survival Medicine Handbook)

What I Did This Week To Prep 1/27/12

and Storm After Action Review

Anytime you use your preps–after you neatly put them away for the next time–it’s important to review how things went. What went well? What needs to be changed or improved? And what did you learn? We were pleased with how our preps worked during the storm, and because of them the power outage was only a minor inconvenience.

However, there were a couple of things I needed to follow-up on. I checked the generator to see why it had stopped running. As stated, I assumed it had stopped because it ran out of gasoline. I looked in the tank, it still had plenty of fuel left, and it started just fine. I let it run for about 20 minutes and there were no issues. I don’t know why it had stopped. My only concern was the age of the gasoline in it. When we bought it a year ago the tank was full and we still had that same fuel. The previous owner had added Sta-Bil, but I don’t know when. I decided to drain the tank and fill it with fresh gasoline. I siphoned as much as I could into the Jeep, then let the generator run until it was empty (it ran for over an hour before it stopped – an inadvertent but useful test). Then I added new gasoline and Sta-Bil, started it up to double-check, and put it away.

While working with the generator, Sarah, Ryan and I all practiced starting it.  It’s important that all adults (and as many of the kids as possible) in the home know how to run the critical prepper equipment. We had been concerned that Sarah wouldn’t have the ‘bulk’ to pull-start the generator, but she was able to do it without much trouble.

Next, when the battery bank was in use it had shut off earlier than I expected; I thought it was because of some kind of a surge. But my understanding may have been flawed. Fellow prepping blogger Homestead Fritz send me a link to The 12volt Side of Life; a 12-volt battery information site. I’m going to do some additional research on that topic. I’ve said before, I have a decent amount of knowledge about a variety of topics – but electricity is not one of them (though I’m learning).

Finally, I went by the hardware store and bought an 8-foot, 14-gauge extension cord that will be dedicated to use with the furnace. During the power outage I realized I was one cord short, so we had to shuffle cords around. The battery bank and the furnace are only about six feet apart so it seemed like a waste to use a 25-foot cord, but the smaller ones I own were only 2-prong household types and I needed a heavier duty 3-prong one.

Also this week, I found out my favorite collapse medicine experts, Doctor Bones and Nurse Amy of the Doom & Bloom Hour, had written a book. The Doom and Bloom Survival Medicine Handbook was published last week. I immediately ordered one and just received it in the mail. I’m very excited to have what I believe will be a fantastic medical reference. I’ll post a review on it soon.

I’ve started posting more to the TraceMyPreps Facebook page. I’d encourage you to “like” it and join our budding community; use that forum to comment, ask questions, and give advice. To make it easier I’ve added a ‘TraceMyPreps on Facebook’ like button on the top of the right side of my blog page. Also, right below that is a ‘Follow Blog Via Email’ box, if you sign up there each post I write will be automatically sent to you as soon as I publish it – this is an easy way to keep up on the posts as they come out.

What did you do?

Winter Power Outage = Good Chance To Test Preps

Weathering The Storm 

Western Washington had a pretty good storm last week. I realize, in the larger category of “winter storms”, this wasn’t anywhere among the worst. That being said, it was a big deal around here – we don’t have storms like that very often. What started off as a good amount of snow coming down, transitioned into an ice storm. The tree branches were weighed down and many broke, taking down power lines and causing a power outage that affected close to 300,000 homes.

We were one of those homes, our power was out for about 36 hours. So when life gives you lemons… I figured this was the perfect opportunity to test our preps! At 7:30 am, as Sarah and I were in the Jeep driving back from the train station (the trains were cancelled because of frozen switches), I got the call the power was out. As I drove up to the house, even though I knew the power was off, I still tried to use the garage door opener (habits). First lesson of the power outage: make sure everyone knows how to manually open the garage door.

Since we have had a couple of “lights-out” drills we knew where to start. We:

  1. ‘Fired-up’ the battery bank and, using a volt meter, checked and recorded the starting voltage (12.6 volts).
  2. Ran a 50 foot, 14-gauge extension cord into the house and plugged it into a surge protector for inside use.
  3. Connected another extension cord to the natural gas furnace to run the blower*.
  4. Put a temperature probe inside the deep freezer (in the garage), with one end out so that it could be easily read, and recorded the starting temperature (10 degrees).
  5. Brought lamps, with low energy bulbs, into the main room and plugged them into the surge protector.

The battery bank operated well that day. My parents, visiting from Colorado, were able to appreciated all our preps. My mom was especially grateful to be able to blow dry and curl her hair (before leaving to see more family) – she felt this alone justified all our preparations. We had heat (though we kept it lower than normal, 62 degrees), light, Ryan was able to play Xbox, and we watched a movie after dinner. Every couple of hours we’d check and record the battery voltage and the deep freezer temperature.

However, when we woke up the next morning I realized the heat wasn’t on. I checked the battery bank and it had powered off. Even though it registered plenty of voltage (11.3 volts) the indicator light showed the batteries had gotten too low – this shouldn’t have happened until it reached 10.0 volts. It’s possible this occurred because I had left the inverter plugged into the wall and the line may have surged, but I don’t know for sure. We got out the generator, fired it up, and connected it to the:

  • inverter, to recharge the battery bank. As soon as it was plugged in the inverter began to charge and work again.
  • freezer, even though the temperature was still below 20 degrees.
  • furnace blower, and turned the heat up to 70 degrees.
  • laptop computer and all other rechargeable devices.

Once the generator was running we used our Volcano Grill and percolator to make coffee, then boiled water for oatmeal.

Sarah and I then left for work. The generator ran for about three hours, then Ryan called and told me it had stopped. I assumed it had run out of gas. I had him plug things back into the inverter and continue to power the house from the battery bank (Repetitive & Redundant). That evening the power came back on. We put everything neatly away, ready for the next time.

(Friday: What I Did This Week To Prep including Storm After Action Review)

*Last summer my good friend, fellow prepper, and HVAC/R technician, Rick helped me rewire the line that powers the blower on my natural gas furnace. This allows me to plug the blower into an alternate power supply if needed. Rick has agreed to guest blog for me next Monday (1/30/12), when he’ll write about how you can do this same project yourself, complete with a detailed how-to video.

The Hassles of Storing Gasoline

To become more self-reliant we try to determine what ‘needed’ items to store; one to think about is fuel. Though there are several types of fuel preppers store: gasoline, propane, diesel, and kerosene; gasoline is the hardest to store long-term and, yet, is the most commonly used.

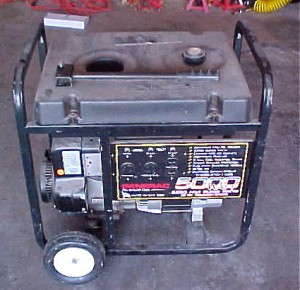
My main reason for storing gasoline is for use in our (gasoline) generator during a power failure. When people believe that disaster is looming–recently during Hurricane Irene, for example–they rush out and buy generators. But how many of them think to store fuel to run those generators? Our Generac 5000 generator has a five gallon fuel tank, it will run approximately five to seven hours on a tank of gasoline. My plan is to use our battery bank (four AGM deep cycle batteries) until depleted, then use the generator to recharge the batteries while still maintaining power to needed appliances. To ensure enough energy to last most power outages we need to store a reasonable amount of gasoline. But couldn’t we just drive to the gas station and get more gasoline? Maybe, but does the gas station have power?

We also want to store gasoline for our vehicles if we had to evacuate; gasoline may either be unavailable (gas station closed because of a power outage) or there may be excessively long lines to get it. We’d also like to have enough gasoline to take with us: to ensure we can reach our BOL, and to use there if power and/or gasoline aren’t available at our destination.

As we’re discussing storage it has to be stressed that gasoline is very flammable and must be stored in an appropriate container in a safe place. It is also relatively heavy–approximately 6.1 pounds per gallon–but at about 30 pounds for five gallons it can still be conveniently handled.

It’s hard to find definitive information about how long gasoline can be stored before it goes bad. But what does ‘bad’ even mean? Gasoline is a refined petroleum-derived chemical which–over time, and compounded by improper storing and temperatures–can break down by:

  • evaporation causing it to lose it’s volatile components (necessary for igniting)
  • drawing in water vapor that can cause separation – where water, since it’s heavier, settles to the bottom of the tank
  • oxidation causing it to become sludgy which can build up inside of small parts *

There are other unknowns, beginning with how old was the gasoline when you bought it (was it fresh from the refinery or already a month old?). What temperatures has it been exposed to and for how long? Was it properly stored by keeping it tightly covered, clean, dry, and cool? So, as a rule of thumb, if you plan to store your gasoline for more than a couple of months you should add a gasoline stabilizer.

The most common brand of stabilizer is Sta-Bil Gas Stabilizer. According to Sta-Bil’s website, using their product will keep fuel fresh for 12 months; you can double the dosage and fuel will remain fresh for 24 months. It’s added at a ratio of one ounce of Stabilizer to 2 1/2 gallons of gasoline. A 32-ounces bottle costs about $12, so it’s roughly $0.40 an ounce, which is only $0.80 for each 5-gallon gasoline can you store. If you store 30 gallons (check with local ordinances on amount you can legally store) it’d cost you less than $5.00 per year.

I add three ounces of Stabilizer (I want an extra buffer) to each 5-gallon container of gasoline (including the generator); we rotate the gasoline every 12 months (each can has a number which correlates with a month, i.e. #3 gets rotated in March). When it’s time to rotate, we just add five gallons into each vehicle’s half-full tank. We’ve found that pouring gas through the pour spout can get heavy and messy. So instead of pouring we use a Super Syphon; it self-primes, it’s easy to use, and it’s affordable. It takes about three minutes to syphon a 5-gallon can.

Plan ahead. If you invest in a generator, you need to have fuel for it. Remember that generator is for an emergency situation; don’t depend on a one that has old, or not enough, gasoline.

(Wednesday: Self-Reliant vs Self-Sufficient)

* Minnesota’s Dept. of Agriculture article Storing Gasoline, has good information on the specific storage problems of weathering, moisture, and oxidation

What I Did This Week To Prep 10/28/11

Last spring, working on our energy category, I bought a used Generac 5000 generator. My goal is to test it each quarter to ensure it still works properly. I especially wanted to be sure this time of year with the cold winter months approaching. So Ryan, his best friend Chanse, and I got it out. It took us a minute, but once we got the choke properly adjusted it fired up. I need to remember next time that the garage (even with the door open) isn’t the place to test it – it’s loud! Though we haven’t used it other than testing, so far I’ve been pleased with it – but I definitely need more experience using it.

Not long after buying the generator, continuing in the energy category, I bought four slightly used AGM deep cycle batteries and a refurbished Magnum inverter/charger. It took me a while to get all the appropriate knowledge and pieces together. But with the help of a couple TSP forum friends (thanks Dan and Rick), and their electrical/alternative energy knowledge, by early summer I had everything wired together and functional. This past week, after it had quietly sat in the garage for a couple months, I finally did my first test of the system. The test was to see how long our 14 cubic foot deep freezer would run (without opening the freezer) on the batteries. The battery bank, fully charged, started at 12.60 volts. I recorded the time and battery voltage several times a day. It ran for a about 100 hours, until the batteries were at 10.71 volts. A few days after my test I realized that the breaker from the batteries to the inverter had tripped and, after looking at the manual, I determined that the batteries probably should have discharged to 10.50 volts before the inverter tripped off; so add a few more hours to the total. I need to do more testing and develop a better understanding of my backup electric system, but it was a start. Next I’ll do a ‘lights out’ test and see how the battery bank does running some electrical appliances in the house. I also need to use the generator to recharge the discharged battery bank and see how long, and how much gas, that takes.

Ryan & Brynn with our combined order

Lastly, we went to the Mormon Family Home Storage Center (cannery) and canned food to add to our LTS. I previously posted about the Mormon canneries, and included a link to a video of the process, in Long Term Storage (Food Part 2). The staff (Mormon volunteers) were super friendly and helpful. The cannery is scheduled by groups; you can form your own group (Mormon or non-Mormon), or you can be added to a smaller group (we were added to a Mormon group from the Auburn area). A friend had planned to go with me but was unable to go that week, so I offered to do his order as well. Since it was going to be a large order (combined 91 cans) I brought Ryan and Brynn along to help. In addition to us, there were about eight other people in our group. We had each previously submitted our order forms, and all the bulk storage bags we would need had been pulled from the shelves and were ready to go. Start to finish, including orientation and cleanup, took just over two hours. We were assigned a task and, assembly line style, the process started: opening bulk bags, pouring into #10 cans, sealing the metal lid on the can, adding a label, and placing the can in a box for the appropriate order. When all the work was completed, we inventoried and paid for our order. We added 55 #10 cans to our LTS.

What did you do?

(Monday: Antibiotics In Your Preps?)

(10/23/11)