Contributed by Guest Blogger: Rick Brodersen
of Rick’s DIY (HVAC & Electrical DIY)
Wiring your gas furnace to a generator is a project that’s frequently either over-thought or not thought of at all. Some people think you need a high dollar transfer switch wired to your breaker panel, requiring an electrician, or you have to temporarily rewire the breaker to the generator and then rewire everything again once the power comes back on.
But this isn’t the case, NEC (National Electric Code) only requires that appliances be on their own dedicated circuit. So, by simply rewiring your furnace you have the ability to use your furnace with a portable generator (or other auxiliary power). Then when the power goes out, just disconnect the furnace from the outlet and connect it to your generator, and use it like you normally would.
video: How To Wire Your Gas Furnace To A Generator
Materials:
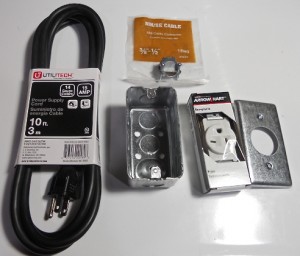
 The cost of the materials was less than $20, and all of the items can be found at most hardware stores.
- Outlet Box
- Single Outlet Receptacle
- Outlet Cover Plate
- Power Supply Cord
- Cable Connector
- Misc Wire Nuts, Electrical Tape & Mounting Screws
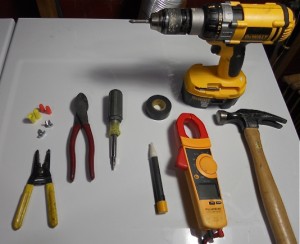
Tools:
 Hammer
- Screwdriver (multi-tip)
- Side Cutters
- Wire Strippers
- Multi-Meter
- Voltage Stick (optional)
- Drill (probably a little overkill but if you’re installing the outlet box onto your furnace with sheet metal screws it will be needed)
How To Do It:
Everytime you’re working around electricity you MUST check that the power is OFF and then CHECK AGAIN. You can never be too careful when it comes to this point. (Even after all these years I occasionally still get shocked.)
Turn Off the breaker that controls your furnace. (Keep in mind that a many breaker panels are mislabeled.) Open your furnace and find where your power is coming in from and follow it to the junction box (or in my case, the circuit board.)
Pull off any covers and then test for voltage. I like to use the Fluke Voltage Stick first (ensure it works on a live circuit and then you can test it). After you have verified the power is off, carefully remove the wire nuts and test with a voltmeter. Once you are darn sure there is no power then you are safe to work on it.
Write down, or label your wires, the BLACK (hot), WHITE (neutral) & GREEN (ground). (Some might be red, orange, brown, etc.) You must rewire it exactly as it was: Black to Black, White to White, and Green to Green/Ground. Pull the wires out to the outside of the furnace.
First, install the OUTLET BOX. I put the conduit with the wires coming from the breaker into the outlet box and then level it where I would like to mount it. Screw it to the wall or furnace with the appropriate screws.
Next, you need to wire in your Single Receptacle Outlet. You may need to cut back your wires and strip them. (This is hard to explain in text and is better understood in the video.) Wire your Black (or hot) to the smaller bladed side of the outlet (if you’re facing the outlet this will be the right side) this screw is normally brass/gold in color. The White (or neutral) wires up to the larger bladed side, this screw is usually silver in color. Then the Green (or ground) goes to the last terminal that is bonded with the metal framework of the receptacle, sometimes this screw will be green colored (but every manufacturer is different).
Once wired, carefully push the receptacle back into the outlet box and screw it in, put on the COVER PLATE and we’re ready to move onto the final part.
To install the POWER CORD we have to add in the CABLE CONNECTOR to where the old power cable came into the furnace. Once you have the cable connector in, you can pull the power cord through and secure it.
Next, rewire the power cord to the connections on the furnace. If you’re using wire nuts be sure to Double Check that the wires are secured by tugging on each individually and then taping the connection with electrical tape (you can further secure with tie straps if needed).
Make sure to replace any cover plates, double-check that everything is wired properly and secured. Turn the power back on and check the outlet with your meter (this is not shown in the video) to make sure everything is wired properly. Finally, plug in your furnace and check operations.
video: An Overview: How To Wire Your Gas Furnace To A Generator
ALL DONE
Now that you’re done, test it out with or without your generator. I recommend a test run on a dark, rainy night so you know what it’s going to be like when you’re actually going to have to use it.
Bio
Rick Brodersen is an HVAC/R Mechanic and has worked in the Seattle area for over 15 years, specializing in the commercial service industry. He has instructed at local trade schools and now continues teaching at RicksDIY.com. He is also an avid prepper, hiker, and fisherman who, along with his family, enjoys taking in all the Pacific Northwest has to offer.
Read Rick’s Disclaimer
NOTE: Comments have been closed for this post. Please feel free to read the many, many replies Rick has given, if you still need his help he has asked you contact him directly through his site at RicksDIY.com.
(Wednesday: Book Review: The Doom and Bloom Survival Medicine Handbook)
